作者:武卓
成為火爆熱門話題的ChatGPT讓大家看到了通用AI大模型的威力,也帶動了近期一批自然語言處理(NLP)領域大模型的不斷被推出──最近在電腦視覺領域就出現了專屬的物體分割大模型,由Meta開源的「萬物可分割」(Segment Anything Model,SAM)物體分割模型。
物體分割是電腦視覺中的核心任務之一,旨在識別影像中屬於特定物件的像素。通常實現影像分割的方4374法有兩種,即互動式分割和自動分割。互動式分割可以對任何類別的物件進行分割,但需要人工引導,並通過反覆精細化遮罩來完成。而自動分割可以對預定義的特定物件類別進行分割,但需要對大量手動標注的物件進行訓練,同時需要大量的計算資源和具有技術專業知識的人員來訓練分割模型。然而,這兩種方法都沒有提供一種通用的、完全自動的分割方法。
SAM是這兩種方法的泛化,它是一個單一模型,可以輕鬆地執行互動式分割和自動分割。SAM可以從輸入提示(例如點或框)生成高品質的物件遮罩,並且可以用於生成影像中所有物件的遮罩。它已經在一個包含1.1億個遮罩的1,100萬個影像資料集上進行了訓練,並且在各種分割任務上具有較強的零樣本性能。它創建了一個通用的物體分割模型,從分析科學影像到編輯照片等各種應用程式中都可以使用。
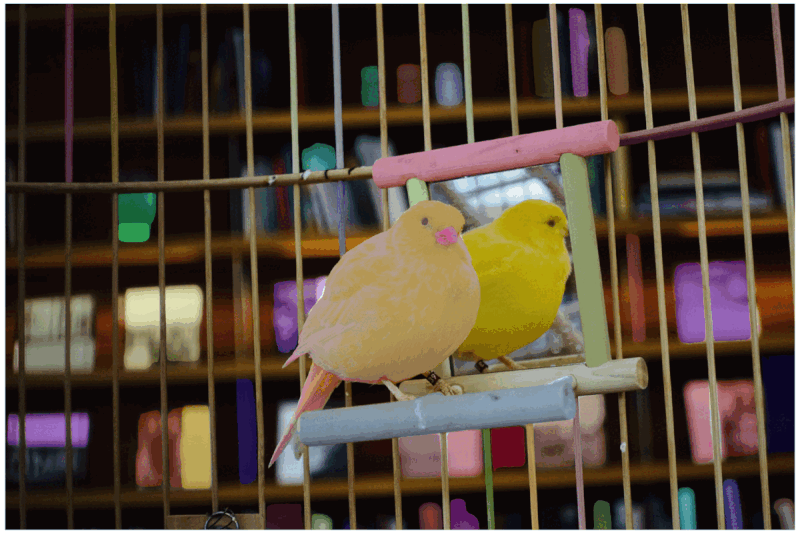
圖1:SAM推論結果範例
這個強大的通用分割模型,我們的OpenVINO當然也是可以對它進行最佳化以及推論的加速,使其可以方便快速地在Intel的CPU上部署執行。為了方便各位開發者使用,我們同樣提供了Jupyter Notebook形式的原始程式碼,大家只需要跟隨程式碼裡的步驟,就可以在自己的機器上執行SAM,對影像進行任意分割!
OpenVINO五歲了!想知道更多最新版本2023.0的新功能與亮點,歡迎免費報名參加OpenVINO™ DevCon 線上系列講座,聽Intel技術專家開講並展示應用範例!
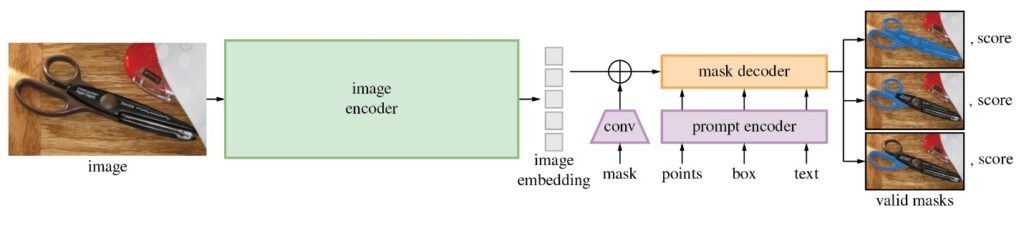
SAM模型由三個部分組成。
- 影像編碼器(Image Encoder):這是一個Vision Transformer模型(ViT),使用Masked Auto Encoders方法(MAE)對影像進行編碼,將影像轉換為嵌入空間。影像編碼器對每個影像執行一次,可以在向模型輸入提示之前應用它。
- 提示編碼器(Prompt Encoder ):這是一個用於分割條件的編碼器。可以使用以下條件進行分割提示:
-
- 點(points)──與應分割的物件相關的一組點。Prompt編碼器使用位置編碼將點轉換為嵌入值。
- 框(boxes)── 應分割的物件所在的邊界框。類似於points,邊界框的座標通過位置編碼來進行編碼。
- 分割遮罩──由使用者提供的分割遮罩使用卷積進行嵌入,並與影像嵌入進行element-wise求和。
- 文本(text)──由CLIP模型編碼的文本表示。
- 遮罩解碼器(Mask Decoder) :遮罩解碼器有效地將影像嵌入、提示嵌入和輸出標記映射到遮罩。
下圖描述了SAM生成遮罩的流程圖:
接著我們一起來看看,利用OpenVINO來最佳化加速SAM的推論執行有哪些重點步驟吧!
》注意:以下步驟中的所有程式碼來自OpenVINO Notebooks開源資料庫中的237-segment-anything notebook 程式碼示例,點擊以下連結可以直達取得原始程式碼:
https://github.com/openvinotoolkit/openvino_notebooks/tree/main/notebooks/237-segment-anything
第一步:安裝相應工具套件、載入模型並轉換為OpenVINO IR格式
本次程式碼範例需要先安裝SAM相應工具套件。
然後下載及載入相對應的PyTorch模型。
有幾個SAM checkpoint可供下載。在本次程式碼範例中,我們將使用基於vit_b的模型;模型載入的方法是通用的,也適用於其他SAM模型。將下面的模型URL、保存checkpoint的路徑和模型類型設置為對應的SAM模型checkpoint,然後使用SAM_model_registry載入模型。
sys.path.append("../utils")
from notebook_utils import download_file
checkpoint = "sam_vit_b_01ec64.pth"
model_url = "https://dl.fbaipublicfiles.com/segment_anything/sam_vit_b_01ec64.pth"
model_type = "vit_b"
download_file(model_url)
載入模型:
sam = sam_model_registry[model_type](checkpoint=checkpoint)
正如我們已經討論過的,每個影像可以使用一次影像編碼器,然後可以多次執行更改提示、提示編碼器和遮罩解碼器來從同一影像中檢索不同的物件。考量到這個事實,我們將模型分為兩個獨立的部分:image_encoder和mask_pr預測器(提示編碼器和遮罩解碼器的組合)。
第二步:定義影像編碼器和遮罩預測器
影像編碼器輸入是NCHW格式的形狀,為1×3×1024×1024的張量,包含用於分割的影像。影像編碼器輸出為影像嵌入,張量形狀為1×256×64×64。程式碼如下:
from pathlib import Path
import torch
from openvino.tools import mo
from openvino.runtime import serialize, Core
core = Core()
ov_encoder_path = Path("sam_image_encoder.xml")
if not ov_encoder_path.exists():
onnx_encoder_path = ov_encoder_path.with_suffix(".onnx")
if not onnx_encoder_path.exists():
with warnings.catch_warnings():
warnings.filterwarnings("ignore", category=torch.jit.TracerWarning)
warnings.filterwarnings("ignore", category=UserWarning)
torch.onnx.export(sam.image_encoder, torch.zeros(1,3,1024,1024), onnx_encoder_path)
ov_encoder_model = mo.convert_model(onnx_encoder_path, compress_to_fp16=True)
serialize(ov_encoder_model, str(ov_encoder_path))
else:
ov_encoder_model = core.read_model(ov_encoder_path)
ov_encoder = core.compile_model(ov_encoder_model)
本次程式碼範例需要匯出的模型帶有參數return_single_mask=True。這意味著模型將只返回最佳遮罩,而不是返回多個遮罩。對於高解析度影像,這可以在放大遮罩開銷大的情況下提升執行時速度。
遮罩預測器
組合提示編碼器和遮罩解碼器模型具有以下輸入清單:
- image_embeddings:從image_encoder中嵌入的影像。具有長度為1的批索引。
- point_coords:稀疏輸入提示的座標,對應於點輸入和框輸入。方框使用兩個點進行編碼,一個用於左上角,另一個用於右下角。座標必須已轉換為長邊1024。具有長度為1的批索引。
- point_labels:稀疏輸入提示的標籤。0是負輸入點,1是正輸入點,2是左上角,3是右下角,-1是填充點。*如果沒有框輸入,則應連接標籤為-1且座標為(0.0,0.0)的單個填充點。
模型輸出:
- 遮罩:預測的遮罩大小調整為原始影像大小,以獲得二進位遮罩,應與閾值(通常等於0.0)進行比較。
- iou_predictions:並集預測上的交集。
- low_res_masks:後處理之前的預測遮罩,可以用作模型的遮罩輸入。
第三步:在互動式分割模式下執行OpenVINO 推論
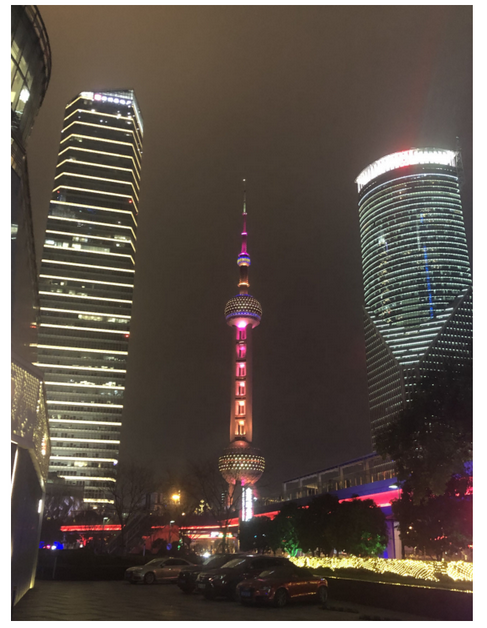
載入分割用的測試圖片。
import cv2
import matplotlib.pyplot as plt
download_file("https://raw.githubusercontent.com/zhuo-yoyowz/classification/master/images/test33.jpg")
image = cv2.imread('test33.jpg')
image = cv2.cvtColor(image, cv2.COLOR_BGR2RGB)
原始圖片如下:
plt.imshow(image)
plt.axis('off')
plt.show()
預處理及視覺化函式定義:
為影像編碼器準備輸入,包含以下步驟:
- 將BGR影像轉換為RGB。
- 調整影像保存縱橫比,其中最長尺寸等於影像編碼器輸入尺寸1024。
- 歸一化影像減去平均值(123.675、116.28、103.53)並除以標準差(58.395、57.12、57.375)。
- 將HWC資料佈局轉換為CHW並添加批次維度。
- 根據影像編碼器預期的輸入形狀,按高度或寬度(取決於縱橫比)向輸入張量添加零填充。
視訊編碼
要開始處理影像,我們應該對其進行預處理,並使用ov_encoder獲得影像嵌入。我們將在所有實驗中使用相同的影像,因此可以執行一次視訊編碼、生成一次影像嵌入,然後重用它們。
encoding_results = ov_encoder(preprocessed_image)
image_embeddings = encoding_results[ov_encoder.output(0)]
現在,我們可以嘗試為遮罩生成提供不同的提示。
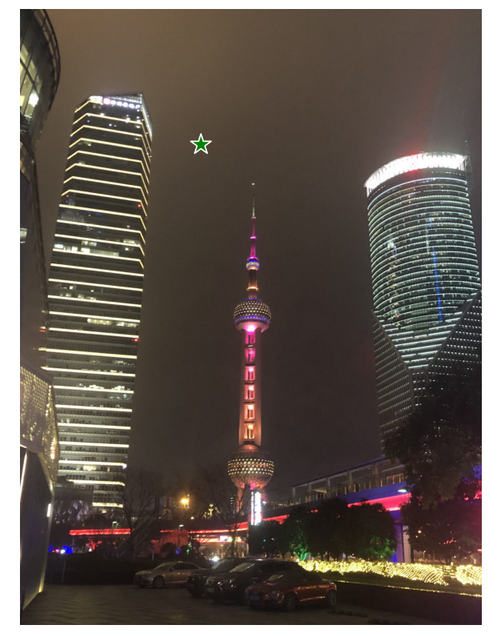
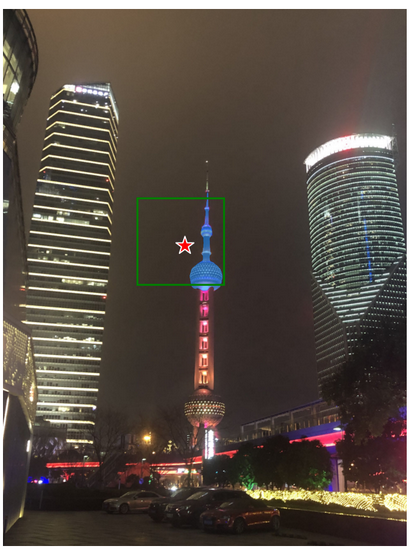
點輸入舉例
在這個例子,我們選擇一個點作為輸入(input_point)。綠色星形符號在下圖中顯示了它的位置。
input_label = np.array([1])
plt.figure(figsize=(10,10))
plt.imshow(image)
show_points(input_point, input_label, plt.gca())
plt.axis('off')
plt.show()
添加一個批索引,連接一個填充點,並將其轉換為輸入張量座標系。
label = np.concatenate([input_label, np.array([-1])], axis=0)[None, :].astype(np.float32)
coord = resizer.apply_coords(coord, image.shape[:2]).astype(np.float32)
將輸入打包以在遮罩預測器中執行。
"image_embeddings": image_embeddings,
"point_coords": coord,
"point_labels": label,
}
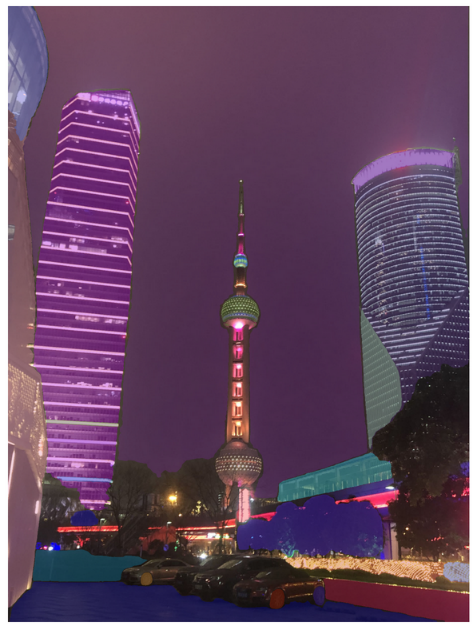
預測一個遮罩並設置閾值以獲得二進位遮罩(0-無物件,1-物件)。
masks = results[ov_predictor.output(0)]
masks = postprocess_masks(masks, image.shape[:-1])
masks = masks > 0.0
繪製結果:
plt.imshow(image)
show_mask(masks, plt.gca())
show_points(input_point, input_label, plt.gca())
plt.axis('off')
plt.show()
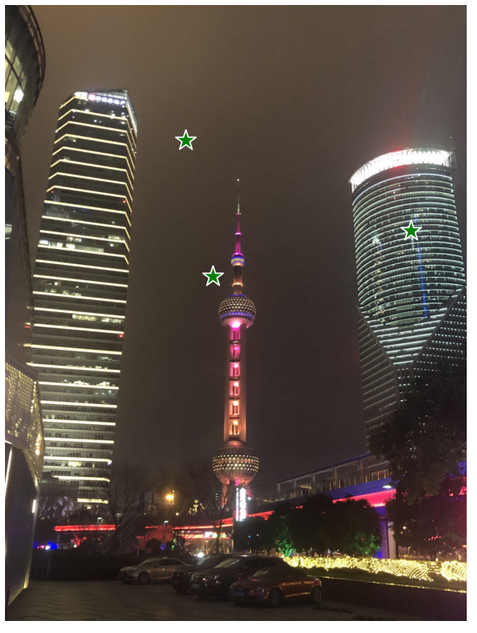
多點輸入舉例
input_label = np.array([1, 1, 1])
模型輸入的提示反應在測試圖片上為:
plt.imshow(image)
show_points(input_point, input_label, plt.gca())
plt.axis('off')
plt.show()
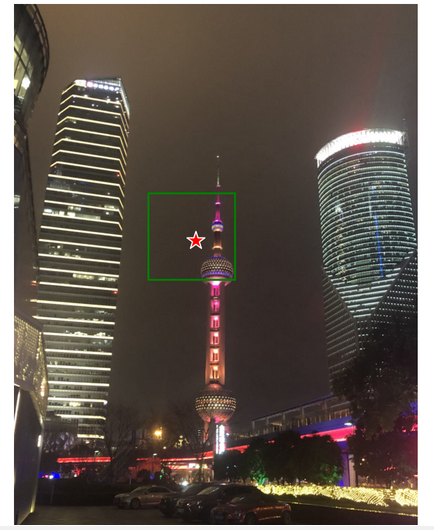
像上面單點輸入的例子一樣,講輸入點變換為張量座標系,進而將輸入打包成所需格式,最後獲得的分割結果如下圖所示:
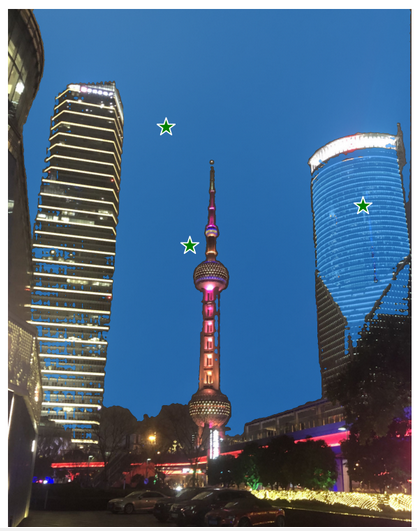
具備負標籤的框和點輸入
在這個例子中,我們使用邊界框和邊界框內的點來定義輸入提示。邊界框表示為其左上角和右下角的一組點。點的標籤0表示該點應從遮罩中排除。
input_point = np.array([[575, 750]])
input_label = np.array([0])
反應在測試圖片中為:
添加批次索引,連接方框和點輸入,為方框角添加適當的標籤,然後進行變換。本次沒有填充點,因為輸入包括一個框輸入。
box_labels = np.array([2,3])
coord = np.concatenate([input_point, box_coords], axis=0)[None, :, :]
label = np.concatenate([input_label, box_labels], axis=0)[None, :].astype(np.float32)
coord = resizer.apply_coords(coord, image.shape[:2]).astype(np.float32)
打包輸入,並進行預測:
"image_embeddings": image_embeddings,
"point_coords": coord,
"point_labels": label,
}
results = ov_predictor(inputs)
masks = results[ov_predictor.output(0)]
masks = postprocess_masks(masks, image.shape[:-1])
masks = masks > 0.0
結果如圖所示:
第四步:在自動分割模式下執行OpenVINO 推論
由於SAM可以有效地處理提示,因此可以透過在影像上採樣大量提示,來生成整個影像的遮罩。
automatic_mask_generation函數實現了這一功能。它的運作原理是在影像上的網格中對單點輸入提示進行採樣,SAM可以從每個提示中預測多個遮罩。然後,對遮罩進行品質過濾,並使用非最大抑制進行去重複。額外的選項允許進一步提高遮罩的品質和數量,例如對影像的多個裁剪進行預測,或對遮罩進行後處理以去除小的斷開區域和孔洞。
MaskData,
generate_crop_boxes,
uncrop_boxes_xyxy,
uncrop_masks,
uncrop_points,
calculate_stability_score,
rle_to_mask,
batched_mask_to_box,
mask_to_rle_pytorch,
is_box_near_crop_edge,
batch_iterator,
remove_small_regions,
build_all_layer_point_grids,
box_xyxy_to_xywh,
area_from_rle
)
from torchvision.ops.boxes import batched_nms, box_area
from typing import Tuple, List, Dict, Any
在自動遮罩生成中有幾個可調參數,用於控制採樣點的密度以及去除低品質或重複遮罩的閾值。此外,生成可以在影像的裁剪上自動執行,以提高對較小物件的性能,後處理可以去除雜散畫素和孔洞。
定義自動分割函數:
image: np.ndarray, min_mask_region_area: int = 0, points_per_side: int = 32, crop_n_layers: int = 0, crop_n_points_downscale_factor: int = 1, crop_overlap_ratio: float = 512 / 1500, box_nms_thresh: float = 0.7, crop_nms_thresh: float = 0.7
) -> List[Dict[str, Any]]:
"""
Generates masks for the given image.
Arguments:
image (np.ndarray): The image to generate masks for, in HWC uint8 format.
Returns:
list(dict(str, any)): A list over records for masks. Each record is
a dict containing the following keys:
segmentation (dict(str, any) or np.ndarray): The mask. If
output_mode='binary_mask', is an array of shape HW. Otherwise,
is a dictionary containing the RLE.
bbox (list(float)): The box around the mask, in XYWH format.
area (int): The area in pixels of the mask.
predicted_iou (float): The model's own prediction of the mask's
quality. This is filtered by the pred_iou_thresh parameter.
point_coords (list(list(float))): The point coordinates input
to the model to generate this mask.
stability_score (float): A measure of the mask's quality. This
is filtered on using the stability_score_thresh parameter.
crop_box (list(float)): The crop of the image used to generate
the mask, given in XYWH format.
"""
point_grids = build_all_layer_point_grids(
points_per_side,
crop_n_layers,
crop_n_points_downscale_factor,
)
mask_data = generate_masks(
image, point_grids, crop_n_layers, crop_overlap_ratio, crop_nms_thresh)
# Filter small disconnected regions and holes in masks
if min_mask_region_area > 0:
mask_data = postprocess_small_regions(
mask_data,
min_mask_region_area,
max(box_nms_thresh, crop_nms_thresh),
)
mask_data["segmentations"] = [
rle_to_mask(rle) for rle in mask_data["rles"]]
# Write mask records
curr_anns = []
for idx in range(len(mask_data["segmentations"])):
ann = {
"segmentation": mask_data["segmentations"][idx],
"area": area_from_rle(mask_data["rles"][idx]),
"bbox": box_xyxy_to_xywh(mask_data["boxes"][idx]).tolist(),
"predicted_iou": mask_data["iou_preds"][idx].item(),
"point_coords": [mask_data["points"][idx].tolist()],
"stability_score": mask_data["stability_score"][idx].item(),
"crop_box": box_xyxy_to_xywh(mask_data["crop_boxes"][idx]).tolist(),
}
curr_anns.append(ann)
return curr_anns
執行自動分割預測:
以上automatic_mask_generation函數返回一個遮罩清單,其中每個遮罩都是一個包含有關遮罩的各種資料的字典:
- 分割:遮罩
- 面積:遮罩的面積(以畫素為單位)
- bbox:XYWH格式的遮罩的邊界框
- predicted_out:模型自己對遮罩品質的預測
- point_coords:生成此遮罩的採樣輸入點
- 穩定性核心:衡量遮罩品質的一個附加指標
- crop_box:用於以XYWH格式生成此遮罩的影像的裁剪
查看遮罩資訊:
print(f"Annotation keys: {prediction[0].keys()}")
獲得如下結果:
Annotation keys: dict_keys(['sgementation', 'area', 'bbox', 'predicted_iou', 'point_coords', 'stability'_score', 'crop_box'])
繪製最後的分割結果:
def draw_anns(image, anns):
if len(anns) == 0:
return
segments_image = image.copy()
sorted_anns = sorted(anns, key=(lambda x: x['area']), reverse=True)
for ann in tqdm(sorted_anns):
mask = ann["segmentation"]
mask_color = np.random.randint(0, 255, size=(1, 1, 3)).astype(np.uint8)
segments_image[mask] = mask_color
return cv2.addWeighted(image.astype(np.float32), 0.7, segments_image.astype(np.float32), 0.3, 0.0)
out = draw_anns(image, prediction)
cv2.imwrite("result.png", out[:, :, ::-1])
PIL.Image.open("result.png")
看看這些分割的效果,是不是非常的驚豔呢。其實除了以上我們介紹的程式碼內容,在Jupyter Notebook程式碼裡,還為大家提供了視窗式滑鼠點擊輸入提示的互動式分割體驗,甚至可以在手機端輸入URL地址體驗即時互動效果,如下圖所示:

這麼多有趣又快速的OpenVINO 執行物體分割的方式,快在你自己的機器上複製我們的程式碼範例,自己動手試試SAM的效果吧!
小結
完整的流程就是這樣,現在就開始跟著我們提供的程式碼和步驟,動手試試OpenVINO和SAM吧!
關於英特爾OpenVINO 開源工具套件的詳細資料,包括其中我們提供的三百多個經驗證並最佳化的預訓練模型的詳細資料,請點擊:https://www.intel.com/content/www/us/en/developer/tools/openvino-toolkit/overview.html
除此之外,為了方便大家瞭解並快速掌握OpenVINO 的使用,我們還提供了一系列開源Jupyter Notebook demo。執行這些Notebook,就能快速了解如何在不同場景下利用OpenVINO 實現包括電腦視覺、語音及自然語言處理等一系列任務。OpenVINO Notebooks的資源可以在GitHub下載安裝:https://github.com/openvinotoolkit/openvino_notebooks。
(責任編輯:Judith Cheng)

- OpenVINO 2025.3: 更多生成式AI,釋放無限可能 - 2025/09/26
- 用OpenVINO GenAI解鎖LoRA微調模型推論 - 2025/08/29
- 用OpenVINO GenAI解鎖LLM極速推論:推測式解碼讓AI爆發潛能 - 2025/04/23
訂閱MakerPRO知識充電報
與40000位開發者一同掌握科技創新的技術資訊!


