作者:曾成訓(CH.Tseng)
OpenVINO 套件包提供多種訓練好的模型供使用者直接進行專案,本文介紹如何使用 OpenVINO 所提供的三種 pre-trained models:face detection、facial landmarks 及 facial embedded features 來進行人臉識別。
Model 介紹
Face Detection Models
針對 face detection,OpenVINO 提供三種 pre-trained model,分別是:

本文將使用其中的 face–detection–adas–0001 作為示範。
Facial Landmarks Models
OpenVINO 提供了二種 facial landmarks models,分別為 5 點的 landmarks–regression–retail–0009 以及35 點的 facial–landmarks–35–adas–0002。
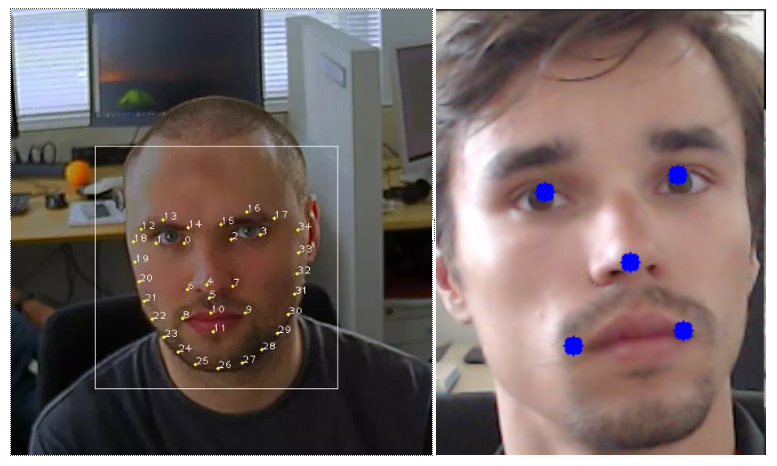
(圖片來源:曾成訓)
本文將使用五點的 landmarks–regression–retail–0009 取得雙眼的兩個中間點,進行人臉的校正示範。
Facial Embedded Features
針對 facial embedded features,本文使用 face–reidentification–retail–0095 model,該 pre–trained model 輸出 256 個 facial embedded features,LFW 正確率為 0.9947,接受的圖片 shape 為[1x3x128x128],輸出的 shape 為 [1, 256, 1, 1]。
下載 Models
1. 下載 Open Model Zoo
git clone:https://github.com/opencv/open_model_zoo
2. 使用 downloader 下載需要的 model:
cd open_model_zoo/model_downloader
本文需要下載下列三個模型:
./downloader.py –all –c
或者,您也可以下載全部的 pre-trained models:
./downloader.py –all
下圖為下載全部模型的畫面:
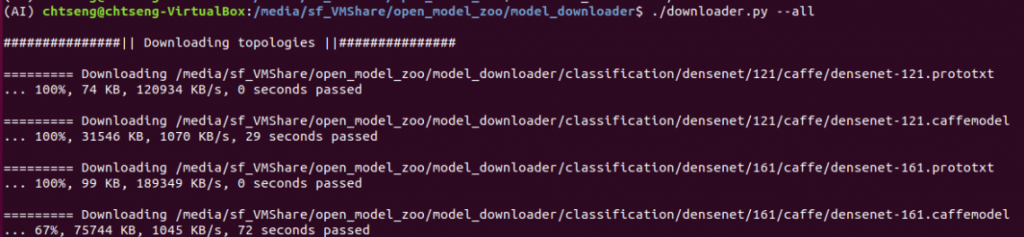
(圖片來源:曾成訓)
(註:model_downloader.py 需要安裝 pyyaml 及 requests 這兩個模型,可使用 pip install pyyaml requests 來安裝)
最後,請確定您已經下載了下列三個 pre-trained 模型檔案(如果您要在樹莓派執行,請下載後接有 fp16 的檔案,其它如 PC 端,則下載沒有 fp16 結尾的檔案)。

(圖片來源:曾成訓)
face–detection–adas–0001 臉部識別模型
為了方便使用,我寫了一個 class for OpenVINO Face detection,import 進來後,只要三行程式便可傳回圖片中的所有人臉。測試結果在樹莓派使用 NCS2 搭配 OpenVINO,使用此 CNN model 進行 Face detection 的速度為 0.2289 秒。
from libFaceDoor import ov_FaceDect
FACE_Detect = ov_FaceDect("models/face-detection-adas-0001.bin", \
"models/face-detection-adas-0001.xml")
#傳入image檔及給予threshold值,就可得到face bbox及scores。
face_boxes, face_scores = FACE_Detect.detect_face(image, score=0.5, \
target_device=cv2.dnn.DNN_TARGET_MYRIAD)
landmarks–regression–retail–0009 臉部特徵點模型
本 model 會傳回一組十個數值的陣列 [1, 10],分別代表 [x0, y0, x1, y1, …, x5, y5] 共五個 facial landmarks。
同樣為了方便使用,我也寫了一個 class for OpenVINO Facial landmarks,import 進來後,只需三行程式,便可取得人臉的五點 landmarks 以及應校正的角度值。測試結果在樹莓派使用 NCS2 搭配OpenVINO,使用此 CNN model 取得 landmarks 的速度為 0.0097 秒。
from libFaceDoor import ov_Face5Landmarks
faceLandmarks = ov_Face5Landmarks(bin_path= \
"models/landmarks-regression-retail-0009.bin",  \
xml_path="models/landmarks-regression-retail-0009.xml")

#face為經由face detection所取得的臉部區域
points = faceLandmarks.getLandmarks(face, \
target_device=cv2.dnn.DNN_TARGET_MYRIAD)
所取得的 landmark points 值如下((x,y)共五組):
[[[[0.19104004]] [[0.3540039 ]] [[0.65234375]] [[0.39941406]] [[0.3803711 ]] [[0.5830078 ]] [[0.21154785]] [[0.7446289 ]] [[0.5371094 ]] [[0.77246094]]]]
face–reidentification–retail–0095 臉部辨識模型
有了臉部的 landmarks 後,我們便可以校正該臉部的傾斜度並取得臉部的 embedded features。下方為取得 facial embedded features 的 python class 使用方法:
from libFaceDoor import ov_FaceRecognize
FACE_RECOG = ov_FaceRecognize( \
"models/face-reidentification-retail-0095.bin", \
"models/face-reidentification-retail-0095.xml")

#下方輸入的參數face為校正過的臉部區域圖檔
face_embs = FACE_RECOG.detect_face(face, \
target_device=cv2.dnn.DNN_TARGET_MYRIAD)
整合應用示範
最後,我們把下方列出的五個步驟整合在一起,組成一個完整的人臉辨識系統。記得嗎?步驟 4~5 已在先前的知識文件中介紹過,而 1~3 步驟的使用可參考本文的說明。
- face detect
- facial landmarks detect
- face alignment
- facial embedded features
- calculate distance of 2 embedded features
下方的影片示範了上述五個執行步驟:
取得人臉 –> 臉部特徵點定位 –> 臉部對齊(顯示於畫面中左上角)–> 臉部特徵向量取得 –> 計算人臉差異,取最小者。
左上角顯示的人臉為即時校正後、用以計算 facial embedded features 的人臉預覽,可以看出,手機上的人臉雖然隨時都在轉動,但經過臉部水平校正後,畫面左上角臉孔的雙眼角度仍然維持水平。
libFaceDoor 程式碼
import time, datetime
import imutils
import math
import cv2
import numpy as np

#--------------------------------------------------------#
# 1. wget --no-check-certificate https://download.01.org/opencv/2019/open_model_zoo/R1/models_bin/face-detection-adas-0001/FP16/face-detection-adas-0001.bin
# 2. wget --no-check-certificate https://download.01.org/opencv/2019/open_model_zoo/R1/models_bin/face-detection-adas-0001/FP16/face-detection-adas-0001.xml
#
class ov_FaceDect:
    def __init__(self, bin_path, xml_path):
        #load the model
        net = cv2.dnn.readNet(xml_path, bin_path)
        self.net = net

    def detect_face(self, frame, score=0.5, target_device=cv2.dnn.DNN_TARGET_MYRIAD):
        net = self.net
        # Specify target device.
        net.setPreferableTarget(target_device)

        #Prepare input blob and perform an inference.
        blob = cv2.dnn.blobFromImage(frame, size=(672, 384), ddepth=cv2.CV_8U)
        net.setInput(blob)
        out = net.forward()

        faces, scores = [], []
        for detection in out.reshape(-1, 7):
            confidence = float(detection[2])
            xmin = int(detection[3] * frame.shape[1])
            ymin = int(detection[4] * frame.shape[0])
            xmax = int(detection[5] * frame.shape[1])
            ymax = int(detection[6] * frame.shape[0])

            if confidence > score:
                faces.append([xmin,ymin,xmax-xmin,ymax-ymin])
                scores.append(confidence)

        return faces, scores

class ov_FaceRecognize:
    def __init__(self, bin_path, xml_path):
        #load the model
        net = cv2.dnn.readNet(xml_path, bin_path)
        self.net = net

    def detect_face(self, face_img, target_device=cv2.dnn.DNN_TARGET_MYRIAD):
        net = self.net
        # Specify target device.
        net.setPreferableTarget(target_device)

        #Prepare input blob and perform an inference.
        blob = cv2.dnn.blobFromImage(face_img, size=(128, 128), ddepth=cv2.CV_8U)
        net.setInput(blob)
        out = net.forward()

        return out

class ov_Face5Landmarks:
    def __init__(self, bin_path, xml_path):
        #load the model
        net = cv2.dnn.readNet(xml_path, bin_path)
        self.net = net

    def getLandmarks(self, face_img, target_device=cv2.dnn.DNN_TARGET_MYRIAD):
        net = self.net
        # Specify target device.
        net.setPreferableTarget(target_device)

        #Prepare input blob and perform an inference.
        try:
            blob = cv2.dnn.blobFromImage(face_img, size=(48, 48), ddepth=cv2.CV_8U)
            net.setInput(blob)
            out = net.forward()
        except:
            out = None

        return out

    def renderFace(self, im, landmarks, color=(0, 255, 0), radius=5):
        for p in landmarks:
            cv2.circle(im, (p[0], p[1]), radius, color, -1)

        return im

    def angle_2_points(self, p1, p2):
        r_angle = math.atan2(p1[1] - p2[1], p1[0] - p2[0])
        rotate_angle = r_angle * 180 / math.pi

        return rotate_angle
(本文經作者同意轉載自 CH.TSENG 部落格、原文連結;責任編輯:賴佩萱)

- 【模型訓練】訓練馬賽克消除器 - 2020/04/27
- 【AI模型訓練】真假分不清!訓練假臉產生器 - 2020/04/13
- 【AI防疫DIY】臉部辨識+口罩偵測+紅外線測溫 - 2020/03/23
訂閱MakerPRO知識充電報
與40000位開發者一同掌握科技創新的技術資訊!


