作者:柯大
為了快速、有效的解決物聯網產品在研發及行銷上的需求,並且可以讓物聯網新創團隊更快速完成初期的原型開發,找到早期使用者進行測試,因此,一套能加快開發的物聯網建置環境會對團隊有很大的幫助。
在筆者另一篇文章《快速上手精簡易用的物聯網開發板-DSI5168》中介紹了DSI5168這塊專為IoT新創設計的開發板,它提供完全兼容Arduino的開發特性,還一舉整合MCU、Wi-Fi、Ethernet及豐富的接腳介面,並搭配提供標準化的Arduino函式庫,是一套完整的物聯網方案開發板,更可快速打造出IoT產品的雛形,進而經由量產輔導機制,很務實地幫團隊加速跨越開發、實作的過程,順利將創意商品量產推入市場。
本文將針對此開發板的一些特色功能進行介紹,並提供相關的範例程式,有興趣的讀者可實際執行看看,會更有心得。
DSI5168 PWM應用測試
在電子元件的操控上,常會使用到PWM,PWM 全名叫做 pulse width modulation(脈衝寬度調變),最主要的核心概念為 工作週期(Duty Cycle)。簡單來說,PWM 原理是用 analogWrite() 輸出0~255的值來產生對應電壓,透過電壓值的變化產生亮度或不同顏色的變化。

PWM運作原理圖(圖片來源:柯清長)
DSI5168開發板提供4個PWM GPIO Pin(D10、D11、D12、D13),如下圖,本範例利用RGB LED來驅動全彩LED亮燈的顏色,此範例的接線方式為 V :5V、R:PWM (D10)、 G:PWM (D11)、 B:PWM (D12)。
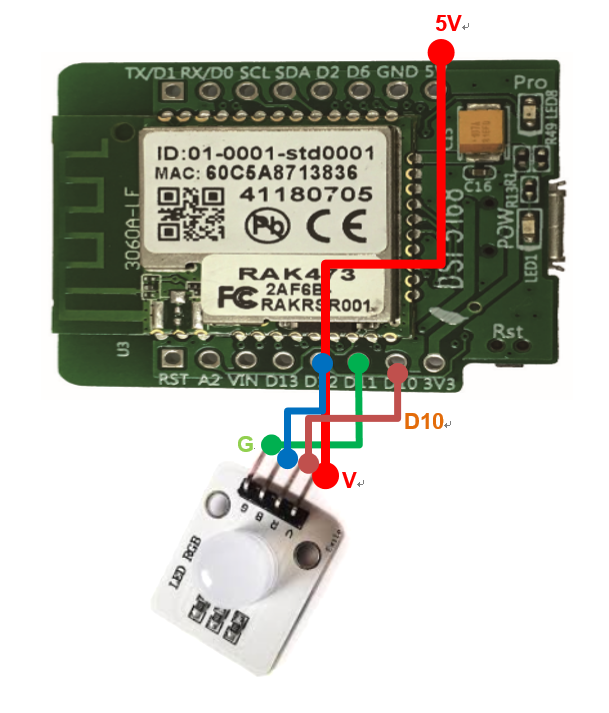
RGB LED感測器接線圖(圖片來源:柯清長)
範例程式如下:
int redPin = 10;
int greenPin = 11;
int bluePin = 12;
//uncomment this line if using a Common Anode LED
#define COMMON_ANODE
void setup()
{
pinMode(redPin, OUTPUT);
pinMode(greenPin, OUTPUT);
pinMode(bluePin, OUTPUT);
}

void loop()
{
setColor(255, 0, 0); // red
delay(1000);
setColor(0, 255, 0); // green
delay(1000);
setColor(0, 0, 255); // blue
delay(1000);
setColor(255, 255, 0); // yellow
delay(1000);
setColor(80, 0, 80); // purple
delay(1000);
setColor(0, 255, 255); // aqua
delay(1000);
}

void setColor(int red, int green, int blue)
{
#ifdef COMMON_ANODE
red = 255 - red;
green = 255 - green;
blue = 255 - blue;
#endif

analogWrite(redPin, red);
analogWrite(greenPin, green);
analogWrite(bluePin, blue);
}
DSI5168 UART應用測試
UART 全名 Universal Asynchronous Receiver/Transmitter,中譯為通用非同步收發傳輸器,通稱為序列式或串列埠傳輸介面。Ameba 開發板提供了3組UART介面,除了Log UART之外,還提供2組硬體的UART(UART0、UART2),為了相容於Arudino的Software Serial API,Ameba在取名上沿用Software Serial,但底層是硬體而不是軟體模擬。
DSI5168則僅接出UART0(D0/RX、D1/TX) 使用,在Ameba Arduino 開發環境下可利用以下方式宣告使用:
#include <SoftwareSerial.h>  //適用在RTL8711AM

SoftwareSerial  mySerial1(0, 1); // 宣告使用UART0(D0/RX、D1/TX)
及
#include <SoftwareSerial.h>  //適手用在RTL8195AM

SoftwareSerial  mySerial2(17, 5); // 宣告使用UART2(D17/RX、D5/TX)
本範例應用目前最夯的空氣品質感測器PMS5003連接DSI5168開發板,它是一款空氣懸浮粒子感測器,使用激光散射原理,能夠得到空氣中0.3 ~ 10微米懸浮顆粒物濃度,測出來的數據,會經由UART輸出。它可以讀出PM 1.0, PM 2.5, PM 10的數據。以PM2.5為例子, 表示每立方公尺的空氣中直徑小於2.5 um的懸浮例子密度,是一個UART介面的感測器。
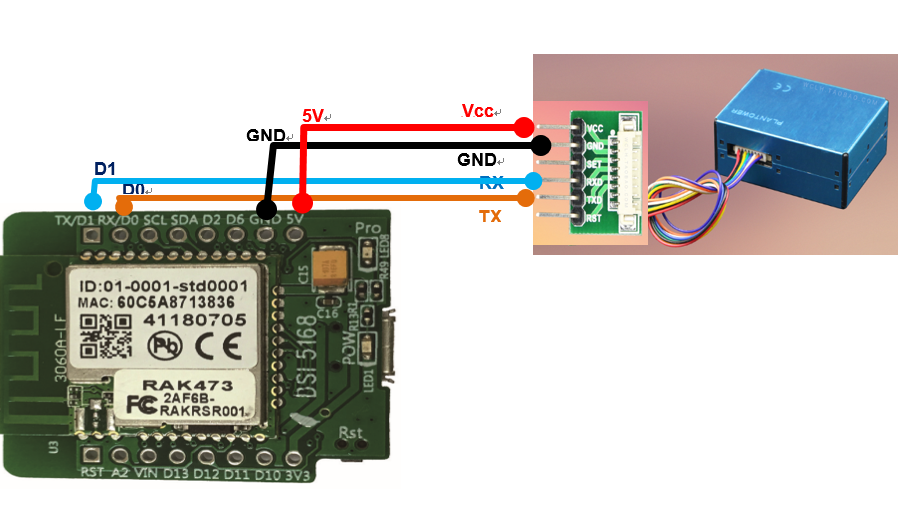
PMS5003感測器接線圖(圖片來源:柯清長)
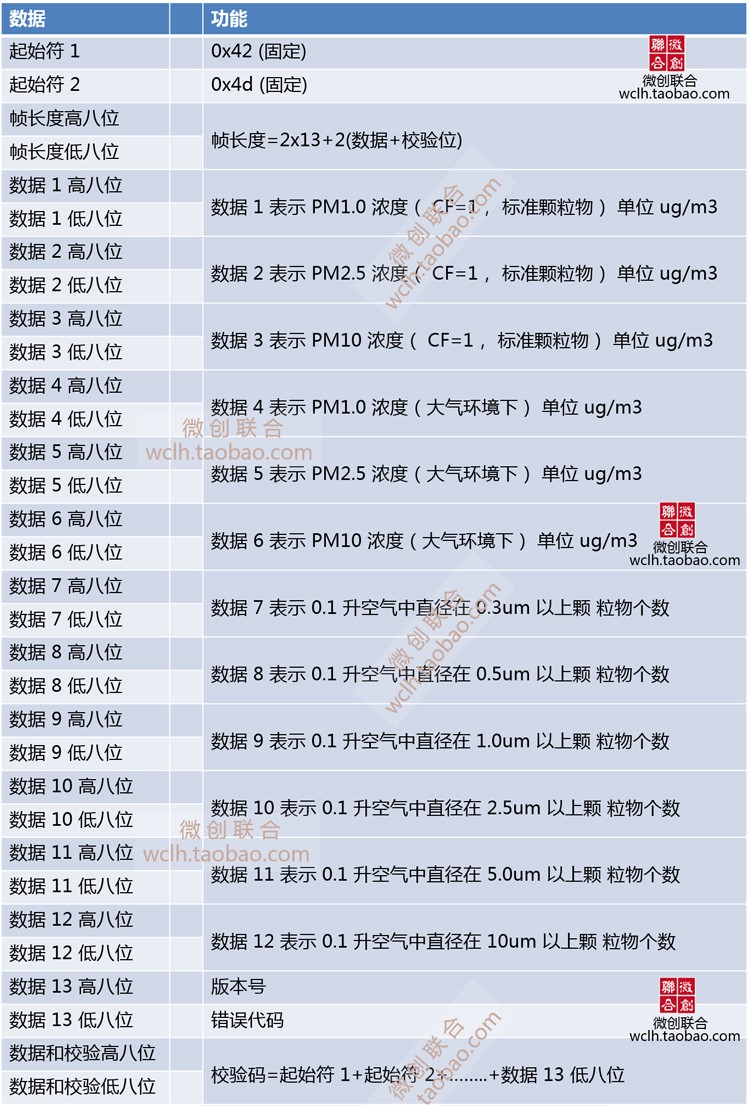
PMS5003感測器回傳資料值說明(圖片來源:柯清長)
範例程式如下:
/*
This example demonstrate how to read pm2.5 value on PMS 3003 air condition sensor

PMS 5003 pin map is as follow:
PIN1 :VCC, connect to 5V
PIN2 :GND
PIN3 :SET, 0:Standby mode, 1:operating mode
PIN4 :RXD :Serial RX
PIN5 :TXD :Serial TX
PIN6 :RESET
PIN7 :NC
PIN8 :NC

In this example, we only use Serial to get PM 2.5 value.

The circuit: (BOARD RTL8195A)
* RX is digital pin 0 (connect to TX of PMS 3003)
* TX is digital pin 1 (connect to RX of PMS 3003)

*/

#include <SoftwareSerial.h>
#if defined(BOARD_RTL8195A)
SoftwareSerial mySerial(0, 1); // RX, TX
#elif defined(BOARD_RTL8710)
SoftwareSerial mySerial(17, 5); // RX, TX
#else
SoftwareSerial mySerial(0, 1); // RX, TX
#endif

#define pmsDataLen 32
uint8_t buf[pmsDataLen];
int idx = 0;
int pm10 = 0;
int pm25 = 0;
int pm100 = 0;

void setup() {
Serial.begin(9600);
mySerial.begin(9600); // PMS 3003 UART has baud rate 9600
}

void loop() { // run over and over
uint8_t c = 0;
idx = 0;
memset(buf, 0, pmsDataLen);

while (true) {
while (c != 0x42) {
while (!mySerial.available());
c = mySerial.read();
}
while (!mySerial.available());
c = mySerial.read();
if (c == 0x4d) {
// now we got a correct header)
buf[idx++] = 0x42;
buf[idx++] = 0x4d;
break;
}
}

while (idx != pmsDataLen) {
while(!mySerial.available());
buf[idx++] = mySerial.read();
}

pm10 = ( buf[10] << 8 ) | buf[11];
pm25 = ( buf[12] << 8 ) | buf[13];
pm100 = ( buf[14] << 8 ) | buf[15];

Serial.print("pm2.5: ");
Serial.print(pm25);
Serial.println(" ug/m3");
}
序列埠輸出結果如下:
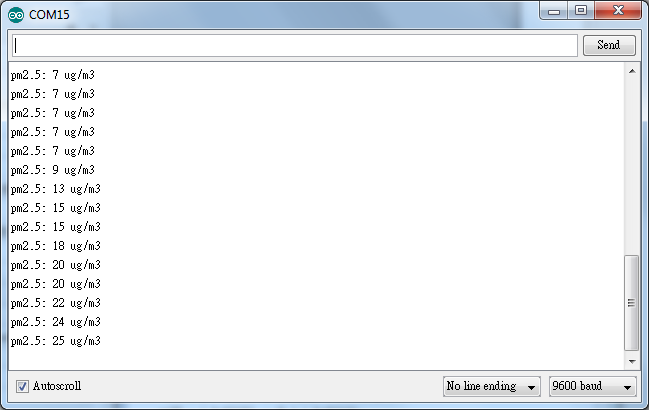
PMS5003範例程式透過序列埠視窗輸出PM2.5值(圖片來源:柯清長)
DSI5168 WiFi功能測試
拿到DSI5168開發板之後,為了確認Wi-Fi有沒有問題,簡單方法之一:讓DSI5169掃描你附近有沒有Wi-Fi無線上網,如果有,那就顯示出來。有個ScanNetworks範例,透過這個範例程式來了解一下WiFi通訊服務的一些意義。
開啟ScanNetworks範例程式:
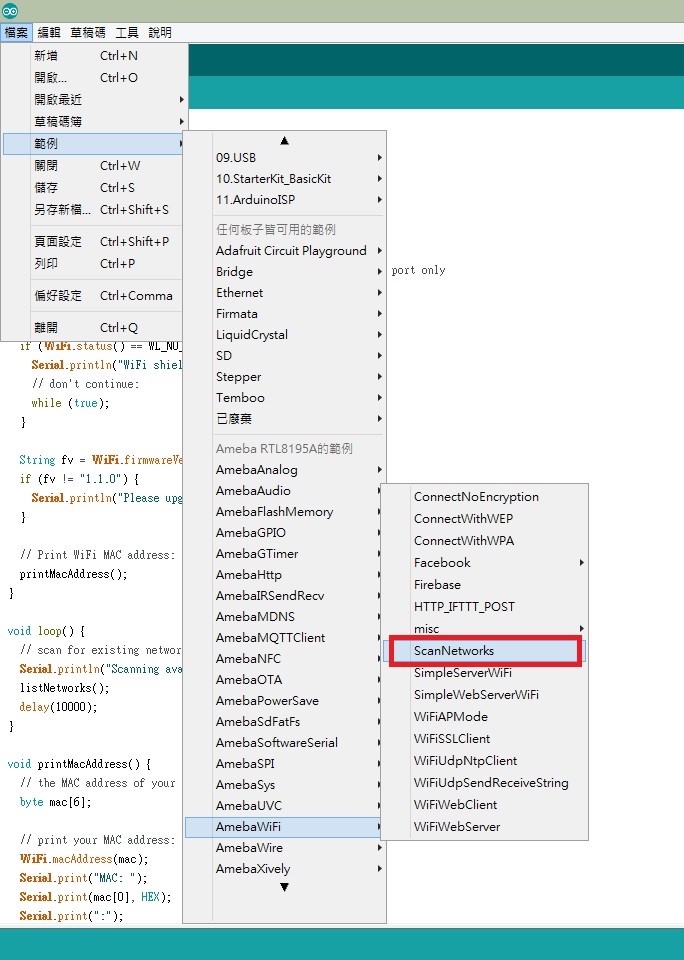
開啟DSI5168 WiFi Scan 範例程式(圖片來源:柯清長)
將ScanNetworks範例編譯完成並上傳成功後,按下Ameba的Reset按鈕,然後打開Arduino IDE的序列埠監控視窗,Wi-Fi功能正常的話應該可以看到現有環境下Scan WiFi網路狀況的結果
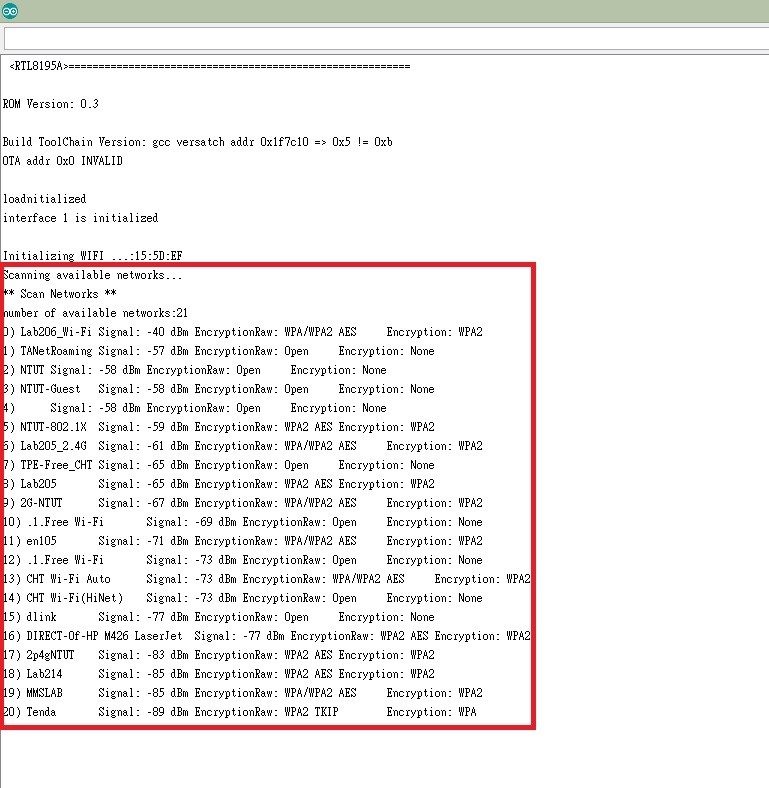
ScanNetworks範例程式可找到DSI5168開發板置附近的Wi-Fi AP分享器(圖片來源:柯清長)
顯示DHT22溫溼度資料
本範例以DSI5168開發板接上最常用到的DHT22溫溼度感測器,再以DSI5168 WiFi建立一個WebServer(標準TCP Port 80),當有Client 利用瀏覽器連上WebServer 時,會自動每15秒讀取DHT22溫溼度感測器,並將感測器透過瀏覽器顯示。
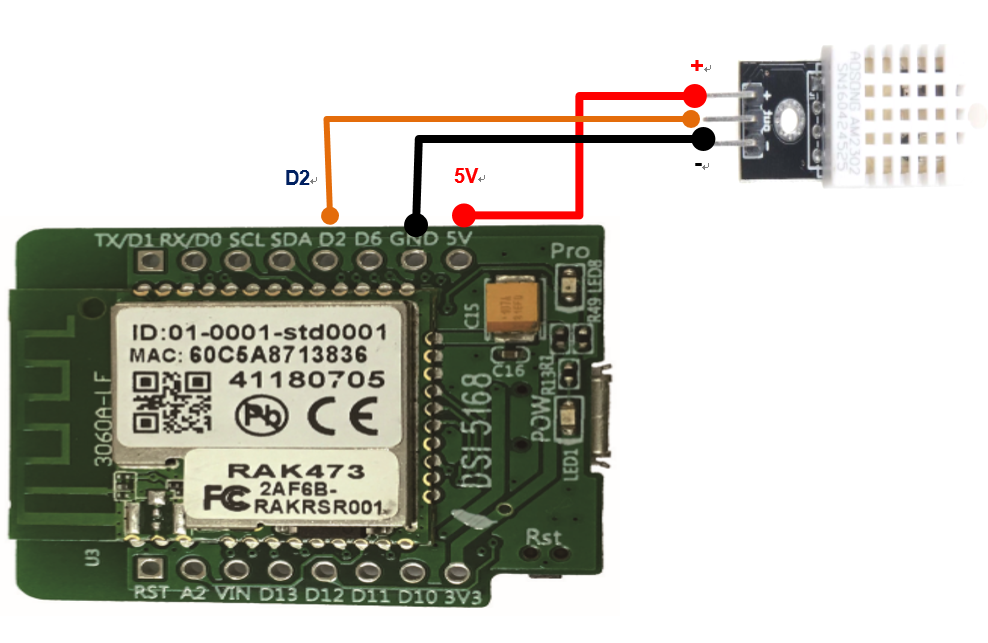
DHT22感測器接線圖(圖片來源:柯清長)
範例程式如下:
#include <WiFi.h>
#include "DHT.h"
#define DHTPIN 2 // what digital pin we're connected to
#define DHTTYPE DHT22 // DHT 11
DHT dht(DHTPIN, DHTTYPE);
#include <Wire.h>

char ssid[] = "KCC-VPN-AP"; // your network SSID (name)
char pass[] = "22917532"; // your network password
int keyIndex = 0; // your network key Index number ( only for WEP)

int status = WL_IDLE_STATUS;
WiFiServer server(80);
void setup() {
//Initialize serial and wait for port to open:
Serial.begin(9600);
// check for the presence of the shield:
if (WiFi.status() == WL_NO_SHIELD) {
Serial.println("WiFi shield not present");
// don't continue:
while (true);
}
String fv = WiFi.firmwareVersion();
if (fv != "1.1.0") {
Serial.println("Please upgrade the firmware");
}
// attempt to connect to Wifi network:
while (status != WL_CONNECTED) {
Serial.print("Attempting to connect to SSID: ");
Serial.println(ssid);
status = WiFi.begin(ssid, pass);

// wait 10 seconds for connection:
delay(10000);
}
server.begin();
// you're connected now, so print out the status:
printWifiStatus();
dht.begin();
}

void loop() {
// listen for incoming clients
WiFiClient client = server.available();
if (client) {
Serial.println("new client");
// an http request ends with a blank line
boolean currentLineIsBlank = true;
while (client.connected()) {
if (client.available()) {
char c = client.read();
Serial.write(c);
// if you've gotten to the end of the line (received a newline
// character) and the line is blank, the http request has ended,
// so you can send a reply
if (c == '\n' && currentLineIsBlank) {
// send a standard http response header
client.println("HTTP/1.1 200 OK");
client.println("Content-Type: text/html");
client.println("Connection: close"); // the connection will be closed
client.println("Refresh: 15"); // refresh the page every 15 sec
client.println();
client.println("");
client.println("");client.println("

");
// output the value of each analog input pin
float h = dht.readHumidity();
float t = dht.readTemperature();
Serial.print("Temp:");
Serial.print(t);
Serial.print(" *C");
Serial.println("");
Serial.print("Humi:");
Serial.print(h);
Serial.print(" %");
Serial.println("");
client.println(" ");
client.print("Temp:");
client.print(t);
client.print(" °C");
client.println("
");
client.println("");
client.println(" ");
client.print("Humi:");
client.print(h);
client.print(" %");
client.println("
");
client.println("");
client.println("

");
client.println("");
break;
}
if (c == '\n') {
// you're starting a new line
currentLineIsBlank = true;
} else if (c != '\r') {
// you've gotten a character on the current line
currentLineIsBlank = false;
}
}
}
// give the web browser time to receive the data
delay(1);

// close the connection:
client.stop();
Serial.println("client disonnected");
}
}

void printWifiStatus() {
// print the SSID of the network you're attached to:
Serial.print("SSID: ");
Serial.println(WiFi.SSID());

// print your WiFi shield's IP address:
IPAddress ip = WiFi.localIP();
Serial.print("IP Address: ");
Serial.println(ip);
// print the received signal strength:
long rssi = WiFi.RSSI();
Serial.print("signal strength (RSSI):");
Serial.print(rssi);
Serial.println(" dBm");
}
序列埠輸出結果如下:

序列埠監控視窗輸出結果(圖片來源:柯清長)
瀏覽器輸出結果如下:
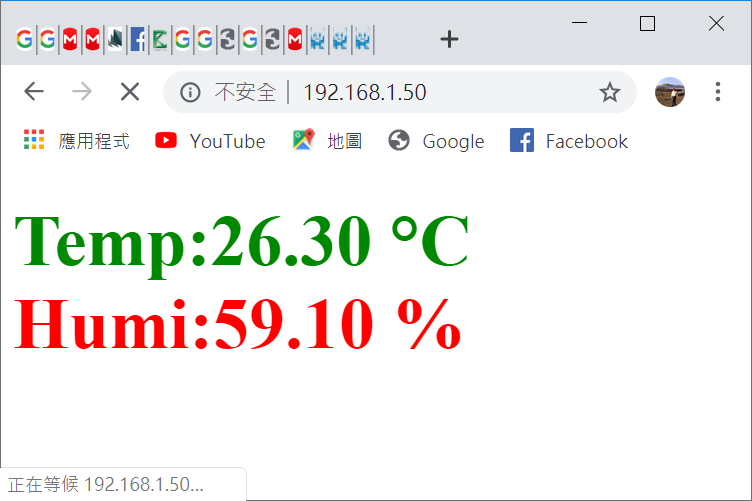
瀏覽器讀取DSI5168 WebServer輸出結果(圖片來源:柯清長)
一站式AIoT快速開發工具平台-IDEAS Chain
資策會服創所整合內部的開發人力,推出了IDEAS Chain一站式AIoT快速開發工具平台,提供簡易且安全的物聯網建置解決方案,能加速Maker、新創團隊與開發者完成專案,IDEAS Chain 可以很簡單、快速導入物聯網數據應用平台。
平台使用步驟:
1.連線至IDEAS Chain網站:https://www.ideaschain.com.tw/www/iot.html
(圖片來源:IDEAS Chain網站)
2.註冊或登入帳號並進入專案管理

(圖片來源:IDEAS Chain網站)
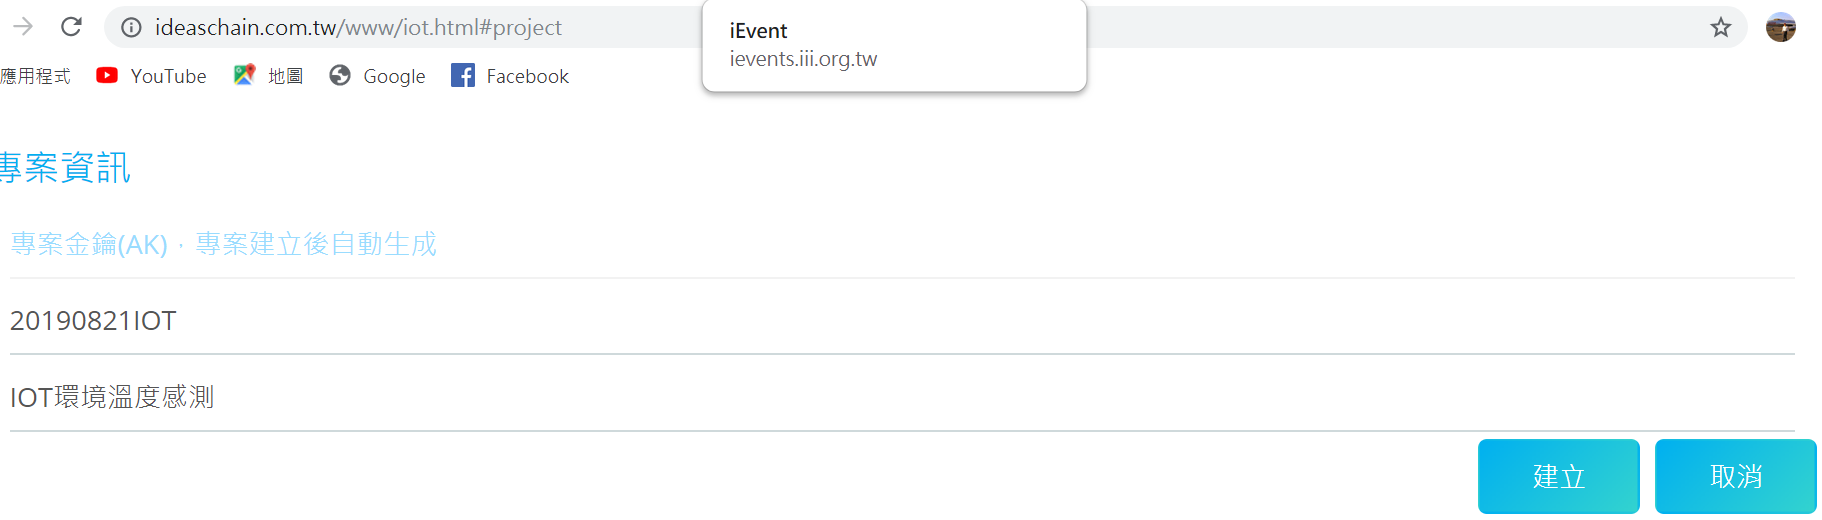
3.新增專案
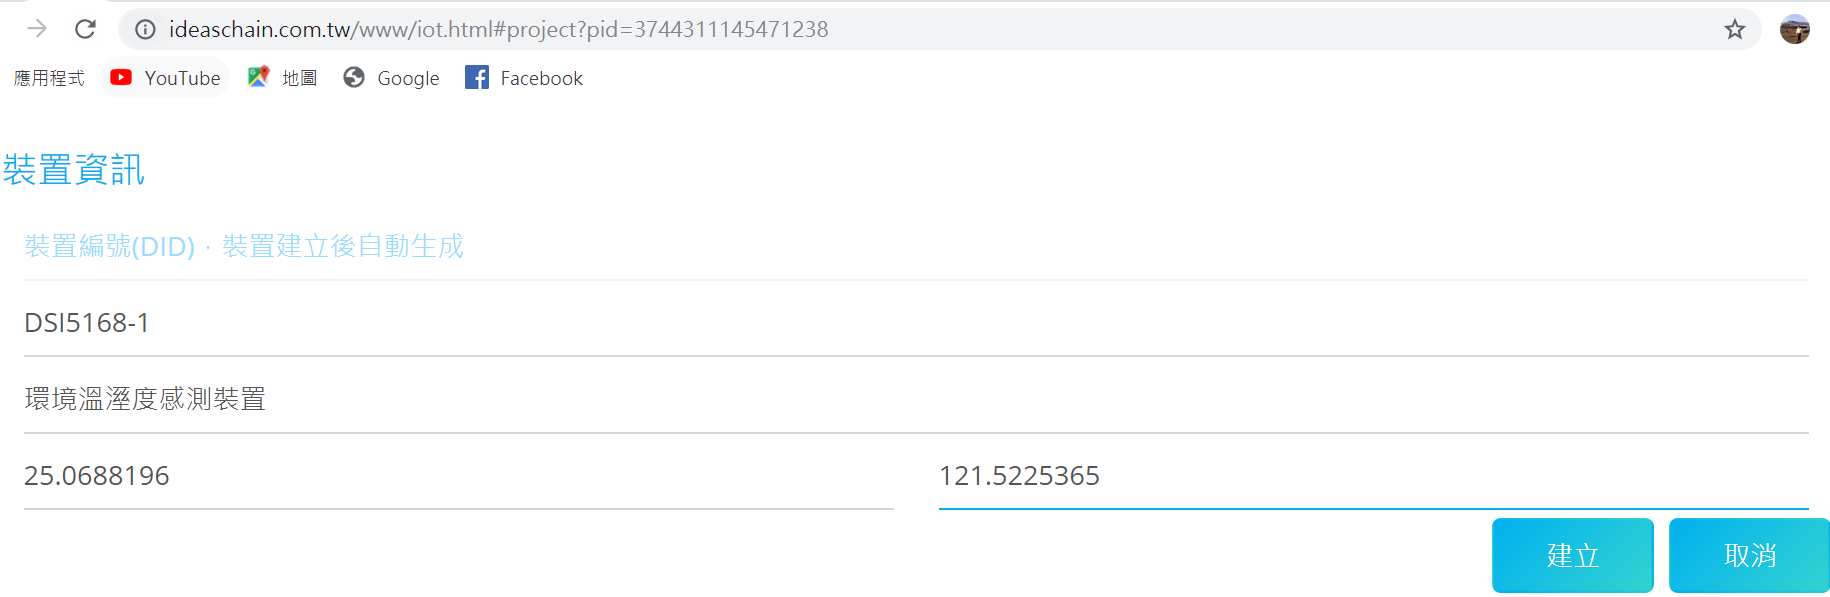
4.新增裝置

5.建立裝置名稱及資訊
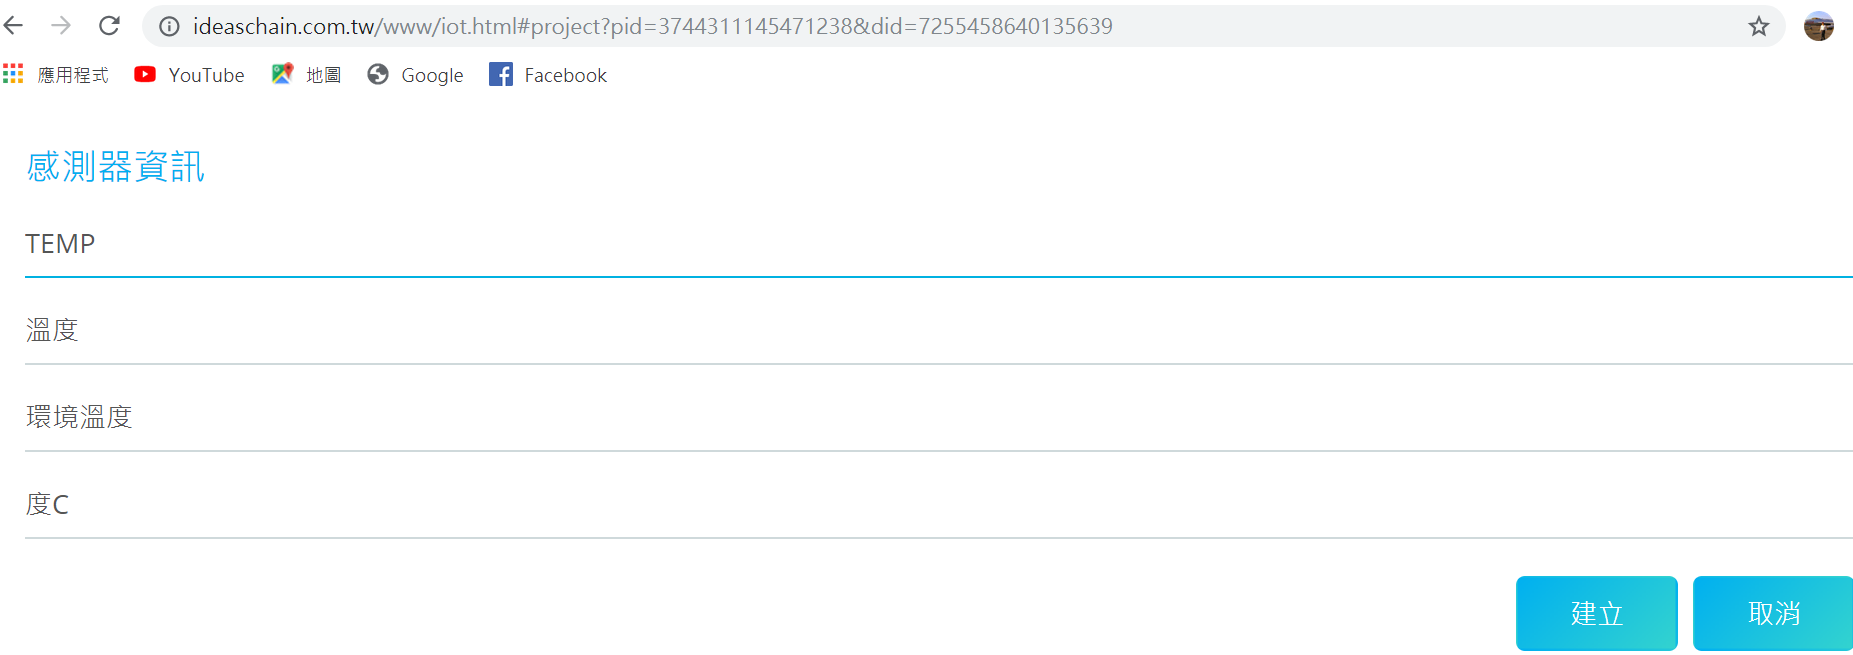
6. 新增感測器項目

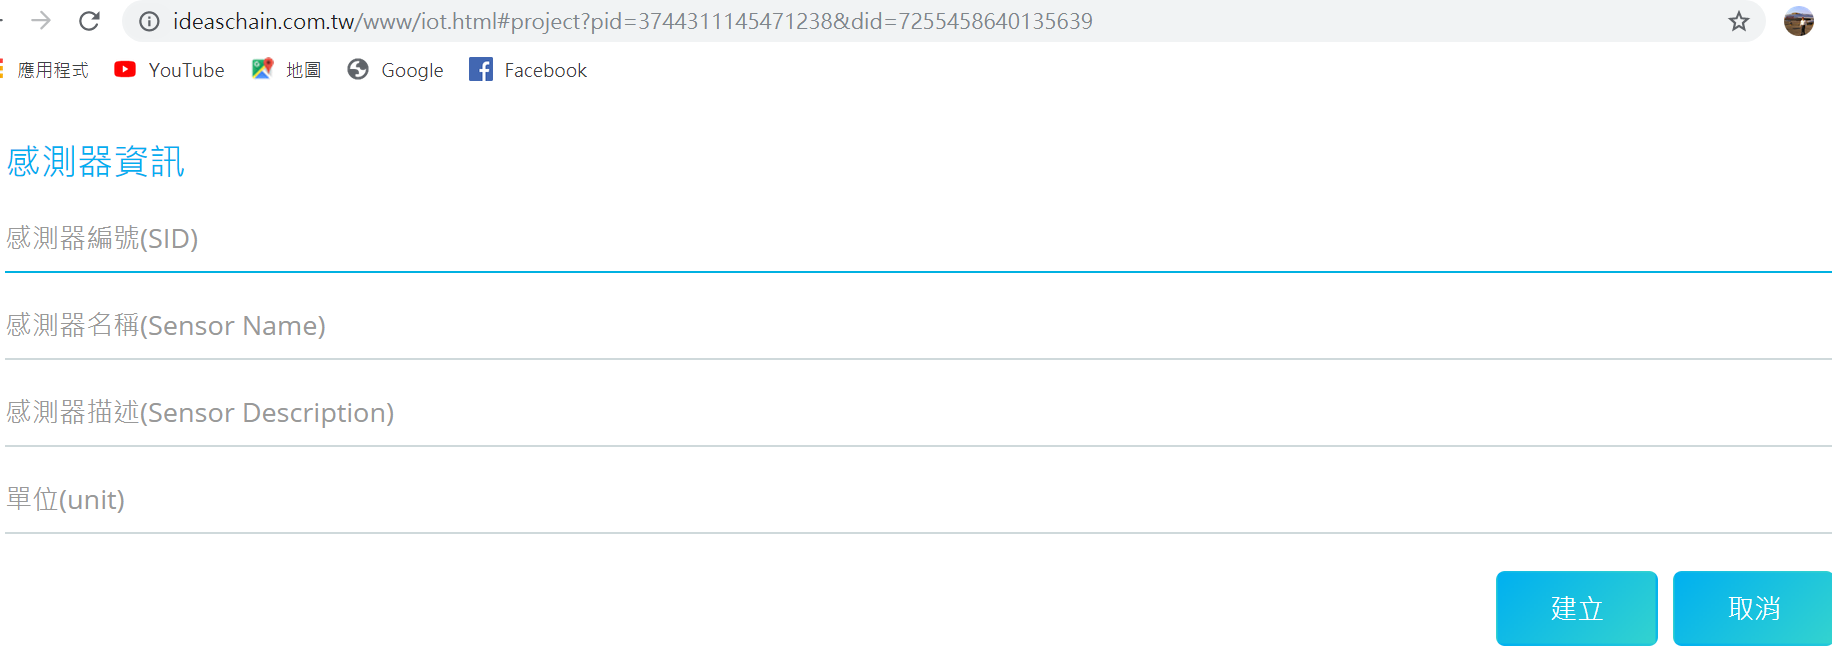
7.建立溫度感測器SID:TEMP
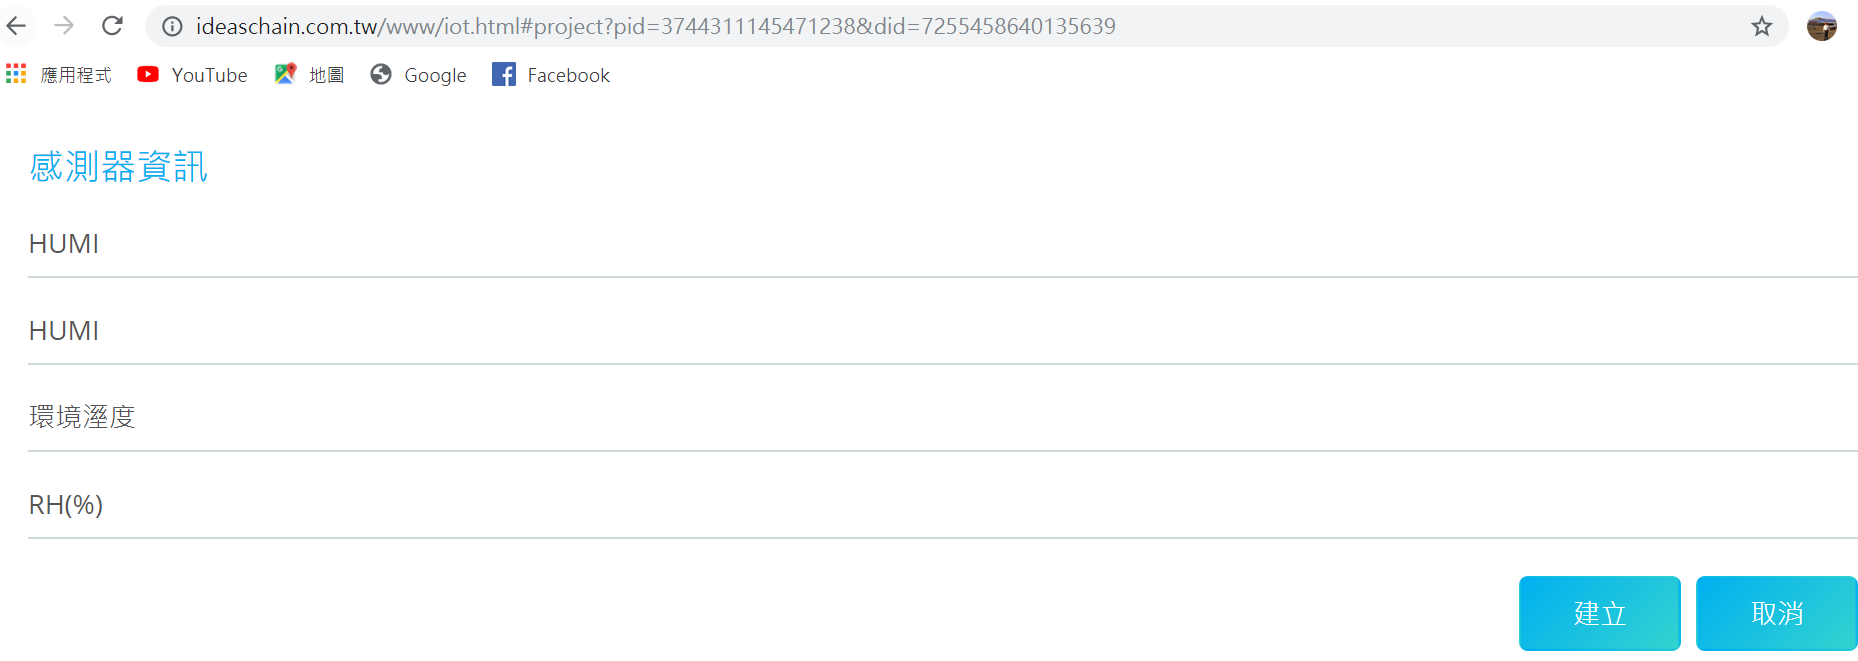
8.建立溼度感測器SID:HUMI
9.取得專案資訊: AK
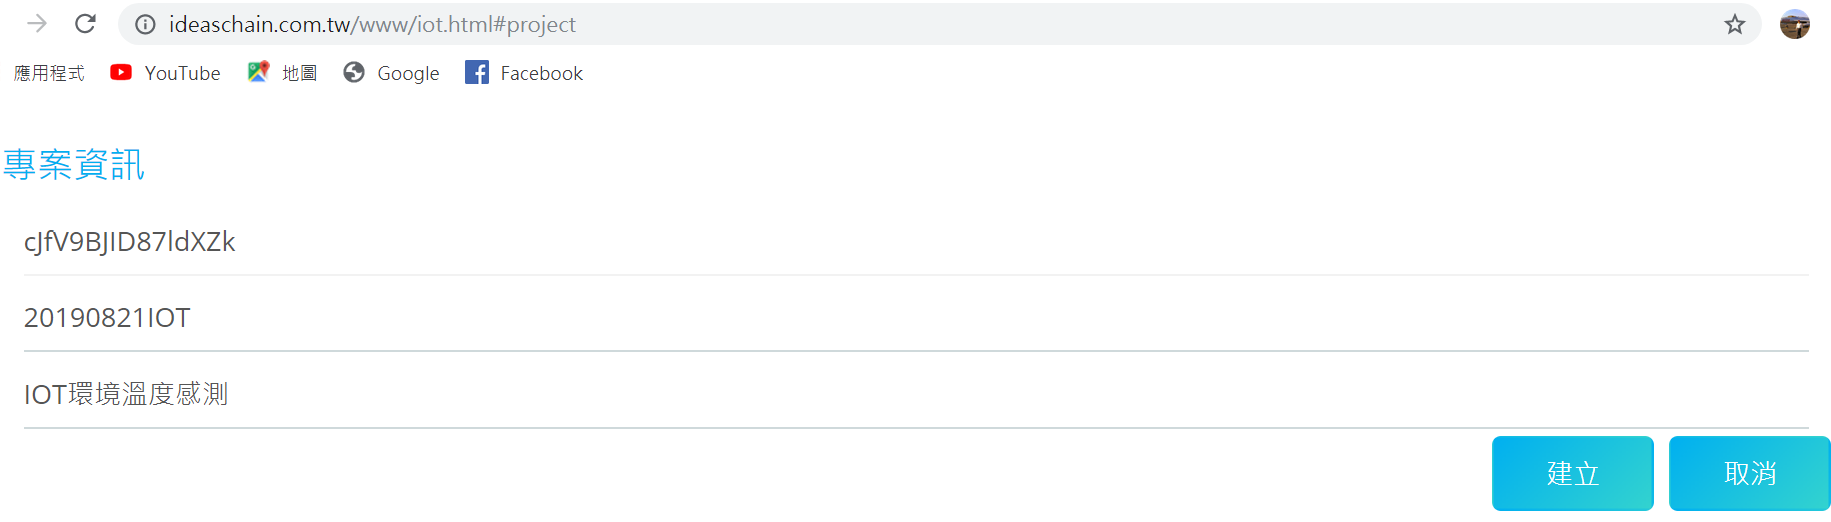
AK = cJfV9BJID87ldXZk
10.取得裝置ID: DID
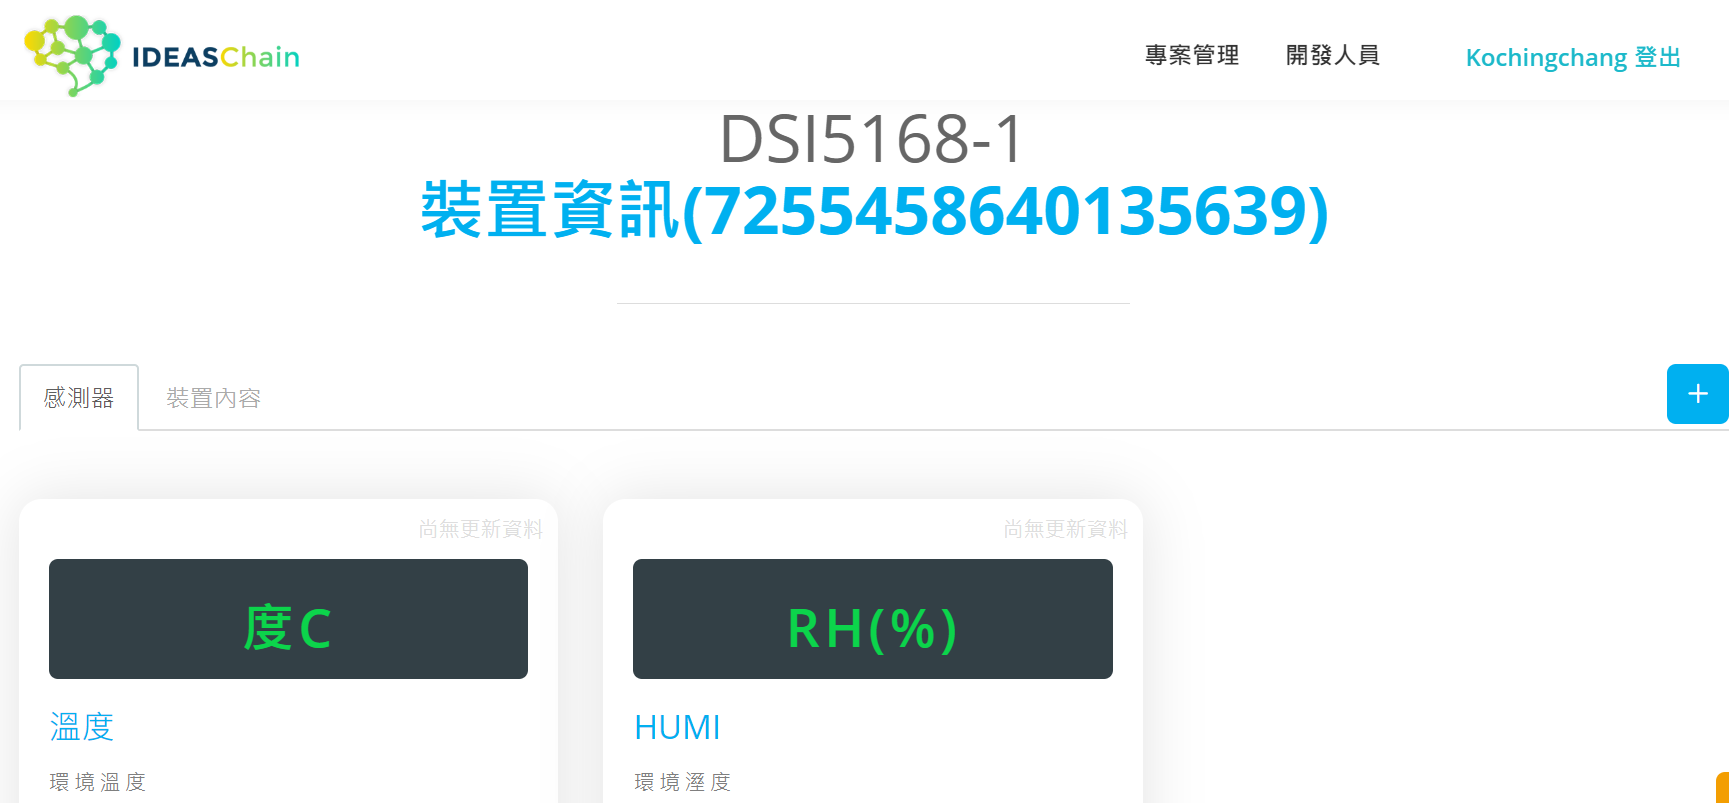
DID = 7255458640135639
SID_1 = TEMP
SID_2 = HUMI
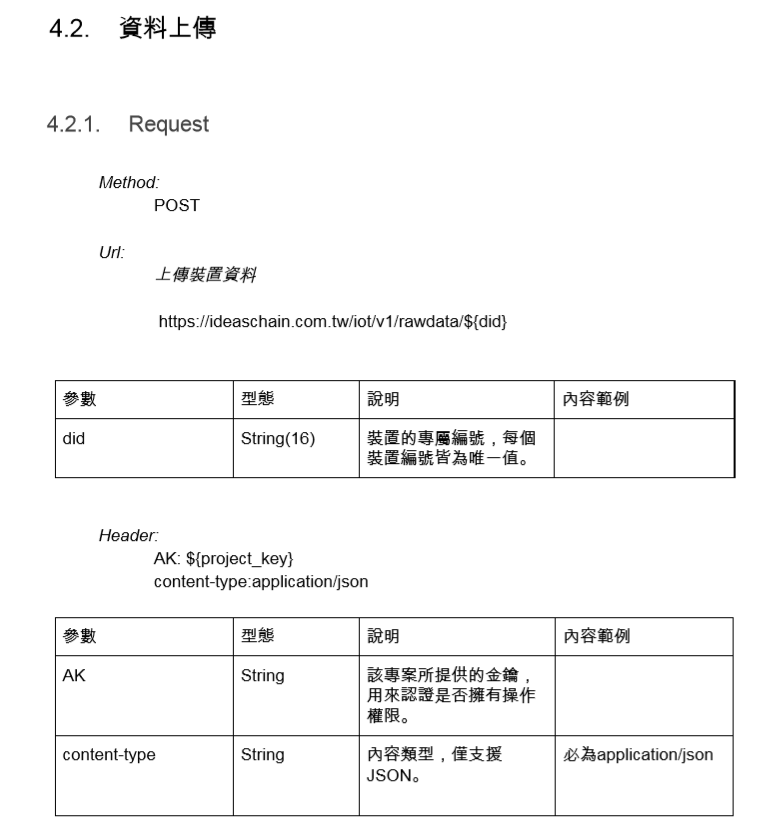
本範例以DSI5168開發板接上最常用到的DHT22溫溼度感測器,再以DSI5168 連線WiFi AP並建立一個WiFi Client 連線Session ,連上IDEAS Chain IoT平台(標準TCP Port 80),每15秒讀取DHT22溫溼度感測器並上傳至平台(參閱平台API文件)。
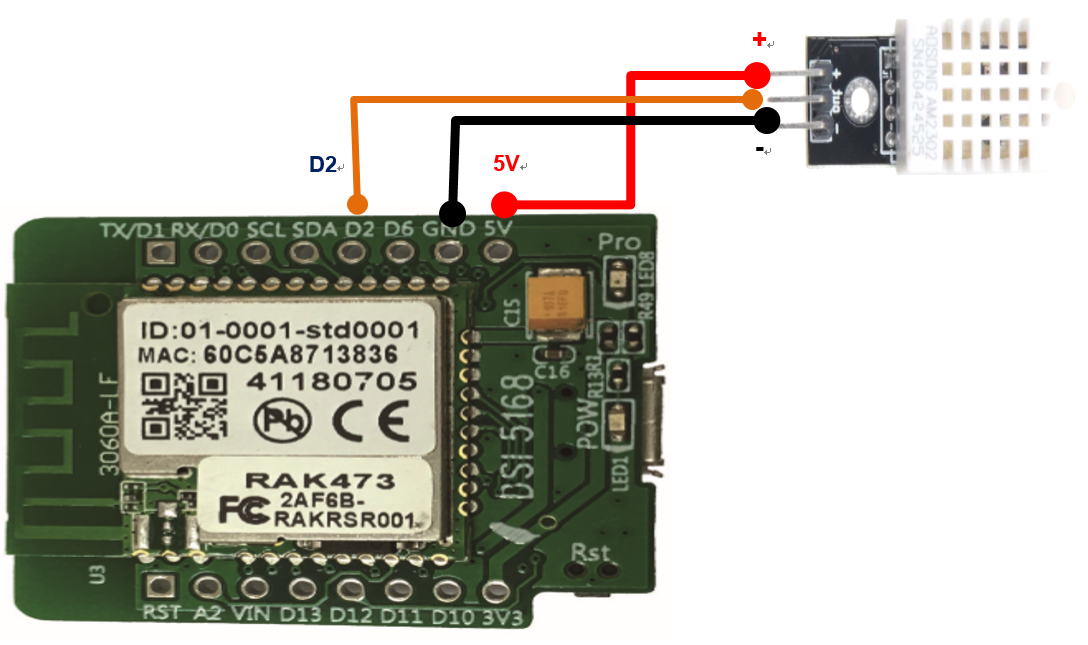
DHT22感測器接線圖(圖片來源:柯清長)
範例程式如下:
#include
#include
#include
#include "sys_api.h"
#include "DHT.h"
#define DHTPIN 2 // what digital pin we're connected to
#define DHTTYPE DHT22 // DHT 11
DHT dht(DHTPIN, DHTTYPE);
char ssid[] = "KCC-VPN-AP"; // your network SSID (name)
char pass[] = "22917532"; // your network password (use for WPA, or use as key for WEP)
/*
*IDEASCHAIN_AK: ideasChain project key.
*IDEASCHAIN_DID: ideasChain device id.
*IDEASCHAIN_SID: ideasChain sensor id.
*/
const String AK = "cJfV9BJID87ldXZk";
const String DID = "7255458640135639";
const String SID_1 = "TEMP";
const String SID_2 = "HUMI";
int status = WL_IDLE_STATUS;
WiFiClient client;
#define LED 13
int count = 1;
void setup()
{
Serial.begin(9600);
Serial.println("START");
dht.begin();
pinMode(LED, OUTPUT);
digitalWrite(LED, LOW);
check_wifi();
Serial.println("Connected to wifi");
}
void loop()
{
// put your main code here, to run repeatedly:
float h = dht.readHumidity();
float t = dht.readTemperature();
Serial.print("Temp:");
Serial.print(t);
Serial.print(" *C");
Serial.println("");
Serial.print("Humi:");
Serial.print(h);
Serial.print(" %");
Serial.println("");
check_wifi();
digitalWrite(LED, HIGH);
post(DID, AK, SID_1, String(t));
delay(3000);
digitalWrite(LED, LOW);
delay(3000);
digitalWrite(LED, HIGH);
post(DID, AK, SID_2, String(h));
delay(3000);
digitalWrite(LED, LOW);
delay(15000);
}
void check_wifi(){ // 檢查wifi連線狀況
while (WiFi.status() != WL_CONNECTED) {
Serial.println("there is no WiFi connected");
// WiFi.begin(ssid, pass); //("SSID", "password")
status = WiFi.begin(ssid, pass);
delay(10*1000);
}
}
void post(String IDEASCHAIN_DID, String IDEASCHAIN_AK, String IDEASCHAIN_SID, String value){ // 資料上傳平台
client.stop();
if (client.connect("ideaschain.com.tw", 80)) {
Serial.println("sending data: "+String(value));
client.print("POST /iot/v1/rawdata/");
client.print(IDEASCHAIN_DID);
client.println(" HTTP/1.1");
client.println("Host: ideaschain.com.tw");
client.print("AK: ");
client.println(IDEASCHAIN_AK);
client.println("Content-Type: application/json"); ;
client.print("Content-Length: ");
client.println(IDEASCHAIN_SID.length()+value.length()+25);
client.println();
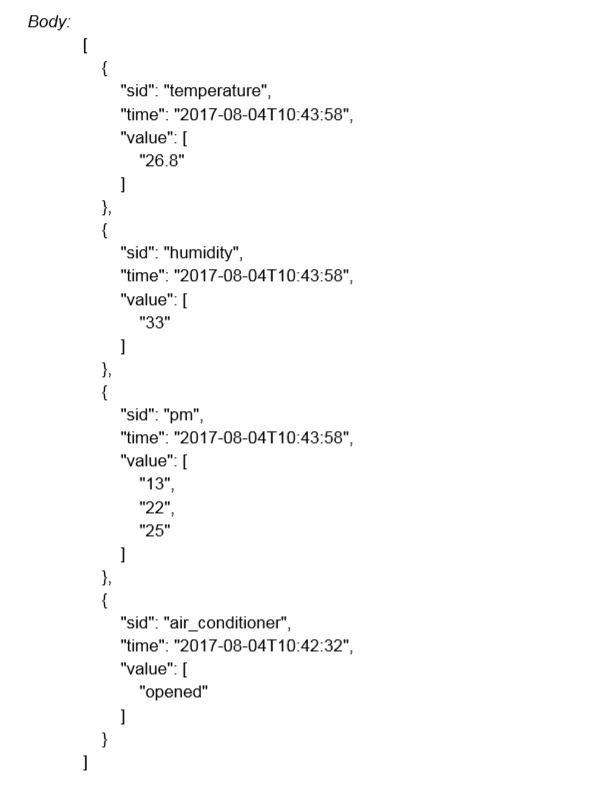
client.print("[{\"sid\":\"");
client.print(IDEASCHAIN_SID);
client.print("\",\"value\":[\"");
client.print(value);
client.println("\"]}]");
} else {
Serial.println();
Serial.println("disconnecting from server.");
}
delay(3000);
Serial.println("send end");
}
序列埠輸出結果如下:
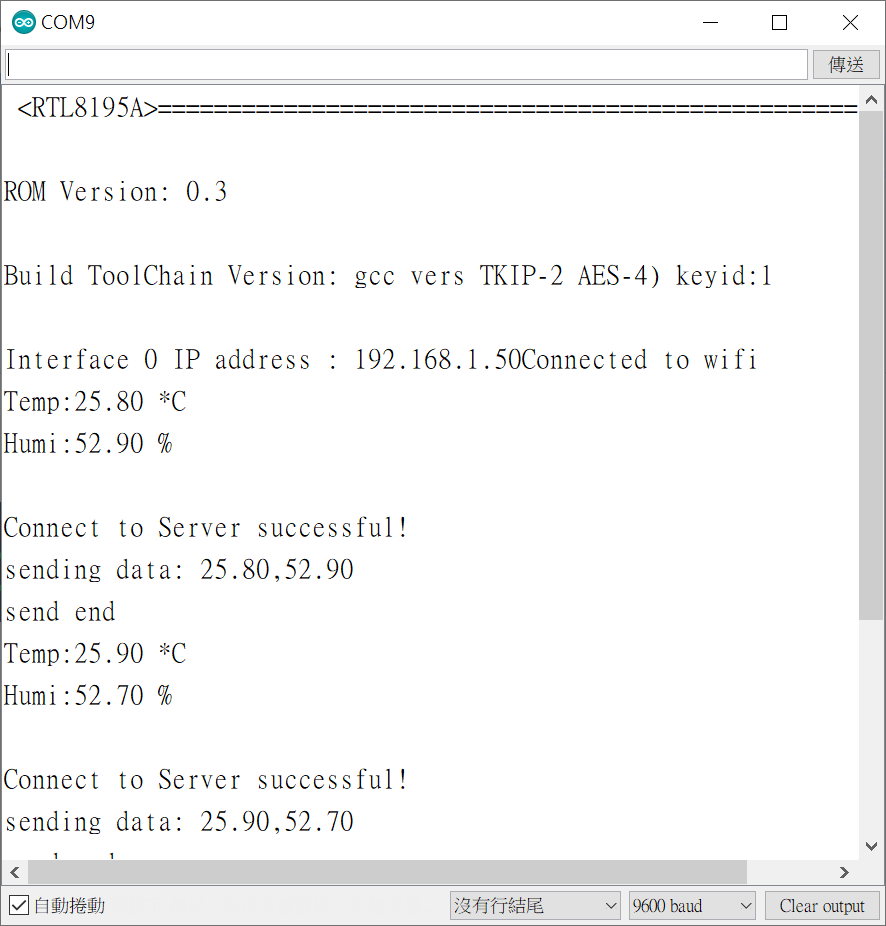
(圖片來源:柯清長)
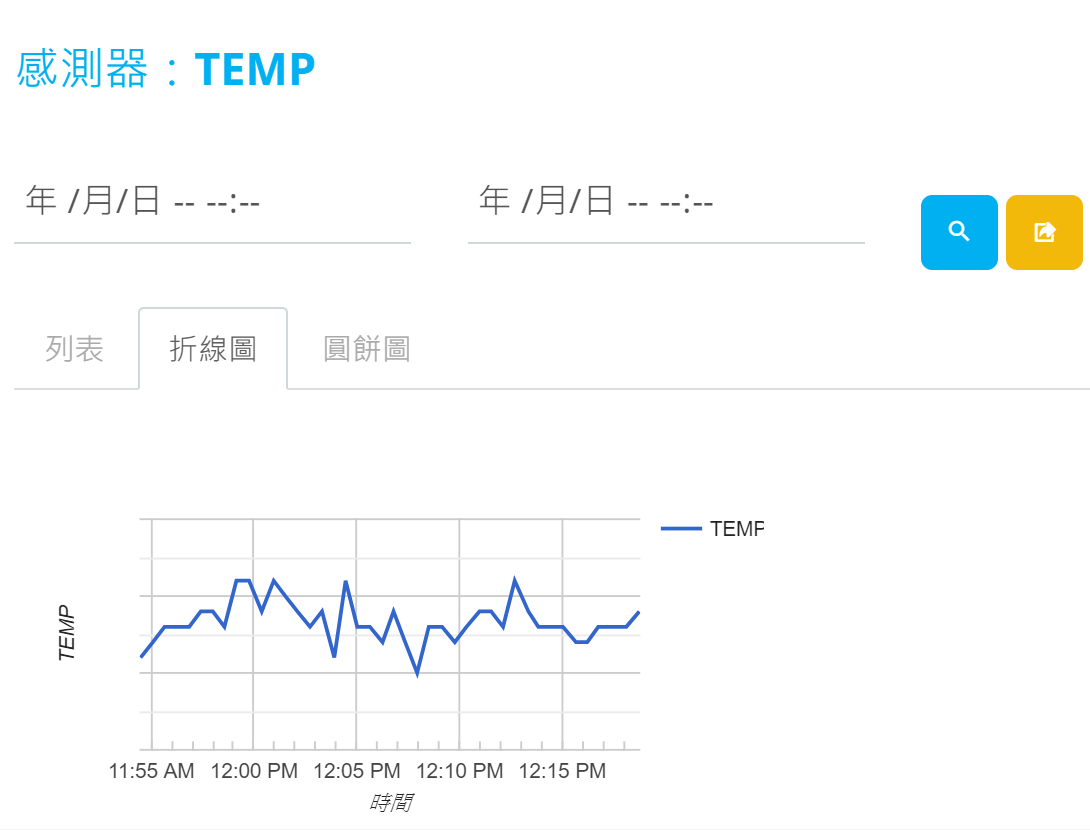
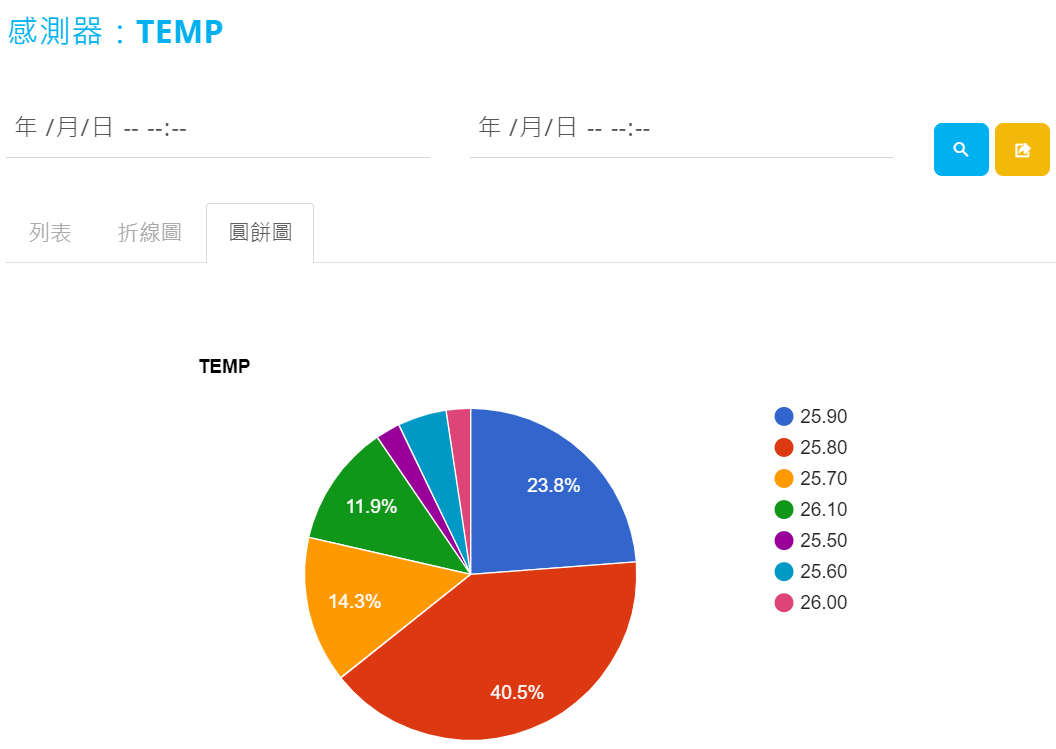
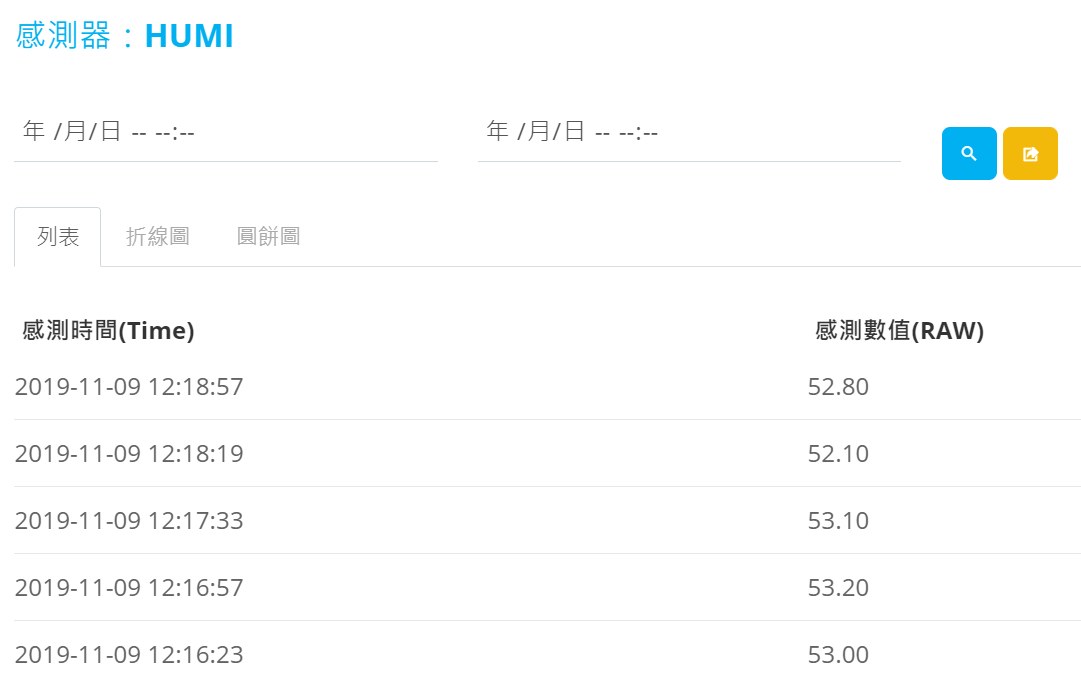
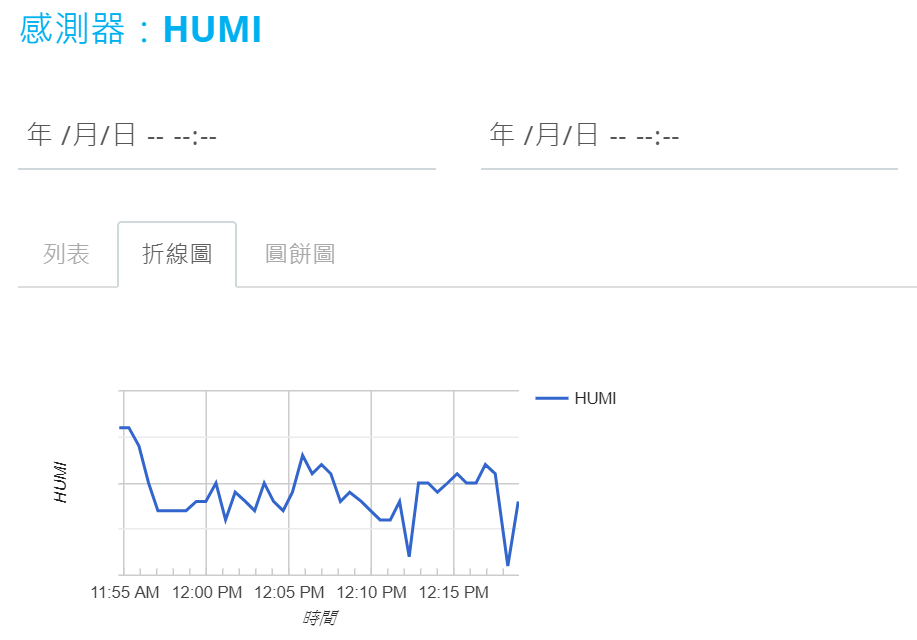
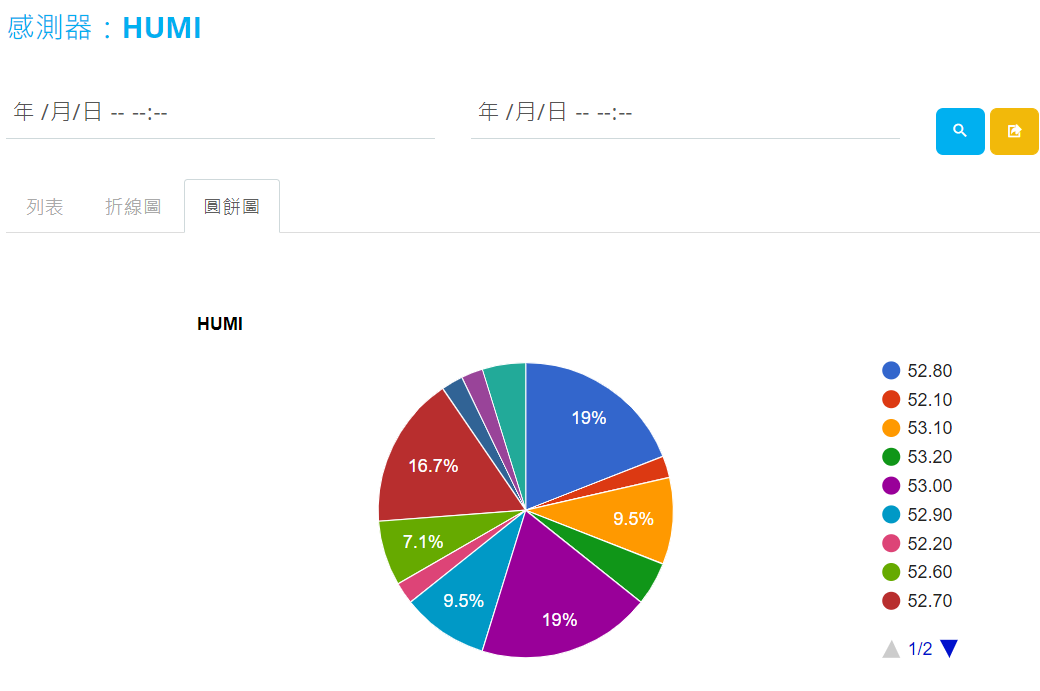
平台接收感測資料結果如下:
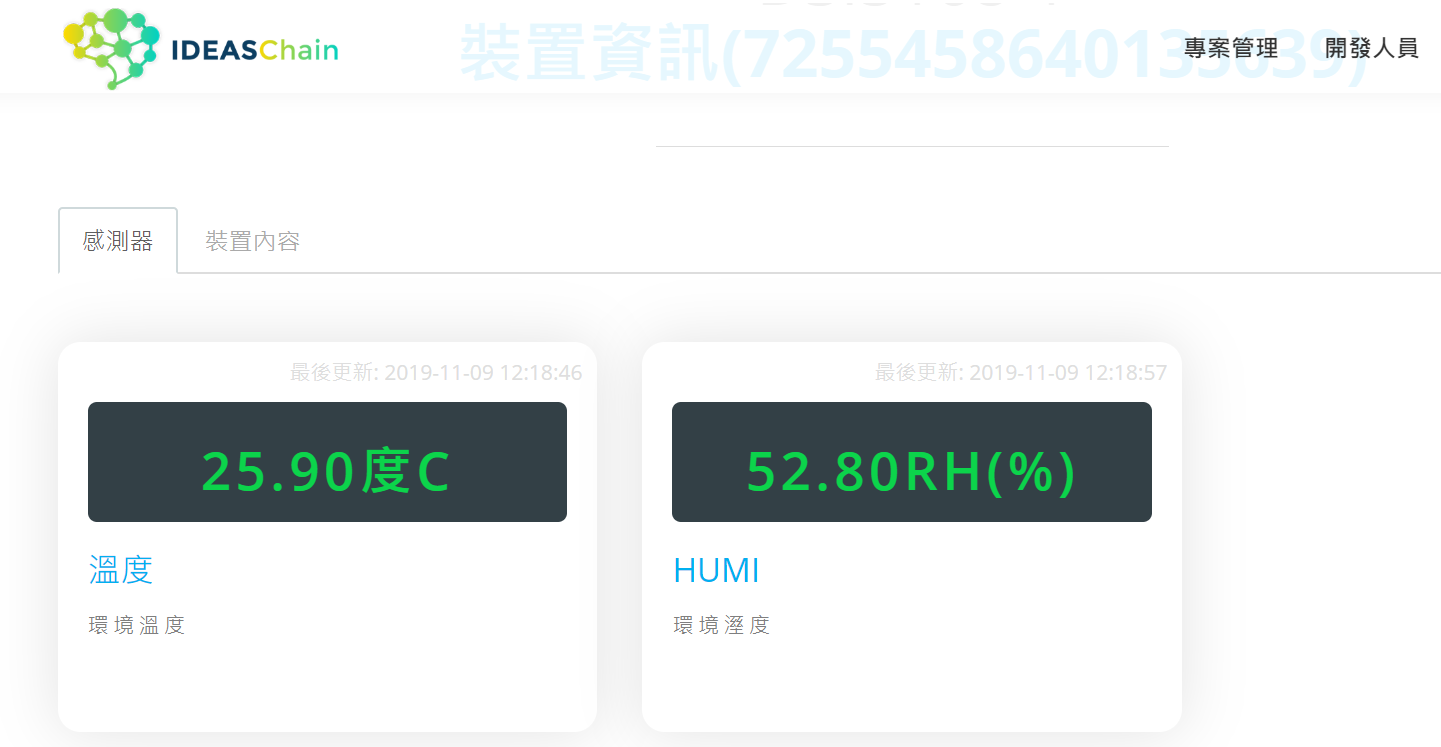
(圖片來源:柯清長)
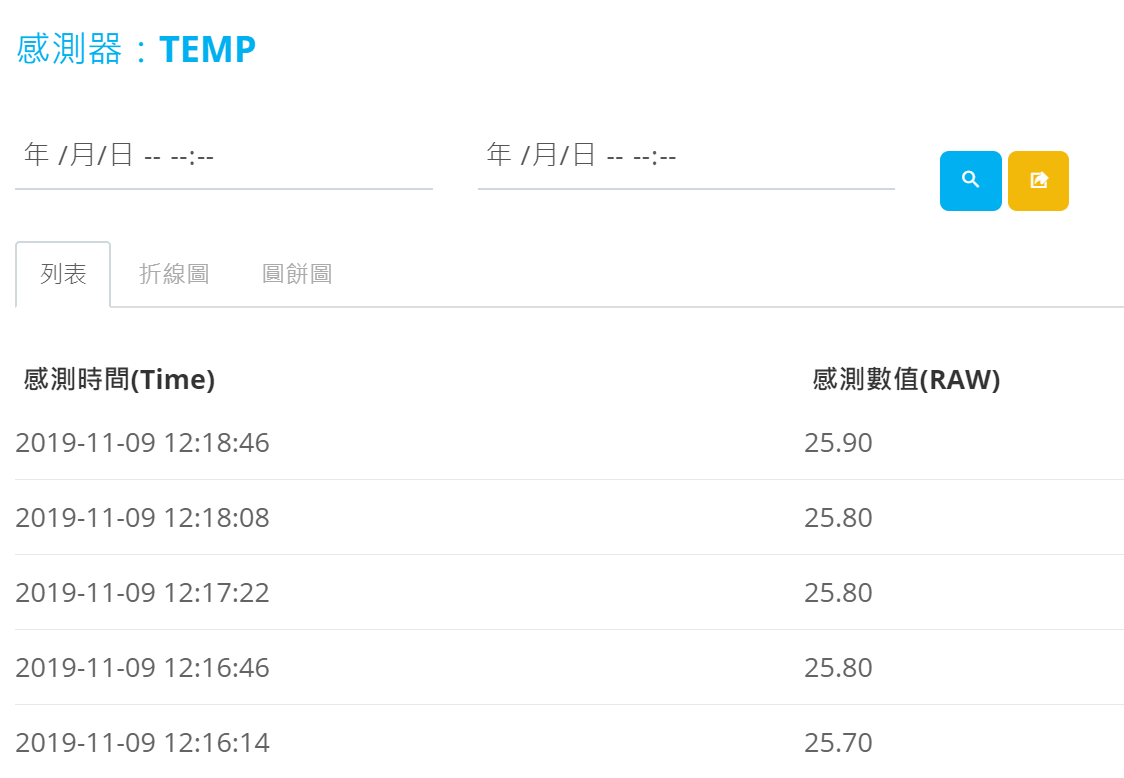
(圖片來源:柯清長)
(圖片來源:柯清長)
(圖片來源:柯清長)
(圖片來源:柯清長)
(圖片來源:柯清長)
(圖片來源:柯清長)
IDEAS Chain POST API 感測值上傳API,其文件介紹如下:
(圖片來源:柯清長)
更多的DSI5168應用範例,可至Realtek Ameba 官網下載各種感測元件及WiFi應用完整的範例。
小結
台灣為全球IC設計重鎮,也是製造量產的大國,擁有IoT創新裝置發展的極佳條件,服創所為了將這些優勢帶給新創團隊,自行研發推出了基於國產IC的DSI5168開發板,同時提供IDEAS Chain開發平台,相當有心,希望本文的介紹讓大家更了解這塊開發板,有機會不妨用它來完成自己的IoT創意專案。
(責任編輯:王姵文)
參考連結
DSI5168 Window USB驅動程式下載連結
https://os.mbed.com/handbook/Windows-serial-configuration
https://os.mbed.com/docs/mbed-os/v5.14/tutorials/windows-serial-driver.html
https://mega.nz/#!FIgTyIIZ!F6wyk7ACxi-v95I-4CH9yRwQ0an2lGMfzl_XY0gX3PA
DSI開發板範例程式連結: http://tinyurl.com/y3zjawep
開發板管理員 URL: https://github.com/Ameba8195/Arduino/raw/master/release/package_realtek.com_ameba_index.json
Ideas Chain平台:
https://www.ideaschain.com.tw/www/iot.html
https://www.ideaschain.com.tw/www/iot.html#developer
Ameba 官網: https://www.amebaiot.com/
MAKERPRO Ameba 應用專題: https://makerpro.cc/category/mainboard/realtek-ameba/
MAKERPRO IDEAS Chain物聯網平台專文介紹: https://makerpro.cc/2019/11/ideas-chain-for-iot-startups/
柯大創客屋情報網 [Ameba 特異功能集]: http://kochingchang.blogspot.com/2018/03/ameba1-1.html
柯大創客屋情報網 [結合Ameba 開發板的LoRa Gateway]: http://kochingchang.blogspot.com/2018/03/loraspi.html
Ameba × Arduino – IoT物聯網實戰應用:
http://www.tiked.com.tw/AB136?fbclid=IwAR24o4ky1F6dfOn05TUOYofqGPz6hZIT0RemOZT83ZA0NISXyjT63PGCCjI

- 【開箱評測】MTDuino IOT開發板: MQTT功能實作介紹 - 2023/06/26
- 【開箱評測】MTDuino IOT開發板:NB-IoT及GPS功能介紹 - 2023/05/07
- 用NB-IoT USB Dongle實現MQTT,加快IoT應用開發 - 2019/12/18
訂閱MakerPRO知識充電報
與40000位開發者一同掌握科技創新的技術資訊!


