作者:柯大
為提供快速開發物聯網各種應用,解決移動型不同應用場域,邁特電子特別推出一款裝置,具有省電、長距離傳輸、低功耗通訊廣域網路,也支援開源開發環境Arduino IDE及Micro Python 的開發板 – MTDuino。
上一期介紹到 MTDuino基本功能,並實作了抓取GPS衛星定位位置,經實際測試不需特別的GPS天線,只用邁特電子出廠所附的小型天線,即可快速定位,冷暖開機定位速度均有不錯的效果,在道路上實際測試也能快速抓到定位經緯度。
本期將再介紹MTDuino的通訊功能,這塊板子採用Quectel BG77模組,除了內建GNSS GPS功能外,也支援LTE Cat M1及LTE Cat NB2二種低功耗物聯網通訊功能。本次實作將以Arduino IDE 撰寫3個實作,分別用MTDuino NBIOT MQTT通訊協定,實作訂閱(Subscribe)/發佈(Publish)/的機制傳訊。
實作前先介紹BG77模組MQTT協定相關AT command,如下:
- AT+QMTCFG:設定MQTT協議運作參數
- AT+QMTOPEN:開啟設定 MQTT裝置端(Client)連接MQTT服務器( Broker)
- AT+QMTCLOSE:關閉MQTT裝置端(Client) 連接MQTT服務器( Broker)
- AT+QMTCONN:將裝置端(Client)連接到 MQTT 服務器
- AT+QMTDISC:斷開裝置端(Client)連接與MQTT服務器的連接
- AT+QMTSUB:訂閱主題(Subscribe)
- AT+QMTUNS:取消訂閱主題(Unsubscribe)
- AT+QMTPUB:發佈訊息(Publish)
- AT+QMTPUBEX:發佈訊息(Publish)
- AT+QMTRECV:從緩衝區中讀取訊息
※以下AT command 說明文件資料來源:Quectec 原廠文件
AT command 範例:
AT+QMTOPEN=?

+QMTOPEN: (0-5),,(0-65535)

OK

AT+QMTOPEN=0,"iot-as-mqtt.cn-shanghai.aliyuncs.com",1883 //Open a network for MQTT client.

OK

+QMTOPEN: 0,0 //Opened the MQTT client network successfully.

AT+QMTOPEN?

+QMTOPEN: 0,"iot-as-mqtt.cn-shanghai.aliyuncs.com",1883

OK

AT+QMTCONN=?

+QMTCONN: (0-5),,,

OK

//Connect a client to MQTT server.

//If AliCloud is connected, AT+QMTCFG="aliauth" can be used to configure the device information in

advance, and there is no need to provide username/password here anymore.

AT+QMTCONN=0,"clientExample"

OK

+QMTCONN: 0,0,0 //Connected the client to MQTT server successfully.

AT+QMTSUB=?

+QMTSUB: (0-5),(1-65535),,(0-2)

OK

//Subscribe to topics.

AT+QMTSUB=0,1,"topic/example",2

OK

+QMTSUB: 0,1,0,2

AT+QMTSUB=0,1,"topic/pub",0

OK

+QMTSUB: 0,1,0,0

//If a client subscribes to a topic and other devices publish the same topic to the server, the module will

report the following information.

+QMTRECV: 0,0,"topic/example","This is the payload related to topic"

//Unsubscribe from topics.

AT+QMTUNS=0,1,"topic/example"

OK

+QMTUNS: 0,2,0


AT+QMTPUB=?

+QMTPUB : (0-5),(0-65535),(0-2),(0,1),,(1-4096)

OK

//Publish messages.

AT+QMTPUB=0,0,0,0,"topic/pub"

>This is test data, hello MQTT. //After receiving >, input data This is test data, hello MQTT. and

then send it. The maximum length of the data is 4096 bytes and the

data that beyond 4096 bytes will be omitted. After inputting data,

tap Ctrl+Z to send.

OK

+QMTPUB: 0,0,0

//If a client subscribes to a topic named "topic/pub" and other devices publish the same topic to the server,

the module will report the following information.

+QMTRECV: 0,0,"topic/pub","This is test data, hello MQTT."

AT+QMTDISC=0 //Disconnect a client from MQTT server.

OK

+QMTDISC: 0,0 //Connection closed successfully


//Start MQTT SSL connection

AT+QMTOPEN=0,"a1zgnxur10j8ux.iot.us-east-1.amazonaws.com",8883

OK

+QMTOPEN: 0,0

//Connect to MQTT server

AT+QMTCONN=0,"MQTT-1"

OK

+QMTCONN: 0,0,0

//Subscribe to topics.

AT+QMTSUB=0,1,"$aws/things/ MQTT-1/shadow/update/accepted",1

OK

+QMTSUB: 0,1,0,1

//Publish messages.

AT+QMTPUB=0,1,1,0,"$aws/things/MQTT-1/shadow/update/accepted"

>This is publish data from client

OK

+QMTPUB: 0,1,0

//If a client subscribes to a topic named “$aws/things/MQTT-1/shadow/update/accepted” and other

devices publish the same topic to the server, the module will report the following information.

+QMTRECV: 0,1,"$aws/things/MQTT-1/shadow/update/accepted","This is publish data from client"

//Disconnect a client from MQTT server.

AT+QMTDISC=0

OK

+QMTDISC: 0,0
AT+QMTCFG
該命令用於配置 MQTT 的可選參數。
AT+QMTOPEN
該命令用於為 MQTT 客戶端打開一個網絡。
範例:
AT+QMTOPEN=0,”gpssensor.ddns.net”,1883
AT+QMTOPEN=1,”mqttgo.io”,1883
AT+QMTCLOSE
該命令用於為 MQTT 客戶端關閉一個網絡。
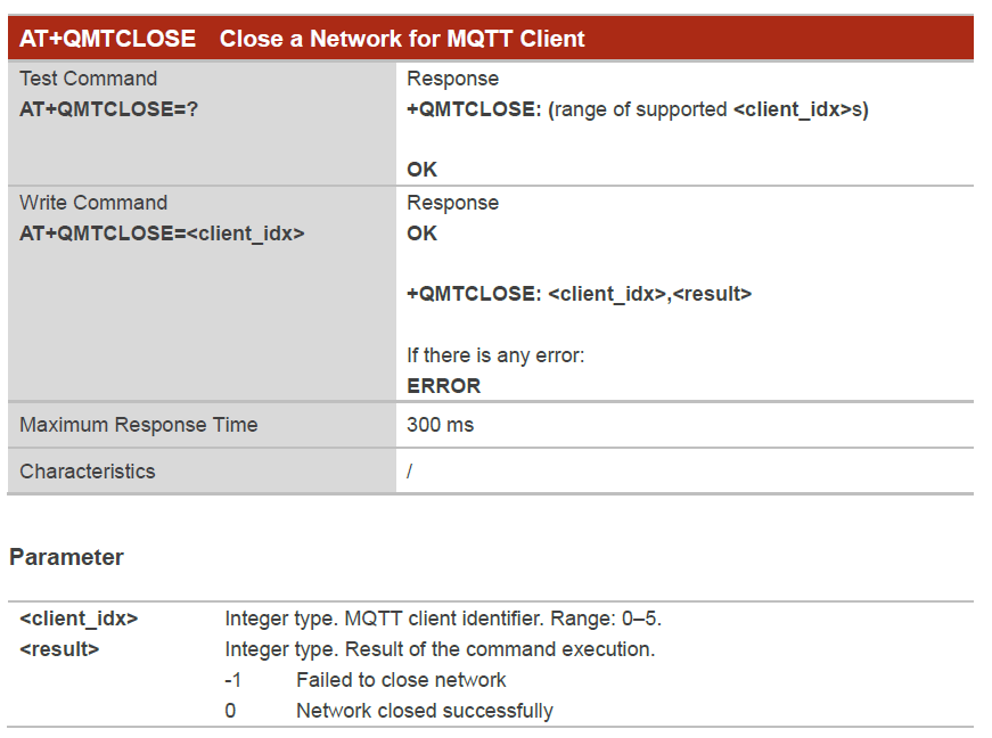
範例:
AT+QMTCLOSE=0
AT+ QMTCLOSE=1
AT+QMTCONN
當客戶端請求連接到 MQTT 伺服器時會使用該命令。 當從客戶端到伺服器建立 TCP/IP 的socket連接時,必須使用 CONNECT flow創建協議級session。
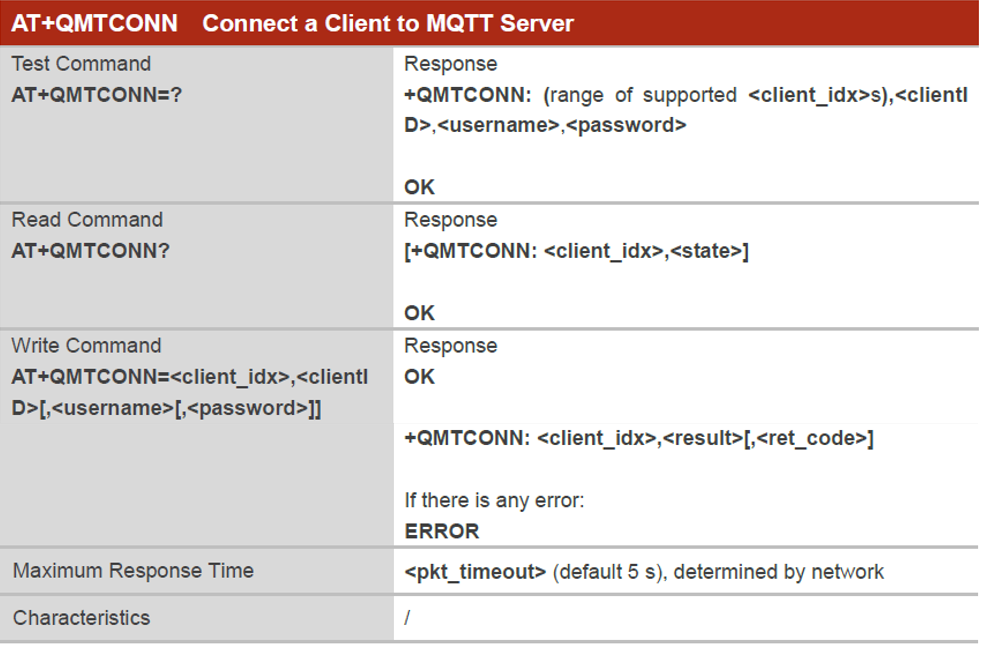
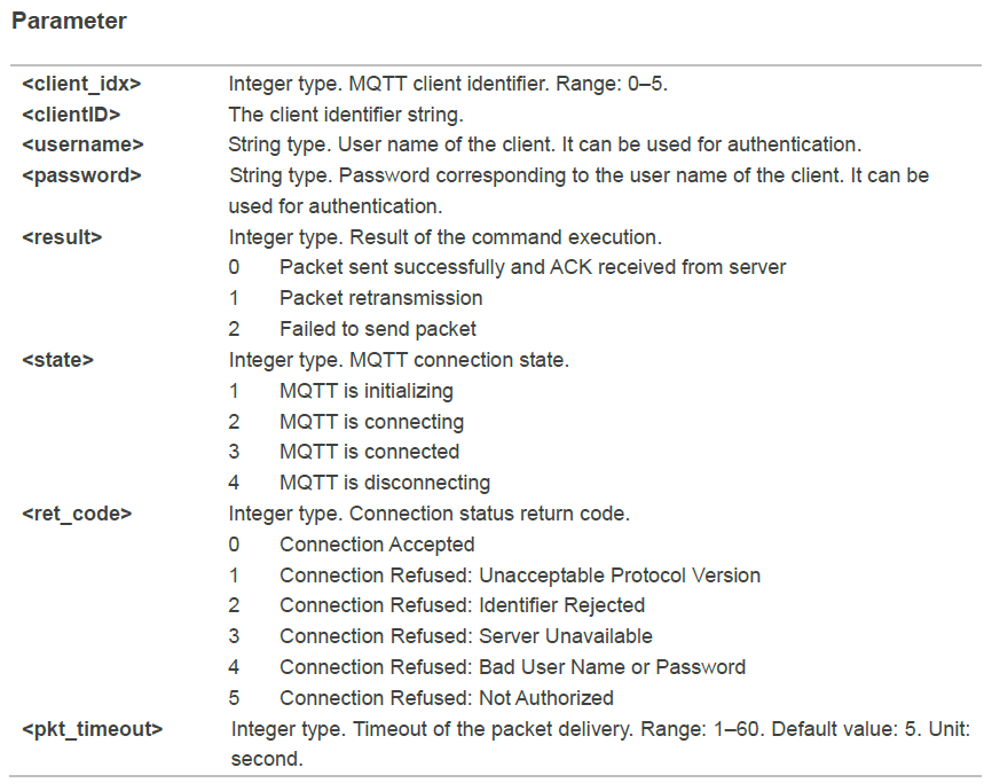
範例:
AT+QMTCONN=0,”BG77Client1″
AT+QMTCONN=1,”BG77Client2″
AT+QMTDISC
當客戶端請求與 MQTT 伺服器斷開連接時使用該命令。 DISCONNECT 訊息會從客戶端發送到伺服器,以指示它即將關閉其 TCP/IP 連接。
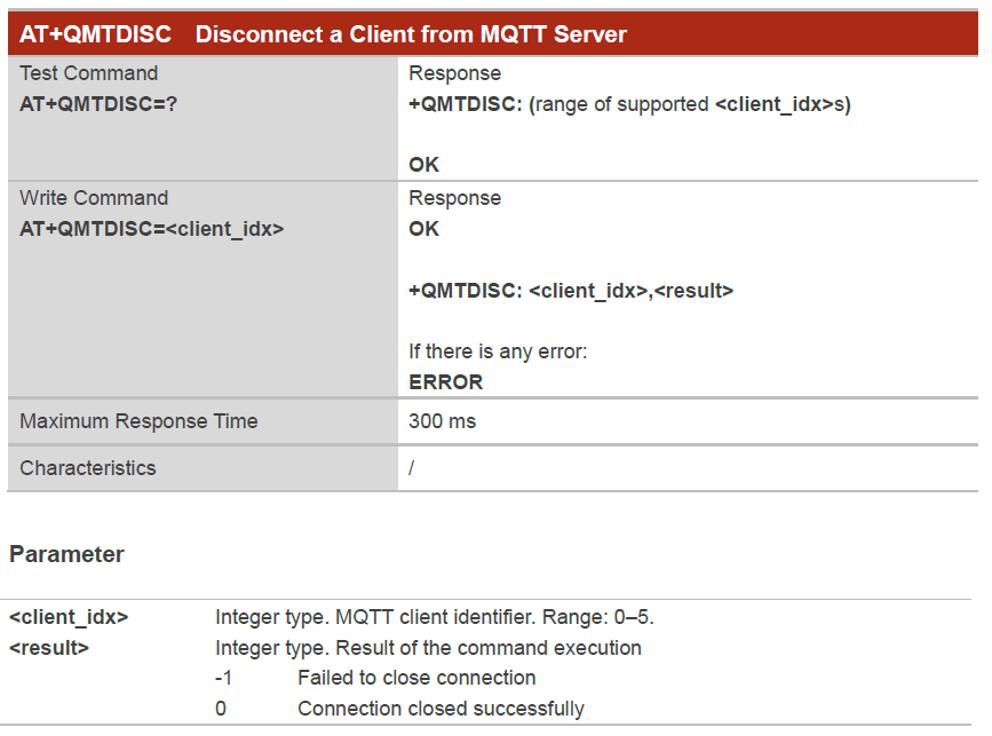
範例:
AT+QMTDISC=0
AT+QMTDISC=1″
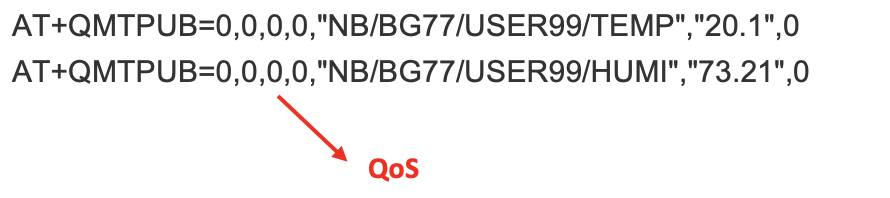
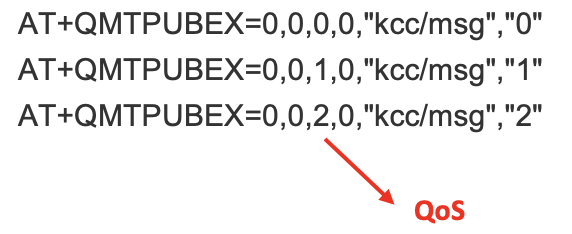
AT+QMTSUB
該命令用於訂閱一個或多個主題。 客戶端發送 SUBSCRIBE 訊息以向伺服器註冊其對一個或多個主題名稱的興趣。 發佈到這些主題的訊息會作為「 PUBLISH 訊息」,從伺服器傳遞到客戶端。
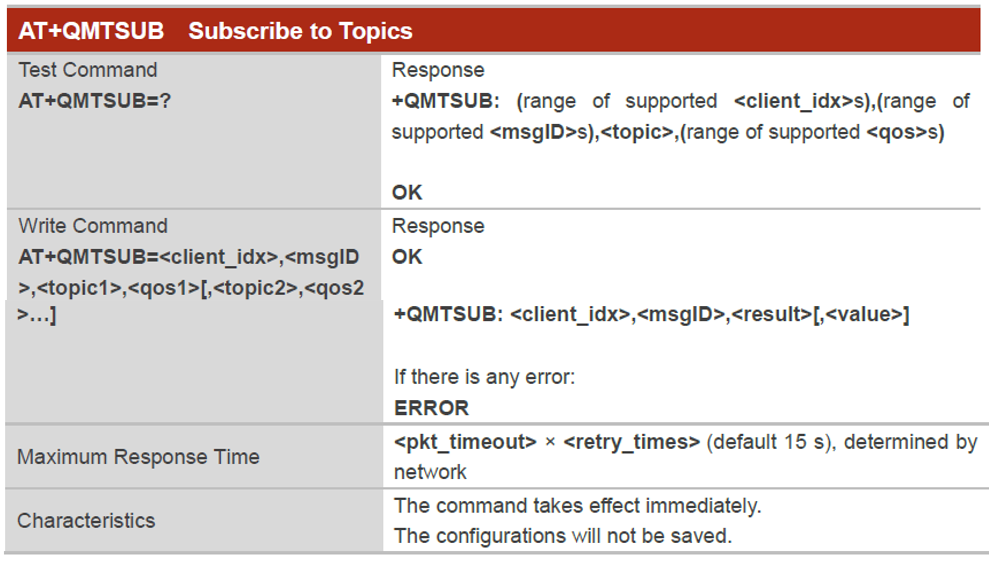
範例:
AT+QMTSUB=0,1,”NB/BG77/USER99/TEMP”,0 (Qos=0)
AT+QMTSUB=0,1,”NB/BG77/USER99/HUMI”,0 (Qos=0)
AT+QMTSUB=0,1,”kcc/msg”,1 (Qos=1)_
AT+QMTSUB=0,1,”kcc/gps”,2 (Qos=2)
AT+QMTUNS
該命令用於取消訂閱一個或多個主題。 客戶端向伺服器發送 UNSUBSCRIBE 訊息以取消訂閱命名主題。
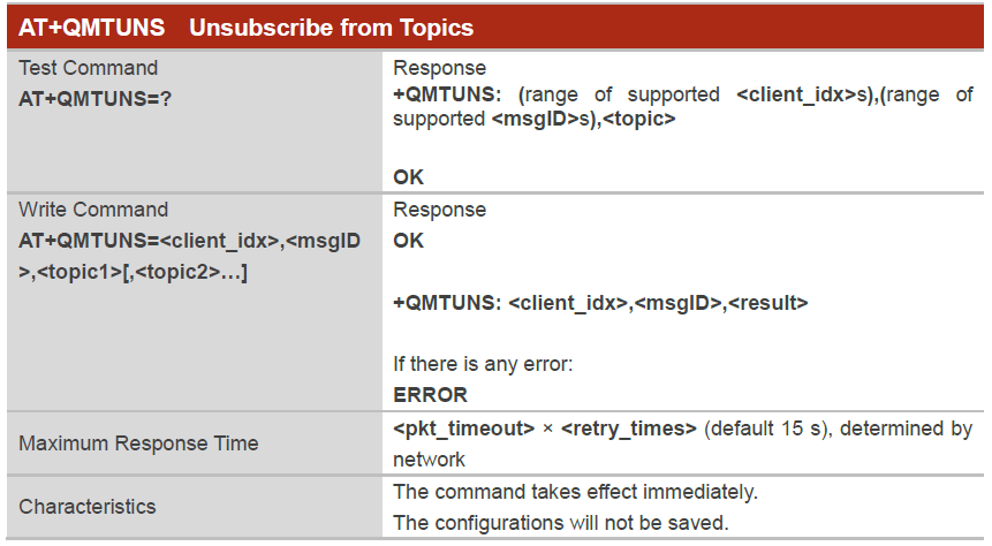
範例:
AT+QMTUNS=0,1,”NB/BG77/USER99/TEMP”
AT+QMTUNS=0,1,”NB/BG77/USER99/HUMI”
AT+QMTPUB
該命令用於由客戶端將消息發佈到伺服器以分發給感興趣的訂閱者。 每個 PUBLISH 訊息都與一個主題名稱相關聯。 如果客戶端訂閱了一個或多個主題,則發佈到這些主題的任何訊息都由伺服器作為 PUBLISH 訊息發送到客戶端。
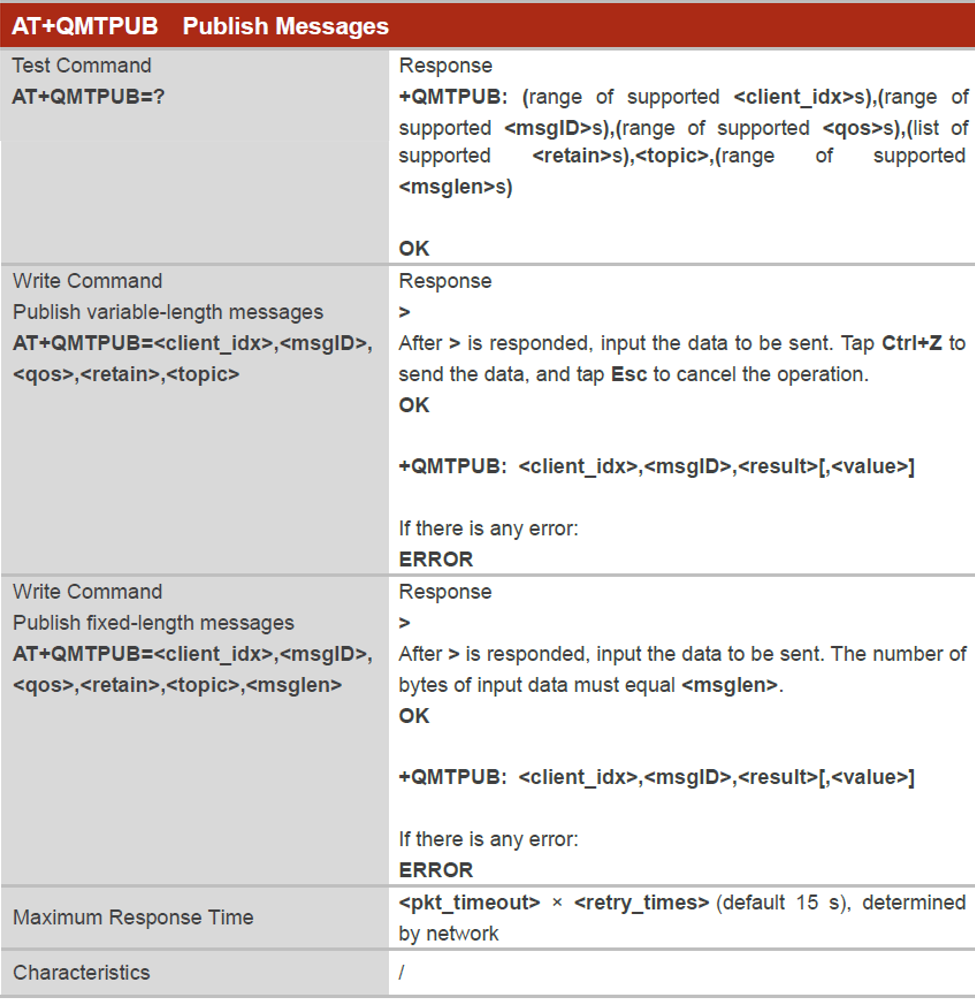
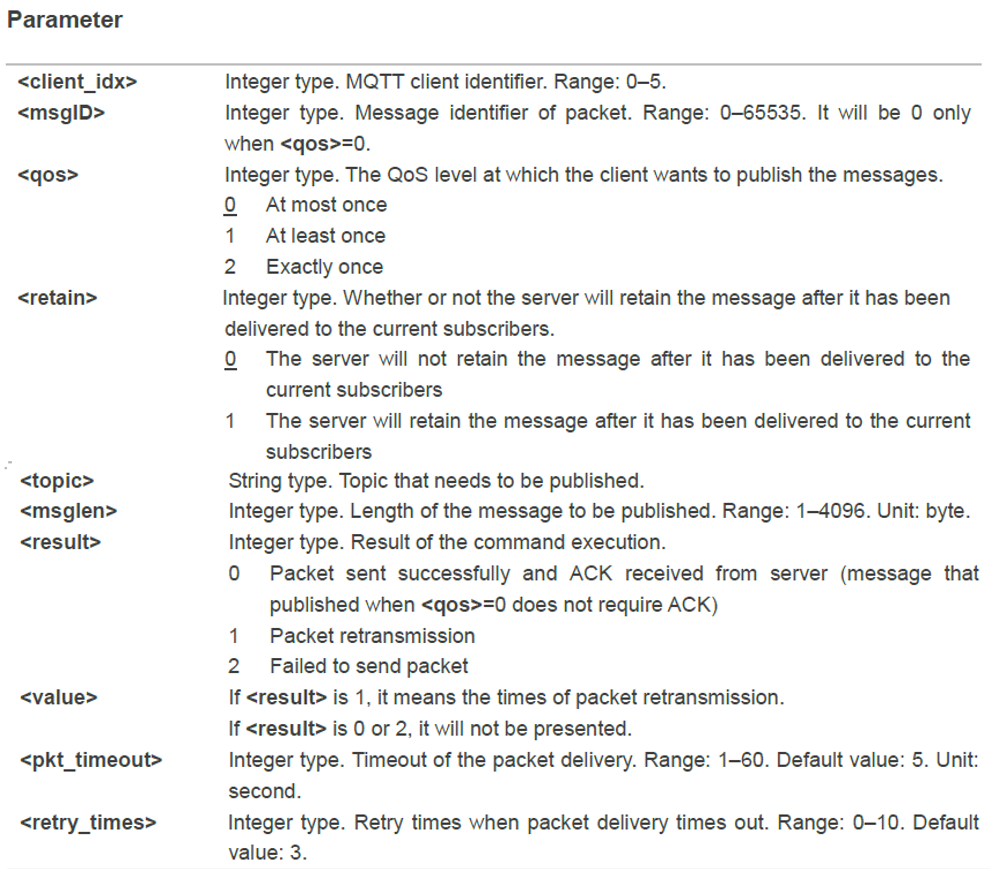
範例:
AT+QMTPUBEX
該命令用於發布消息。它提供與AT+QMTPUB相同的功能,只是格式不同。
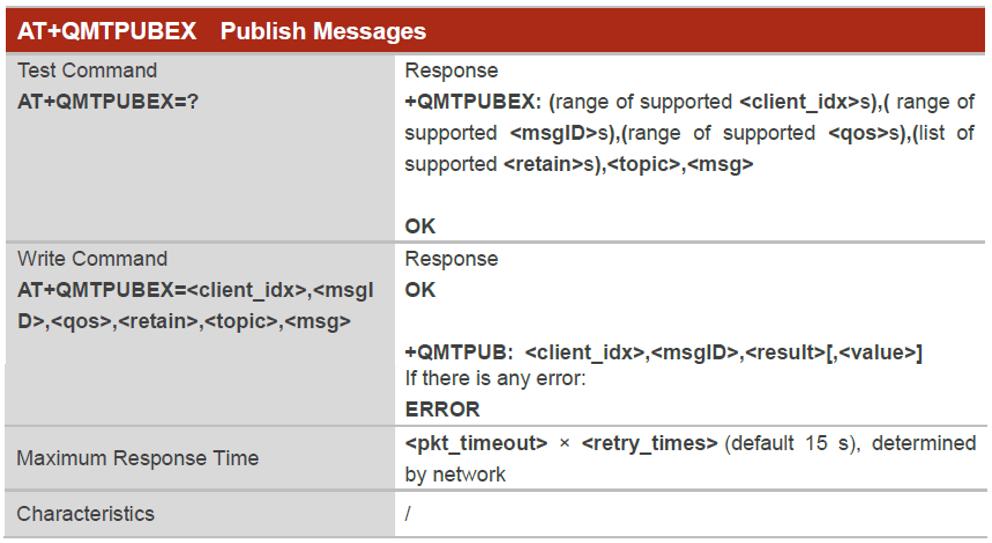
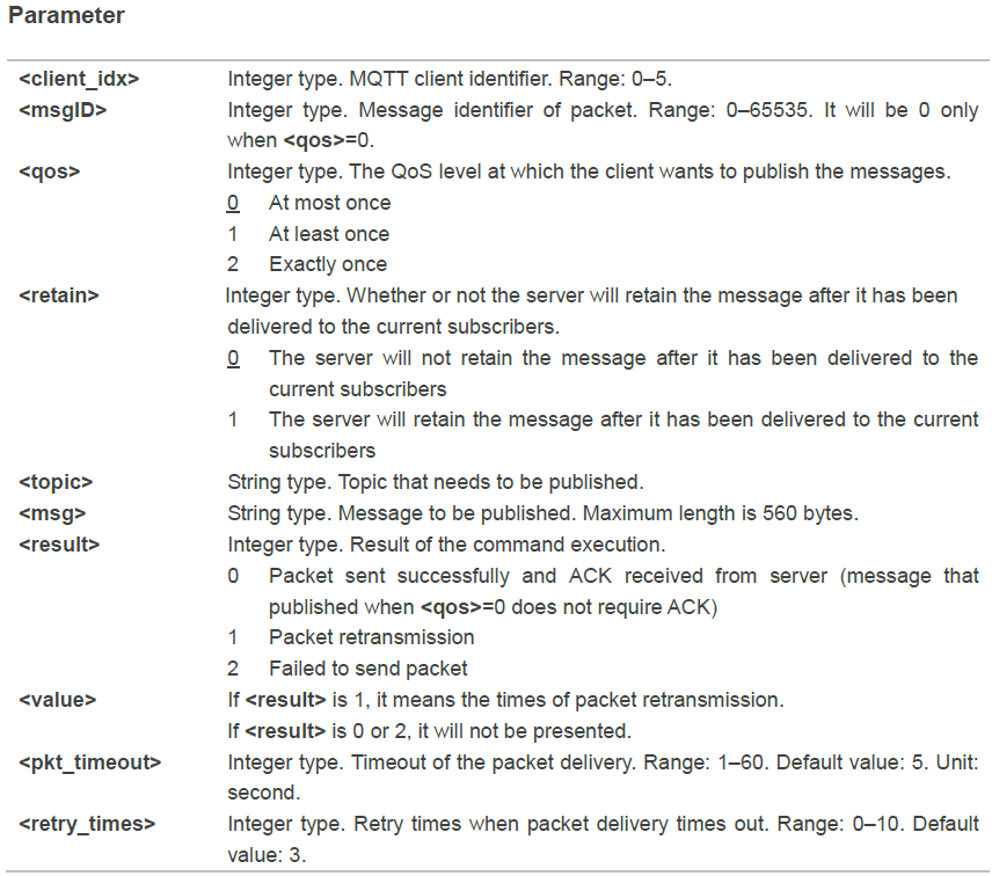
範例:
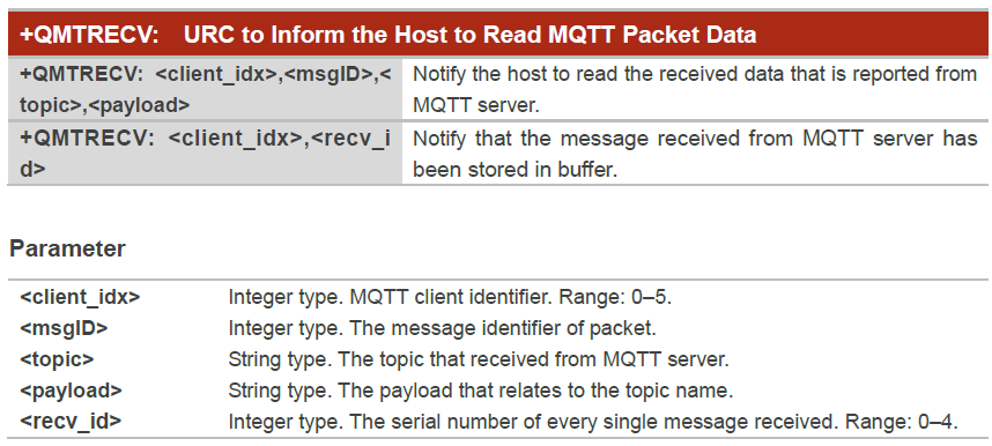
AT+QMTRECV
該命令用於在伺服器上報消息時從存儲消息的存儲緩衝區中讀取消息。
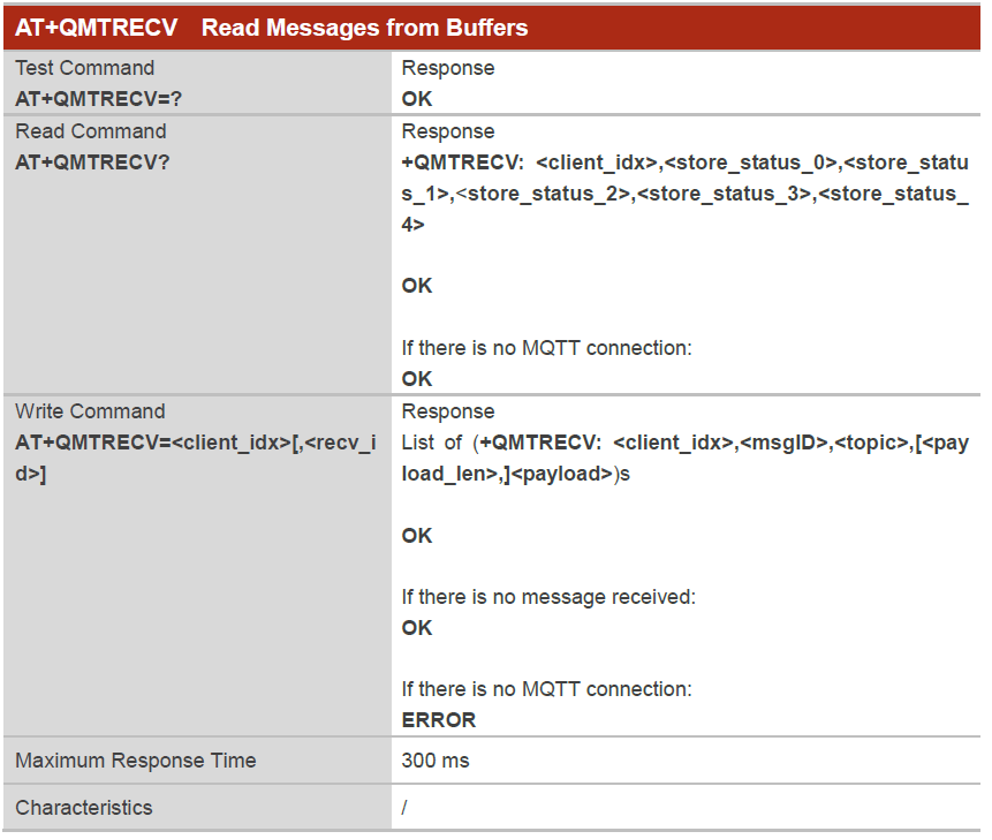
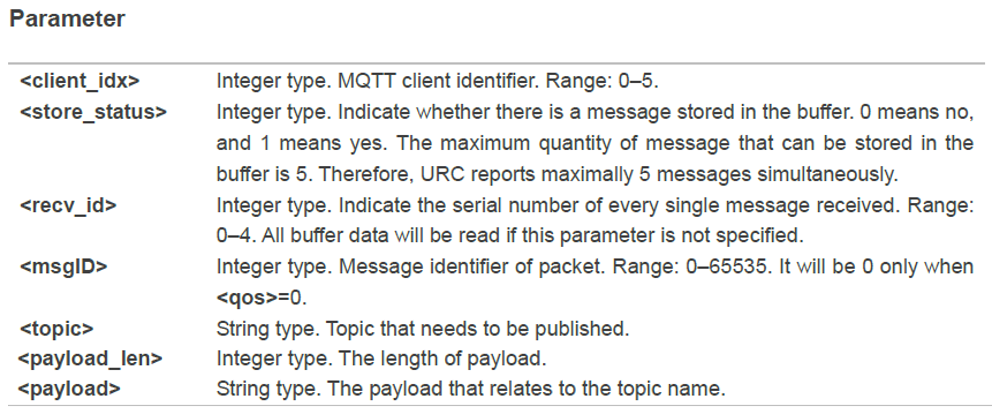 接收到MQTT Broker 訊息格式如下:
實測一、LED燈MQTT訂閱控制
以MTDuino NBIOT MQTT Subscrible功能,訂閱LED控制燈亮及熄滅,並回覆狀態。

訂閱LED 狀態Subscrible Topic:kcc/led,控制LED 燈亮及熄滅(0:熄滅,1: 燈亮)。

發佈狀態訊息 Publish Topic:kcc/msg,訊息(熄滅:OFF,燈亮:ON)。

詳細原始程式碼如下:
//程式開頭

#include

#include "wiring_private.h"

#define BG77_PWRKEY_PA27 26     /*  PWRKEY  */

#define BG77_RSYTKEY_PA08 27    /*  RSTKEY  */

#define BG77_GPS 9    /*  GPS Status  */

#define BG77_LED 9    /*  SUB LED Status  */


#define BG77Serial Serial2  // BG77 對映MTDuino_NBGPS 格板Serial2

#define BG77 Serial2  // BG77 對映MTDuino_NBGPS 格板Serial2


String response = "";

String rr="";


void setup(void) {

  BG77Serial.begin(115200);  // 初始化BG77串口,設定鮑率為115200

  Serial.begin(115200);  // 初始化USB串口,設定鮑率為115200

  delay(100);

  pinMode(BG77_PWRKEY_PA27, OUTPUT);

  pinMode(BG77_GPS, OUTPUT);

  digitalWrite(BG77_PWRKEY_PA27, LOW);

  delay(1000);

  digitalWrite(BG77_PWRKEY_PA27, HIGH);

  delay(2000);

  digitalWrite(BG77_PWRKEY_PA27, LOW);

  delay(10000);

  Serial.println("BG77模塊已啟動.");

  BG77Serial.println("ATE0");

  sendATcommand("AT+QGPSCFG="priority",1","OK",2000);   // NBIOT

  delay(5000);

  rr=sendATcommand("AT+QMTOPEN=0,"mqttgo.io",1883","+QMTOPEN: 0,0",10000);

  Serial.print("1-OPEN:");

  Serial.println(rr);

  rr=sendATcommand("AT+QMTCONN=0,"Client1"","+QMTCONN: 0,0,0",10000);

  Serial.print("2-CONNECT:");

  Serial.println(rr);

  rr=sendATcommand("AT+QMTSUB=0,1,"kcc/led",0","+QMTSUB: 0,1,0,0",10000);

  Serial.print("3-Subscribe:");

  Serial.println(rr);


   Serial.println("MQTT Ready");

      String msg="AT+QMTPUBEX=0,0,0,0,";

      msg = msg + ""kcc/led"" ;

      String payload="0";

      msg = msg + "," + """+payload + """;

      Serial.print("Publish:");

      Serial.println(msg);

      // MQTT publish LED status

      rr=sendATcommand(msg,"+QMTPUB: 0,0,0",20000);


      msg="AT+QMTPUBEX=0,0,0,0,";

      msg = msg + ""kcc/msg"" ;

      payload="OFF";

      msg = msg + "," + """+payload + """;

      Serial.print("Publish:");

      Serial.println(msg);

      // MQTT publish msg

      rr=sendATcommand(msg,"+QMTPUB: 0,0,0",20000);

      rr=sendATcommand("AT+QMTSUB=0,1,"kcc/led",0","+QMTSUB: 0,1,0,0",10000);

      Serial.print("3-Subscribe LED status:");

      Serial.println(rr);

      Serial.println("系統初始備妥.");

      Serial.println();

     for(int i=1;i<5;i++) { digitalWrite(BG77_LED, HIGH); delay(100); digitalWrite(BG77_LED, LOW); delay(100); } } void loop(void) { // MQTT Subscrible receive while (BG77Serial.available() == 0) {} //wait for data available String teststr = BG77Serial.readString(); //read until timeout teststr.trim(); // remove any \r \n whitespace at the end of the String if (teststr.indexOf("+QMTRECV: 0,0,") != -1) { Serial.print("Receive:"); Serial.println(teststr); String getmsg = teststr.substring(teststr.indexOf("+QMTRECV: 0,0,"kcc/led",")+25,26); Serial.print("LED status:"); Serial.println(getmsg); if (getmsg == "1"){ digitalWrite(BG77_LED, HIGH); String msg="AT+QMTPUBEX=0,0,0,0,"; msg = msg + ""kcc/msg"" ; String payload="ON"; msg = msg + "," + """+payload + """; Serial.print("msg:"); Serial.println(msg); // MQTT publish rr=sendATcommand(msg,"+QMTPUB: 0,0,0",20000); } else { digitalWrite(BG77_LED, LOW); String msg="AT+QMTPUBEX=0,0,0,0,"; msg = msg + ""kcc/msg"" ; String payload="OFF"; msg = msg + "," + """+payload + """; Serial.print("Publish:"); Serial.println(msg); // MQTT publish rr=sendATcommand(msg,"+QMTPUB: 0,0,0",20000); } } else { //Serial.println("Something else"); } } String sendATcommand(String command, String expectedResponse, long timeout) { BG77Serial.flush(); String response = ""; BG77Serial.println(command); // 發送AT指令 long int time = millis(); while ((time + timeout) > millis()) {

     while (BG77Serial.available() == 0) {}     //wait for data available

     String response = BG77Serial.readString();  //read until timeout

     response.trim();   // remove any \r \n whitespace at the end of the String

     if (response.indexOf(expectedResponse) != -1) {

       return response;

     }

   }

}
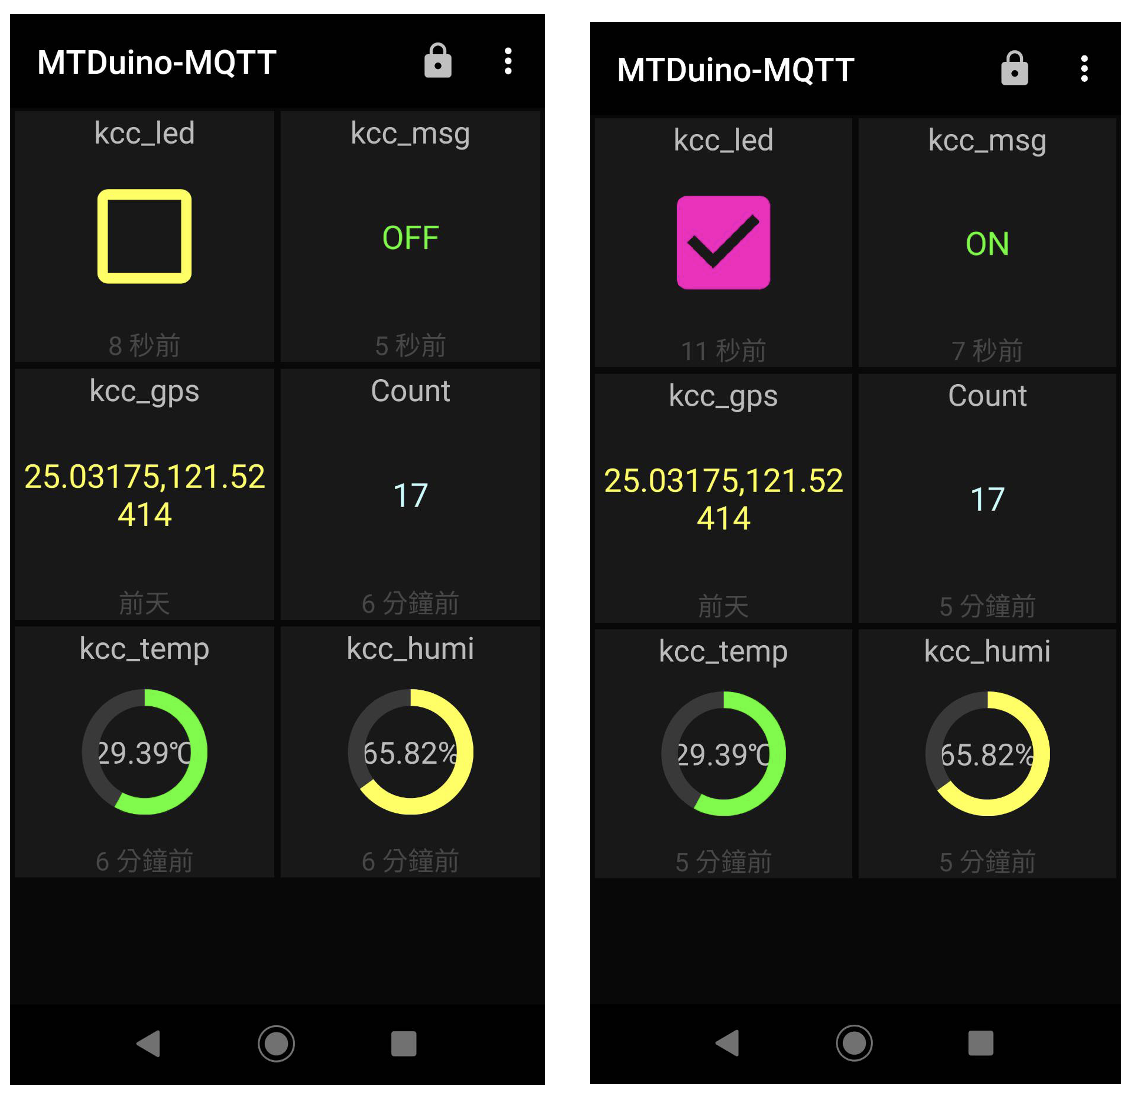
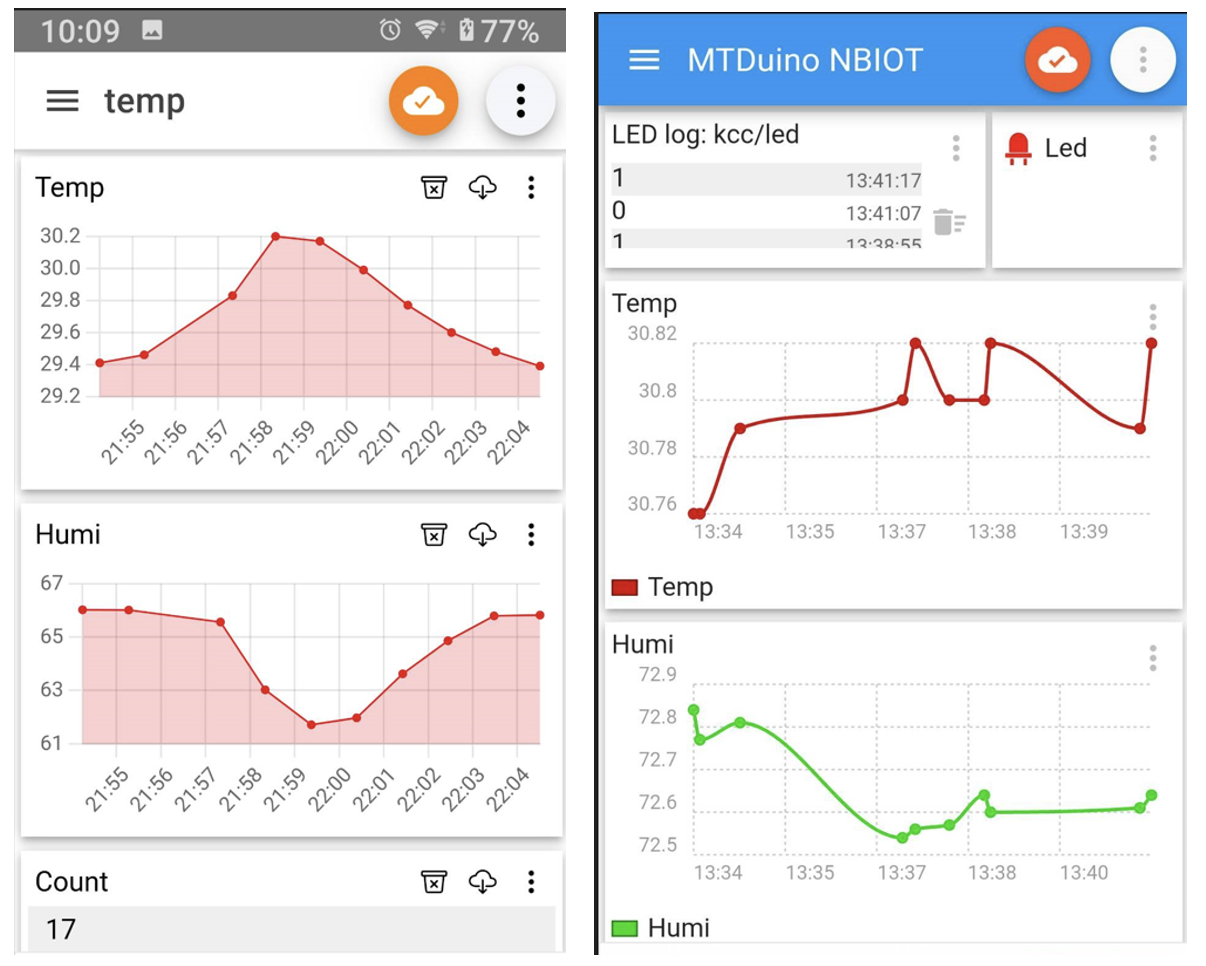
接著利用MQTT Dash APP 訂閱及發佈LED狀態,請先安裝MQTT Dash Android版APP。

下方右圖為訂閱及發佈LED狀態。
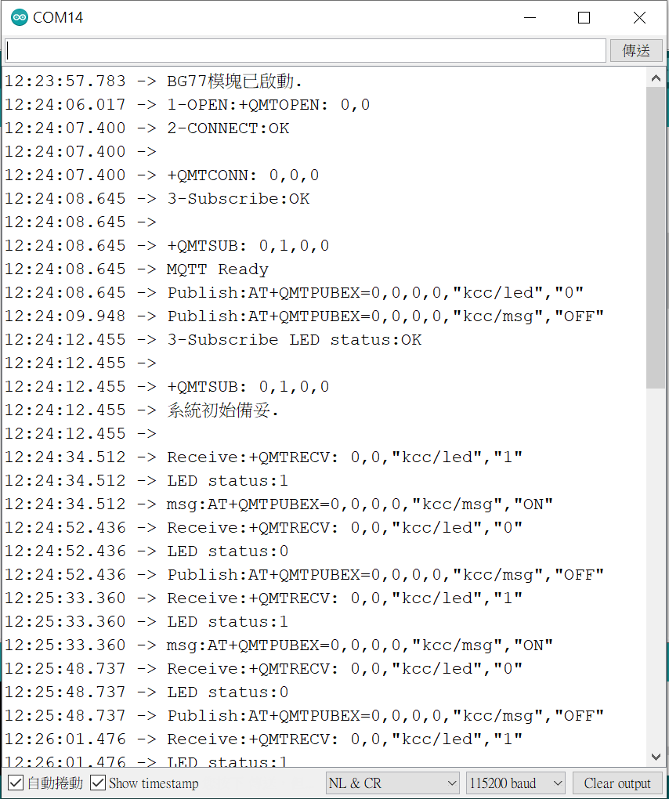
執行結果:以序列埠視窗查看執行情形如下。
實測二、每分鐘以MQTT發佈裝置溫溼度資訊
以MTDuino NBIOT MQTT Publish功能,發佈溫溼度資訊。

發佈狀態訊息 Publish Topic:kcc/temp 溫度。

發佈狀態訊息 Publish Topic:kcc/humi 溼度。

詳細原始程式碼如下:
#include

#include "wiring_private.h"

#include

#include "Adafruit_SHT31.h"

Adafruit_SHT31 sht31 = Adafruit_SHT31();


#define BG77_PWRKEY_PA27 26     /*  PWRKEY  */

#define BG77_RSYTKEY_PA08 27    /*  RSTKEY  */

#define BG77_BG77 9    /*  BG77 Status  */

#define BG77_GPS 9    /*  GPS Status  */

#define BG77_LED 9    /*  SUB LED Status  */

#define buzzerPin 8


#define BG77Serial Serial2  // BG77 對映MTDuino_NBGPS 格板Serial2

#define BG77 Serial2  // BG77 對映MTDuino_NBGPS 格板Serial2


String msg;

String payload;

String getmsg;

String teststr;

String rr="";

long count=0;


void setup(void) {

  BG77Serial.begin(115200);  // 初始化BG77串口,設定鮑率為115200

  Serial.begin(11500);  // 初始化USB串口,設定鮑率為115200

  delay(100);

  pinMode(BG77_PWRKEY_PA27, OUTPUT);

  pinMode(BG77_BG77, OUTPUT);

  digitalWrite(BG77_PWRKEY_PA27, LOW);

  delay(1000);

  digitalWrite(BG77_PWRKEY_PA27, HIGH);

  delay(5000);

  digitalWrite(BG77_PWRKEY_PA27, LOW);

  delay(1000);

  Serial.println("BG77模塊已啟動.");


  if (! sht31.begin(0x44)) {   // Set to 0x45 for alternate i2c addr

    Serial.println("Couldn't find SHT31");

  }


   //BG77Serial.println("ATE0");

   //sendATcommand("AT+QGPSCFG="priority",1","OK",2000);   // NBIOT

   delay(20000);


    rr=sendATcommand("AT+QMTOPEN=0,"mqttgo.io",1883","+QMTOPEN: 0,0",50000);

    Serial.print("1-OPEN:");

    Serial.println(rr);

    rr=sendATcommand("AT+QMTCONN=0,"Client1"","+QMTCONN: 0,0,0",50000);

    Serial.print("2-CONNECT:");

    Serial.println(rr);


    Serial.println("MQTT Ready");

    msg="AT+QMTPUBEX=0,0,0,0,";

    msg = msg + ""kcc/count"" ;

    payload="Ready";

    msg = msg + "," + """+payload + """;

    Serial.print("3.Publish:");

    Serial.println(msg);

    // MQTT publish count status

    rr=sendATcommand(msg,"+QMTPUB: 0,0,0",30000);

    Serial.println(rr);


    Serial.println("系統初始備妥.");

    Serial.println();

    for(int i=1;i<5;i++) { digitalWrite(BG77_BG77, HIGH); delay(100); digitalWrite(BG77_BG77, LOW); delay(100); } tone(buzzerPin, 1000); delay(200); noTone(buzzerPin); delay(100); } void loop(void) { //Serialclear(); count+=1; Serial.println("MQTT Loop"); float t = sht31.readTemperature(); float h = sht31.readHumidity(); Serial.print("Temp:"); Serial.print(t); Serial.print(","); Serial.print("Humi:"); Serial.print(h); Serial.println(); //每分鐘回報 MTDuino IoT 裝置,以NBIOT MQTT 功能回報溫溼度值 msg="AT+QMTPUBEX=0,0,0,0,"; msg = msg + ""kcc/count"" ; payload=String(count); msg = msg + "," + """+payload + """; Serial.print("3.Publish:"); Serial.println(msg); // MQTT publish count status rr=sendATcommand(msg,"+QMTPUB: 0,0,0",20000); Serial.println(rr); // Publish Tempture msg="AT+QMTPUBEX=0,0,0,0,"; msg = msg + ""kcc/temp"" ; payload=String(t,2); msg = msg + "," + """+payload + """; Serial.print("Publish:"); Serial.println(msg); // MQTT publish rr=sendATcommand(msg,"+QMTPUB: 0,0,0",20000); Serial.println(rr); // Publish Humi msg="AT+QMTPUBEX=0,0,0,0,"; msg = msg + ""kcc/humi"" ; payload=String(h,2); msg = msg + "," + """+payload + """; Serial.print("Publish:"); Serial.println(msg); // MQTT publish Huminity rr=sendATcommand(msg,"+QMTPUB: 0,0,0",20000); Serial.println(rr); tone(buzzerPin, 1000); delay(200); noTone(buzzerPin); delay(100); delay(60000); } String sendATcommand(String command, String expectedResponse, long timeout) { BG77Serial.flush(); String response = ""; BG77Serial.println(command); // 發送AT指令 long int time = millis(); while ((time + timeout) > millis()) {

    while (BG77Serial.available()) {

      //delay(1);

      char c = BG77Serial.read();

      //Serial.print(c);

      response += c;

      if (response.indexOf(expectedResponse) != -1) {

        return response;

      }


    }

  }

}


void Serialclear() {

    while(BG77Serial.available()){BG77Serial.read();}

}
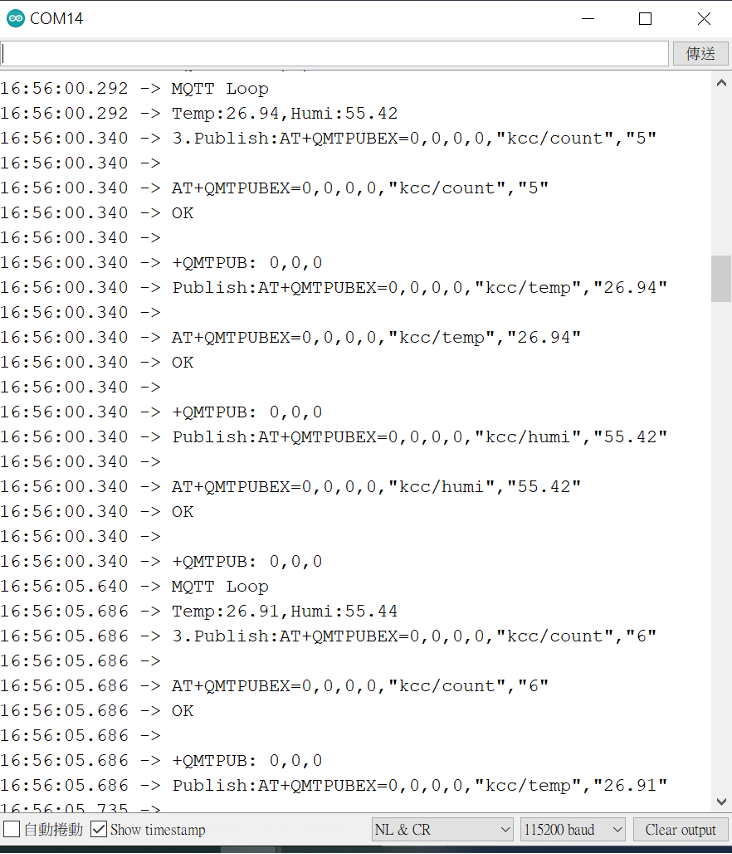
執行結果:以序列埠視窗查看執行情形如下。
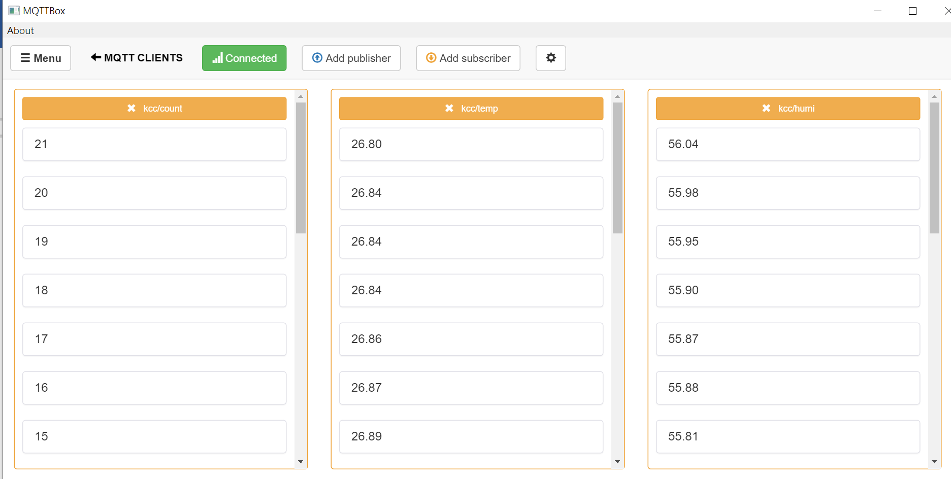
利用MQTT BOX 軟體訂閱讀取溫溼度資料,結果如下:
以IoT MQTT Panel APP 訂閱接收溫溼度資料,以圖表顯示如下。

IoT MQTT Panel Android版APP
實測三、每10分鐘以MQTT發佈裝置GPS位置資訊
以MTDuino NBIOT MQTT Publish功能,發佈GPS位置及溫溼度資訊。
發佈狀態訊息 Publish Topic:kcc/gps GPS經緯度。
 發佈狀態訊息 Publish Topic:kcc/temp 溫度。

發佈狀態訊息 Publish Topic:kcc/humi 溼度
 由於MTDuino 具有內建GNSS GPS及LET (Cat M1、Cat NB2)低功耗物聯網通訊功能,但使用上需切換GPS、NBIOT 優先度,可以AT+QGPSCFG=”priority”,0 設定為GPS優先,或AT+QGPSCFG=”priority”,1 設定為NBIOT 優先。
程式運作程序如下:
1. GPS程序:

2. 連GPS=>GET Location

3.連NBIOT=> MQTT Publish

4.Delay 10分鐘
5.執行程序1
詳細原始程式碼範例如下:
#include

#include


#include "Adafruit_SHT31.h"

#include "wiring_private.h"

Adafruit_SHT31 sht31 = Adafruit_SHT31();


#define BG77_PWRKEY_PA27 26     /*  PWRKEY  */

#define BG77_RSYTKEY_PA08 27    /*  RSTKEY  */

#define BG77_GPS 9    /*  GPS Status  */


#define BG77Serial Serial2  // BG77 對映MTDuino_NBGPS 格板Serial2

#define BG77 Serial2  // BG77 對映MTDuino_NBGPS 格板Serial2


String gpsData = "";

String lat ="";

String lng ="";

long gettry=0;

String rr="";


void setup(void) {


  if (! sht31.begin(0x44)) {   // Set to 0x45 for alternate i2c addr

    Serial.println("Couldn't find SHT31");

    while (1) delay(1);

  }


  BG77Serial.begin(115200);  // 初始化BG77串口,設定鮑率為115200

  Serial.begin(115200);  // 初始化USB串口,設定鮑率為115200

  delay(100);

  pinMode(BG77_PWRKEY_PA27, OUTPUT);

  pinMode(BG77_GPS, OUTPUT);

  digitalWrite(BG77_PWRKEY_PA27, LOW);

  delay(1000);

  digitalWrite(BG77_PWRKEY_PA27, HIGH);

  delay(2000);

  digitalWrite(BG77_PWRKEY_PA27, LOW);

  delay(1000);


  Serial.println("BG77模塊已啟動");

  //BG77Serial.println("ATE0");

  sendATcommand("AT+QGPSCFG="priority",0","OK",2000);

  sendATcommand("ATE0","OK",1000);

  sendATcommand("AT+QGPSCFG="autogps",1", "OK",2000); // 設置模組自動啟動GPS定位

  sendATcommand("AT+QGPSEND","OK",2000); // 停止GPS定位

  sendATcommand("AT+QGPS=1","OK",2000); // 啟動GPS定位

  Serial.println("BG77模塊GPS已啟動");


  for(int i=1;i<5;i++) { digitalWrite(BG77_GPS, HIGH); delay(100); digitalWrite(BG77_GPS, LOW); delay(100); } //Serial.println("GPS定位中..."); } void loop(void) { float t = sht31.readTemperature(); float h = sht31.readHumidity(); gpsData=""; gpsData=sendATcommand("AT+QGPSLOC=2", "+QGPSLOC: ", 3000); // 獲取GPS定位數據 if (gpsData.indexOf("+QGPSLOC: ") != -1 ) { gpsData=gpsData.substring(0,gpsData.indexOf("\r\n")); if(gpsData.indexOf(".000") == -1 ) return; Serial.println(gpsData); //Serial.print("GPS位置:"); digitalWrite(BG77_GPS, HIGH); delay(100); digitalWrite(BG77_GPS, LOW); //lat =gpsData.substring(11, 19); //lng =gpsData.substring(20, 29); String location = gpsData.substring(gpsData.indexOf(":") + 1); int comma1 = location.indexOf(","); int comma2 = location.indexOf(",", comma1 + 1); int comma3 = location.indexOf(",", comma2 + 1); int comma4 = location.indexOf(",", comma3 + 1); int comma5 = location.indexOf(",", comma4 + 1); int comma6 = location.indexOf(",", comma5 + 1); int comma7 = location.indexOf(",", comma6 + 1); int comma8 = location.indexOf(",", comma7 + 1); int comma9 = location.indexOf(",", comma8 + 1); int comma10 = location.indexOf(",", comma9 + 1); // Extract latitude and longitude String latitude = location.substring(comma1 + 1, comma2); String longitude = location.substring(comma2 + 1, comma3); // Extract date and time String time = location.substring(0,comma1); String date = location.substring(comma9 + 1, comma10); // Convert time to Taiwan date time Serial.print(date); Serial.print(","); Serial.println(time); int year = date.substring(4, 6).toInt() + 2000; int month = date.substring(2, 4).toInt(); int day = date.substring(0, 2).toInt(); int hour = time.substring(0, 2).toInt() ; hour+= 8; // Convert to Taiwan time if(hour>23) {hour-=24;  day+=1;}


    int minute = time.substring(2, 4).toInt();

    int second = time.substring(4, 6).toInt();

    Serial.print("Date: ");

    Serial.print(year);

    Serial.print("/");

    Serial.print(month);

    Serial.print("/");

    Serial.println(day);

    Serial.print("Time: ");

    Serial.print(hour);

    Serial.print(":");

    Serial.print(minute);

    Serial.print(":");

    Serial.println(second);

    Serial.print("Temp *C = "); Serial.println(t);

    Serial.print("Humi % = "); Serial.println(h);

    Serial.print("Latitude: ");

    Serial.println(latitude);

    Serial.print("Longitude: ");

    Serial.println(longitude);


     //MQTT open


    sendATcommand("AT+QGPSCFG="priority",1","OK",1000);

    Serial.print("1:");

    Serial.println();


    rr=sendATcommand("AT+QMTOPEN=0,"mqttgo.io",1883","+QMTOPEN: 0,0",20000);

    Serial.print("2:");

    Serial.println(rr);

    rr=sendATcommand("AT+QMTCONN=0,"Client1"","+QMTCONN: 0,0,0",20000);

    Serial.print("3:");

    Serial.println(rr);


    String msg="AT+QMTPUBEX=0,0,0,0,";

    msg = msg + ""kcc/gps"" ;

    String payload="";

    payload = payload + latitude + "," + longitude + ",";

    payload = payload + String(t);

    msg = msg + "," + """+payload + """;

    Serial.print("msg:");

    Serial.println(msg);

    // MQTT publish

    rr=sendATcommand(msg,"+QMTPUB: 0,0,0",20000);

    Serial.print("4:");

    Serial.println(rr);


    msg="AT+QMTPUBEX=0,0,0,0,";

    msg = msg + ""kcc/temp"" ;

    payload="";

    payload = payload + String(t)+ "," + String(h);

    msg = msg + "," + """+payload + """;

    Serial.print("msg:");

    Serial.println(msg);

    // MQTT publish

    rr=sendATcommand(msg,"+QMTPUB: 0,0,0",20000);

    Serial.print("4:");

    Serial.println(rr);


    msg="AT+QMTPUBEX=0,0,0,0,";

    msg = msg + ""kcc/temp"" ;

    payload="";

    payload = payload + String(h);

    msg = msg + "," + """+payload + """;

    Serial.print("msg:");

    Serial.println(msg);

    // MQTT publish

    rr=sendATcommand(msg,"+QMTPUB: 0,0,0",20000);

    Serial.print("4:");

    Serial.println(rr);


    rr=sendATcommand("AT+QMTCLOSE=0","OK",8000);

    Serial.print("5:");

    Serial.println(rr);


    rr=sendATcommand("AT+QGPSCFG="priority",0","OK",2000);

    Serial.print("6:");

    Serial.println(rr);


    gettry=0;

    //delay(60000);

    delay(1000);

    //BG77Serial.flush();

   }

  else {

    gettry+=1;

    Serial.print("GPS定位中...");

    Serial.println(gettry);


  }


 delay(10*60000); // Delay 10分鐘


}


String sendATcommand(String command, String expectedResponse, int timeout) {

  BG77Serial.flush();

  String response = "";

  BG77Serial.println(command); // 發送AT指令

  long int time = millis();

  while ((time + timeout) > millis()) {

    while (BG77Serial.available()) {

      //delay(1);

      char c = BG77Serial.read();

      //Serial.print(c);

      response += c;

      if (response.indexOf(expectedResponse) != -1) {

        return response;

      }


    }

  }

}

- 【開箱評測】MTDuino IOT開發板: MQTT功能實作介紹 - 2023/06/26
- 【開箱評測】MTDuino IOT開發板:NB-IoT及GPS功能介紹 - 2023/05/07
- 用NB-IoT USB Dongle實現MQTT,加快IoT應用開發 - 2019/12/18
訂閱MakerPRO知識充電報
與40000位開發者一同掌握科技創新的技術資訊!


