作者:曾成訓(CH.Tseng)
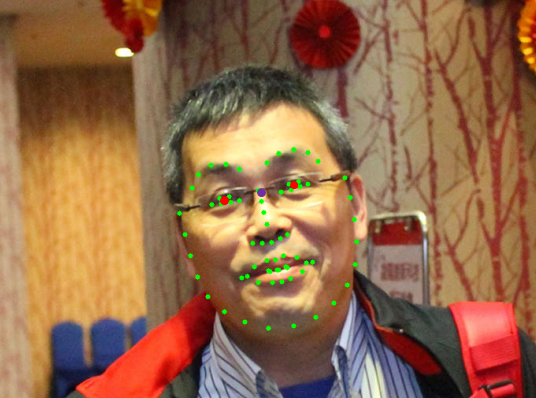
face alignment 的功能主要是將傾斜的人臉旋轉至端正的角度,用以提高後續進行人臉識別時的精準度。在進行 alignment 前,需要先取得 facial landmarks 才能進行校準,目前最常用的 facial landmark model 則是 Dlib 所提供的 5 點及 68 點模型,一般多是使用 68 點 landmarks 來進行校正。
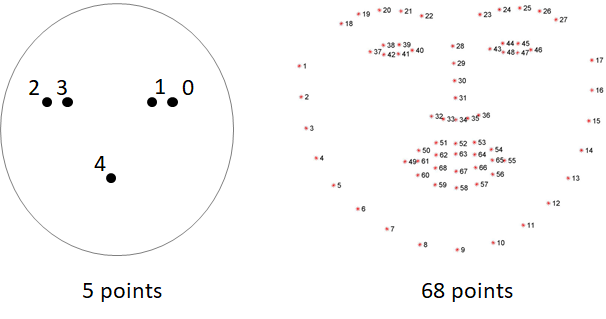
Dlib 提供的 5 點及 68 點 facial landmark model(圖片來源:曾成訓提供)
在取得臉部的特徵點後,便能開始臉部校正的處理,使臉孔端正後再進行辨識步驟可大幅提高精準度,因此 face align(臉孔校正)算是人臉識別中相當重要的步驟,或許您的臉孔辨識專案沒有臉孔校正也能有不錯的效果,但若加入此功能,相信能讓您的臉部辨識專案更臻非凡。
Dlib Facial Landmarks 的效率
下面以一張川普家族的合照,看看 face detection 與 facial landmarks 分別在 PC 及樹莓派的執行效率如何?
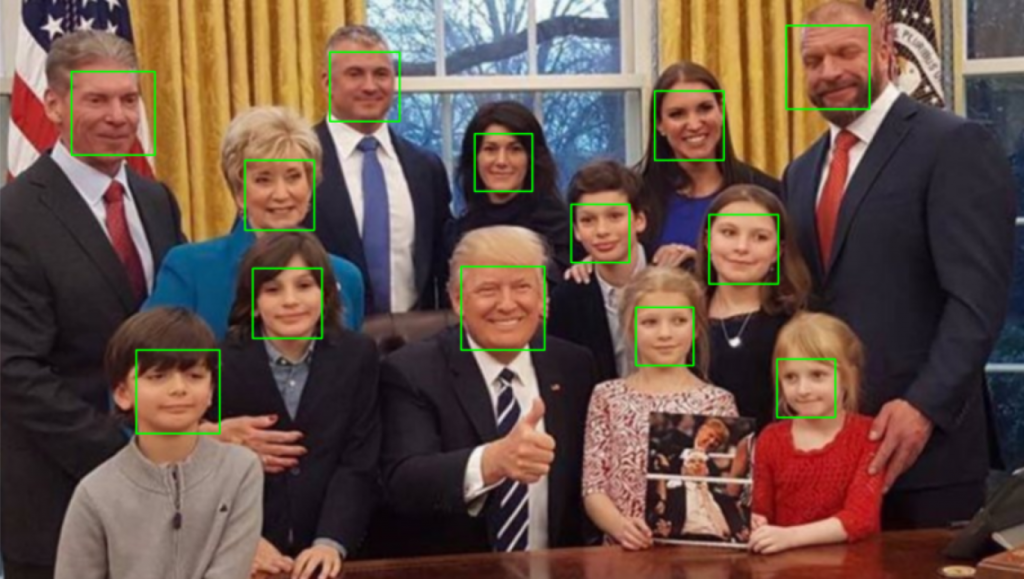
(圖片來源:曾成訓提供)
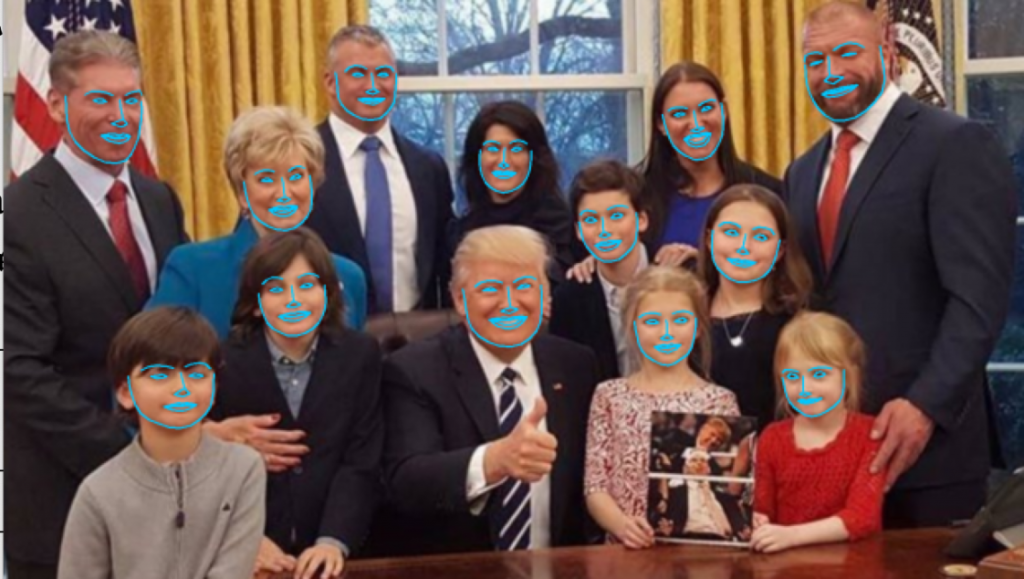
(圖片來源:曾成訓提供)
(圖片來源:曾成訓提供)
另外來一張 2 千萬像素 6015 × 3325 超大張的內閣合照吧!結果抓取 landmarks 時樹莓派無法處理如此大的影像。
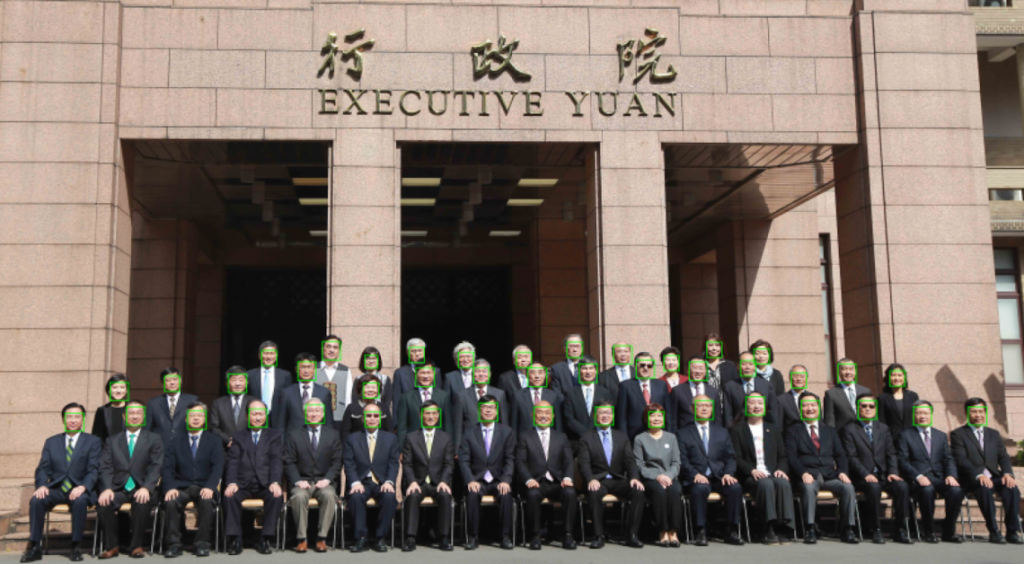
(圖片來源:曾成訓提供)

(圖片來源:曾成訓提供)
(圖片來源:曾成訓提供)
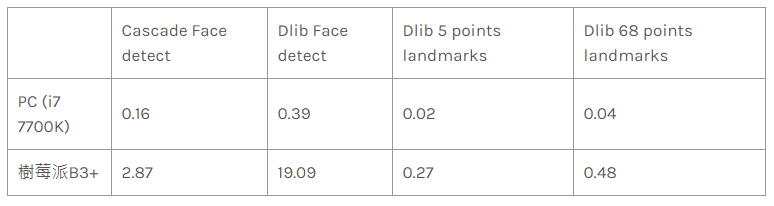
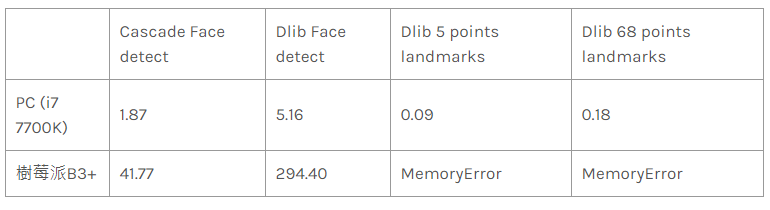
看來 facial landmarks 的運作效率還不錯,遠低於 Face detect 的時間;5 points landmarks 的 model size為 8.7 MB,比起 68 points landmarks 的 95 MB 小很多,不但模型載入時間短且偵測速度也較快,因此本文中我們將使用 5 points landmarks 在樹莓派上進行臉部校正。
取得 Facial Landmarks
import dlib 後,只需要宣告臉孔偵測及 landmarks 偵測物件後就可以開始使用了,唯一要注意的是,dlib 所回傳的 bounding box 及 points 是專屬的格式,使用時需注意:
- 臉孔偵測:Dlib 回傳某個臉孔的 bbox 物件為 dets,因此該臉孔的(x,y,w,h)為(d.left(), d.top(), d.right, d.bottom())。
- Landmarks 偵測:Dlib 回傳某個臉孔的 landmarks 物件為 shape,如果想取得每個點的(x,y),可透過如下的方式:landmarks = np.matrix([[p.x, p.y] for p in shape.parts()])
程式:取得相片中所有臉孔的 landmarks
import dlib
import cv2

#Dlib facial landmarks model的path
predictor_path = "models/shape_predictor_5_face_landmarks.dat"
#待處理的相片
face_path = "faces/IMG_2995.jpg"

#於landmarks上畫圓,標識特徴點
def renderFace(im, landmarks, color=(0, 255, 0), radius=3):
  for p in landmarks.parts():
    cv2.circle(im, (p.x, p.y), radius, color, -1)

#detector為臉孔偵測,predictor為landmarks偵測
detector = dlib.get_frontal_face_detector()
predictor = dlib.shape_predictor(predictor_path)

#讀入相片
img = cv2.imread(face_path)
#偵測臉孔
dets = detector(img, 1)

#針對相片中的每張臉孔偵測五個landmarks
for k, d in enumerate(dets):
    shape = predictor(img, d)
    renderFace(img, shape)

cv2.imshow("face-rendered", img)
cv2.waitKey(0)

(圖片來源:曾成訓提供)
進行對齊 Alignment
有了臉部的 landmarks 後,接下來就能進行 facial alignment 了。在 AI 及電腦視覺領域相當活躍的 Adrian Rosebrock 在他的 PyImagesSearch 網站介紹了如何進行 alignment,他所使用的是 68 points landmarks,因此對齊校正後可以得到相當準確適合用於臉孔辨識的 faces。
(圖片來源:曾成訓提供)
他的作法是:
1. 取得左右兩眼的中心點
leftEyeCenter = leftEyePts.mean(axis=0).astype(“int”)
rightEyeCenter = rightEyePts.mean(axis=0).astype(“int”)
2. 依據此兩點形成的直線,計算與水平線的角度
dY = rightEyeCenter[1] – leftEyeCenter[1]
dX = rightEyeCenter[0] – leftEyeCenter[0]
angle = np.degrees(np.arctan2(dY, dX)) – 180
3. 依雙眼間距計算旋轉後的縮放比例(依使用者所指定對齊後的臉孔大小)
desiredRightEyeX = 1.0 – self.desiredLeftEye[0]
dist = np.sqrt((dX ** 2) + (dY ** 2))
desiredDist = (desiredRightEyeX – self.desiredLeftEye[0])
desiredDist *= self.desiredFaceWidth
scale = desiredDist / dist
4. 取得雙眼的中間點,此點亦作為臉部旋轉的中心點
eyesCenter = ((leftEyeCenter[0] + rightEyeCenter[0]) // 2,
(leftEyeCenter[1] + rightEyeCenter[1]) // 2)
5. 計算稍後要使用於 cv2.warpAffine 的旋轉矩陣 M
M = cv2.getRotationMatrix2D(eyesCenter, angle, scale)
tX = self.desiredFaceWidth * 0.5
tY = self.desiredFaceHeight * self.desiredLeftEye[1]
M[0, 2] += (tX – eyesCenter[0])
M[1, 2] += (tY – eyesCenter[1])
6. 套用旋轉矩陣 M,完成臉部的校正對齊
(w, h) = (self.desiredFaceWidth, self.desiredFaceHeight)
output = cv2.warpAffine(image, M, (w, h), flags=cv2.INTER_CUBIC)
Adrian Rosebrock 有將此 face alignment 的程式碼放在 imutils 的模組中,因此只要 import 進來後,輸入幾行指令便能套用此功能。
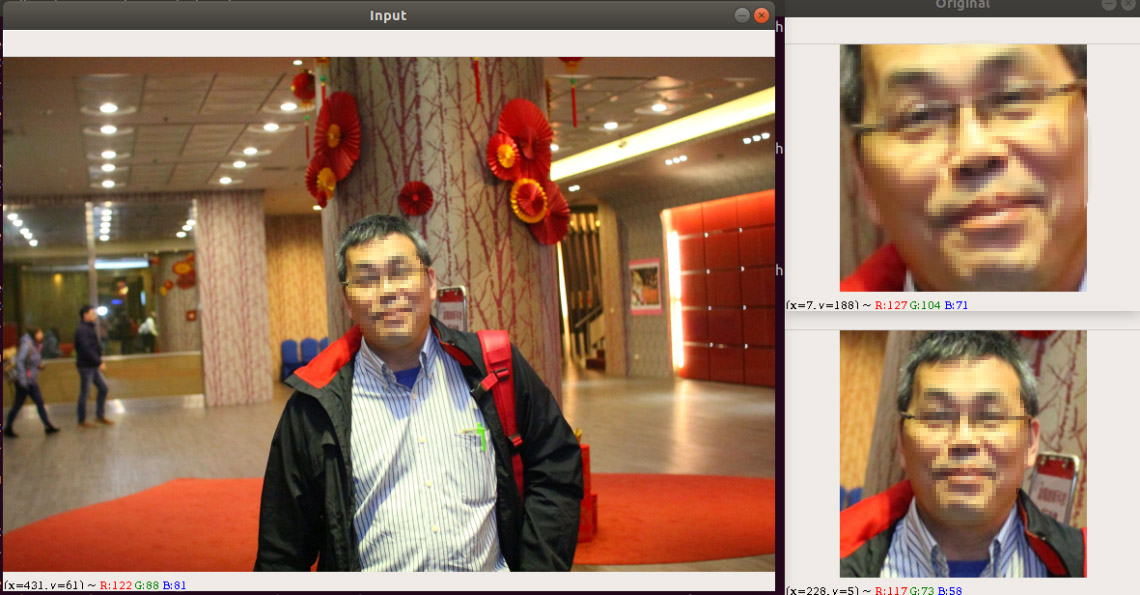
(圖片來源:曾成訓提供)
import cv2
import imutils
import dlib
import numpy as np
from imutils.face_utils import FaceAligner
from imutils import face_utils

predictor_path = "models/shape_predictor_5_face_landmarks.dat"
face_path = "faces/IMG_2884.jpg"

detector = dlib.get_frontal_face_detector()
predictor = dlib.shape_predictor(predictor_path)
fa = FaceAligner(predictor, desiredFaceWidth=256)

image = cv2.imread(face_path)
image = imutils.resize(image, width=800)
gray = cv2.cvtColor(image, cv2.COLOR_BGR2GRAY)

cv2.imshow("Input", image)
rects = detector(gray, 2)

for rect in rects:
        (x, y, w, h) = face_utils.rect_to_bb(rect)
        faceOrig = imutils.resize(image[y:y + h, x:x + w], width=256)
        faceAligned = fa.align(image, gray, rect)

        cv2.imshow("Original", faceOrig)
        cv2.imshow("Aligned", faceAligned)
        cv2.waitKey(0)
改用 5 points landmarks 進行 aligment
由於 68 points 的 model 太大,使用於樹莓派或其它 embedded 的裝置顯得太過笨重,因此我們改用體積不到其十分之一的 5 points landmarks 來實作 face alignment,我的步驟是:
- 取得雙眼左右兩點的 landmarks
- 依 landmarks 計算雙眼的中間點
- 計算兩個中間點與水平線的角度
- 重新取得較大的人臉區域,並依第三步所得到的角度旋轉
- 針對旋轉後的區域重新取得人臉,此即為 aligned 的人臉
如果不做後兩個步驟的話,傾斜的臉部在旋轉後會被裁切到部份面積,如下圖所示:

因此將圖片旋轉到正確的角度後,我們先擴增臉部區域,再偵測一次臉部,取得新的 bounding box 後再裁切,就能取得沒有損失的臉部,如下圖步驟:

相關程式說明
- Dlib 臉部偵測
本段程式會偵測輸入的影像,取得臉部 bounding box 後,轉為(x, y, w, h)格式回傳。
detector = dlib.get_frontal_face_detector()
def detect_face(face_area):
    bbox = []
    dets = detector(face_area, 1)
    for k, d in enumerate(dets):
        print("Detection {}: Left: {} Top: {} Right: {} Bottom: {}".format(
            k, d.left(), d.top(), d.right(), d.bottom()))
        bbox.append((d.left(), d.top(), d.right()-d.left(), d.bottom()-d.top()))

    return bbox
- 繪製特徵點
傳入圖片及 5 或 68 points landmark model 所取得的 Dlib 特徵點,繪製圓形於圖上。
def renderFace(im, landmarks, color=(0, 255, 0), radius=5):
  for p in landmarks:
    cv2.circle(im, (p[0], p[1]), radius, color, -1)
- 計算兩點角度
計算兩點(左右眼的中心點)形成的直線與水平的角度。
def angle_2points(p1, p2):
    r_angle = math.atan2(p1[1] - p2[1], p1[0] - p2[0])
    rotate_angle = r_angle * 180 / math.pi

    return rotate_angle
- 擴張 bounding box 區域(臉部區域)
def area_expand(bbox, ratio):
    ew = int(bbox[3] * ratio)
    eh = int(bbox[2] * ratio)
    nx = int(bbox[0] - ((ew - bbox[2]) / 2))
    ny = int(bbox[1] - ((eh - bbox[3]) / 2))
    if(nx<0):
        nx = 0
    if(ny<0):
        ny = 0

    return (nx,ny,ew,eh)
小結
一張臉孔的 facial embedded features 的 size 並不大,以輸出 256 個 facial embedded features 的 float numbers 為例,透過 joblib 匯出後,file size 僅為 4.0 K,因此我們可與資料庫搭配來儲存眾多的人臉訊息作為「臉孔資料庫」,提供未來的檢索或資料發現使用。
例如,我們可以撰寫一支程式,針對實時的 web camera 或取出影片中所有臉孔後進行自動校正,依時間或影片 frame 編號匯出 facial embedded features 並儲存於資料庫中,未來只要輸入某個人的相片,便能快速檢索出該人物曾經出現的影片時間位置,相當適合檢索犯人或實時監測某些特定人員使用。
商家行號也可於門口或店內,透過 facial embedded features 搭配非監督式學習的 K-Means,定期自動分群並統計篩選出哪些人頻繁來訪購物、哪些人只來過一次,另外也可以針對某些特定人員作出特定功能,如到店示警或特別的宣傳及客製化服務。
(本文經作者同意轉載自 CH.TSENG 部落格、原文連結;責任編輯:賴佩萱)

- 【模型訓練】訓練馬賽克消除器 - 2020/04/27
- 【AI模型訓練】真假分不清!訓練假臉產生器 - 2020/04/13
- 【AI防疫DIY】臉部辨識+口罩偵測+紅外線測溫 - 2020/03/23
訂閱MakerPRO知識充電報
與40000位開發者一同掌握科技創新的技術資訊!


