作者:曾成訓(CH.Tseng)
一提到 AI,我們腦海中總會浮現如火星文般的複雜演算法、深不可測的神經網路、數量龐大到以 TB 計數的 dataset 以及高速運算耗電量驚人的 GPU 等,它們可能存在於雲端,甚至就在自家機房的內部;然而,儘管它們的演算法再精確、GPU 運算再迅速、網路傳輸再加快,還是無法滿足一般使用者最基本的需求:即時回饋,因此更貼近使用者、無延遲的「Edge AI」近年來大量興起,而前述龐大笨重的 AI 系統則隱身幕後稱為「Centralized AI」,兩者便組成 Distributed AI 的架構。
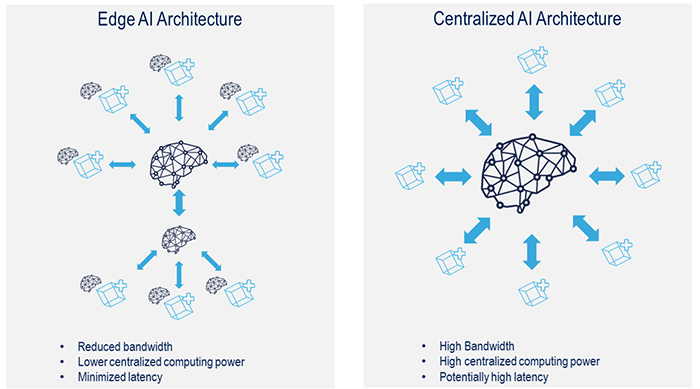
Edge AI 與 Centralized AI 架構的差別(圖片來源:Linkedin)
如上圖左側,Edge AI 佈署於使用者終端,專用於「推論及決策」等動作,可滿足低延遲、快速回應的 AI需求,例如 Robots、Drones、Portable or Mobile Devices、Outdoor Devices 等。
Google Coral USB Accelerator
目前市面可滿足 Edge AI 的硬體裝置的選擇相當多,大致可分為可單獨運行的單版 AI board 與 USB 接口無法獨立運行的 AI 加速器。今天要開箱的是一片可以透過 USB 與樹莓派搭配的 AI 加速器:Google Coral USB Accelerator,它的外形與功能很容易讓我們聯想到 Intel 的 Neural Computing Stick(NCS),這兩種都屬於針對「深度學習運算」特別設計的 ASIC IC(Application Specific Integrated Circuit),它們兩者都非常適合平行的處理大量加乘運算,但也由於專用於特定用途,因此它們只支援有限的深度學習框架,而且必須先將模型轉換為特定的中介格式後才能運作。
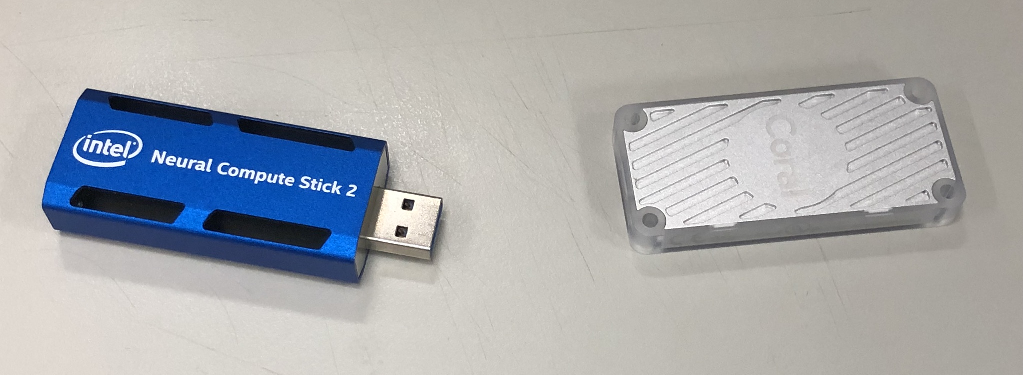
NCS2 (左)與 Google Coral USB Accelerator(右)(圖片來源:曾成訓提供)
NCS2 使用的中介檔稱為 IR(Intermediate Representation),可支援 TensorFlow、Caffe、MXNet、ONNX、Darknet 等模型轉換為 IR(Intermediate Representation)的中介檔格式,且還支援 OpenCV 的 DNN 模組;而 Google Edge TPU 目前則僅支援自家的 Tensorflow Lite 格式,且是 Edge TPU 專用的tflite-tpu,因此使用前必須將 TF Lite 模型轉檔後才能使用。
Google Coral USB Accelerator 的尺寸與重量都比想像中的更小更輕,相較於部置在雲端能夠提供訓練與推論的 Cloud TPU,這塊 Coral USB Accelerator 屬於 Edge AI 的一環,即是上面所指的 Edge TPU。
推論時間比較
這片小巧的加速器能提升多少深度模型的推論速度呢?下面統計資料來自官方網站,由左至右:藍色為使用一般 PC(CPU)、橘色為 PC 加上 Edge TPU、灰色為樹莓派 3、黑色為樹莓派加 Edge TPU,數值代表模型的推論時間,因此愈小愈好;由圖表中可看出樹莓派加上 Edge TPU 後可說是如虎添翼,比 PC 的 CPU 快上數十倍,甚至與 CPU+Edge TPU 並駕齊驅,可惜樹莓派沒有支援 USB 3.0,否則速度應該會更令人滿意。
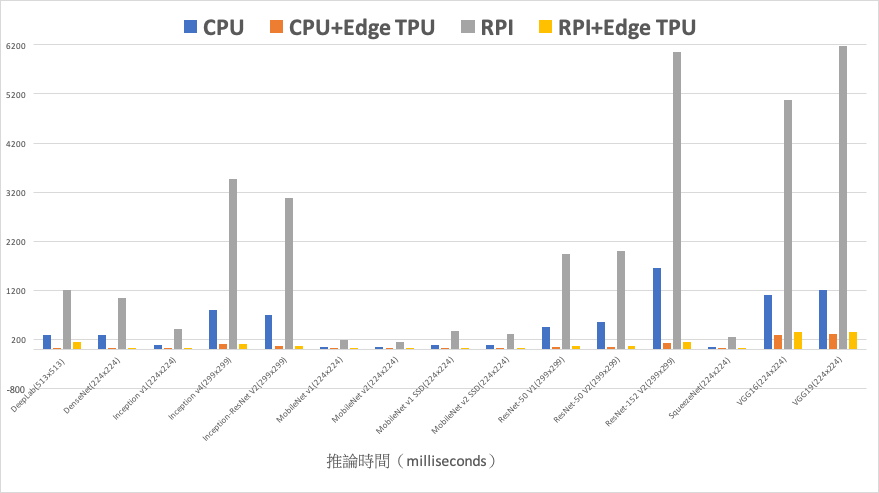
使用各加速器推論時間的比較
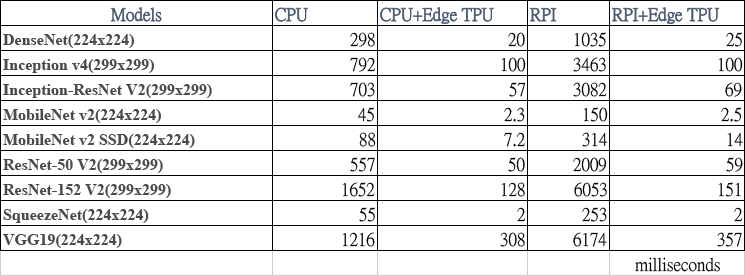
推論時間數值表
安裝 Edge TPU 與 Python 資料集
接下來,我們先將 Google Coral USB Accelerator 接上樹莓派,如下圖所示:
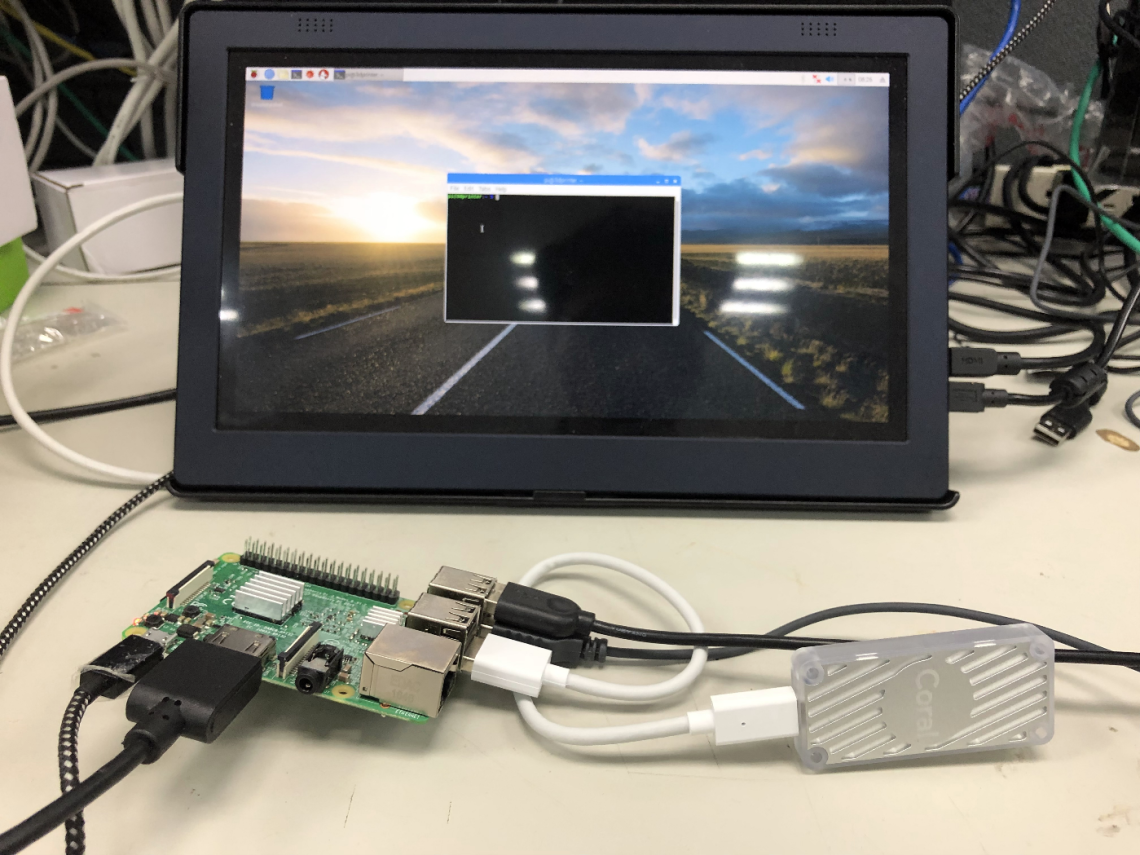
(圖片來源:曾成訓提供)
A.下載 Edge TPU API
cd ~/
wget https://dl.google.com/coral/edgetpu_api/edgetpu_api_latest.tar.gz -O edgetpu_api.tar.gz –trust-server-names
tar xzf edgetpu_api.tar.gz
B. 安裝 Edge TPU API
cd edgetpu_api
bash ./install.sh
下圖為安裝的畫面,未來如果想要更改設定值,可以重複執行此安裝的步驟。
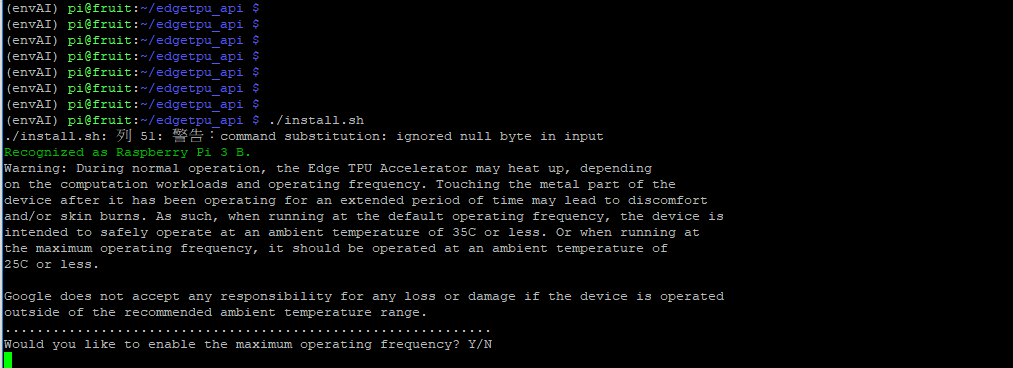
(圖片來源:曾成訓提供)
最後一行出現”Would you like to enable the maximum operating frequency?”如果輸入Y,那麼 Edge TPU 在推論時會全力運作加快速度,但需注意在這種情況下可能會產生高熱。
安裝的過程相當簡單且順利,目前的版本為 edgetpu-1.9.2,如下圖所示:
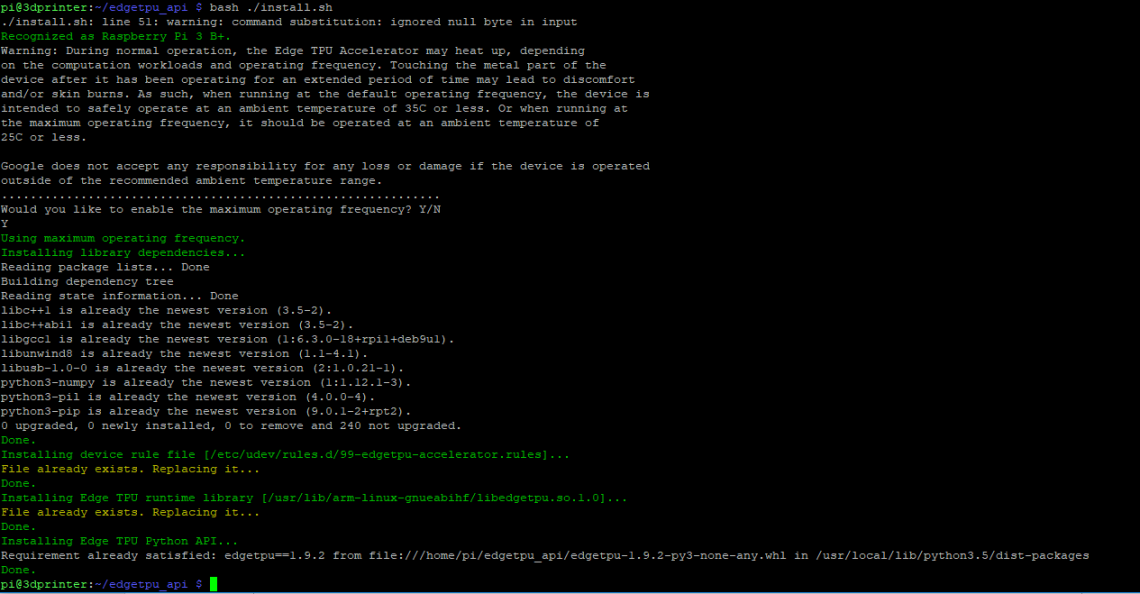
(圖片來源:曾成訓提供)
C. 重新插入
安裝好 API 後,如果 Accelerator 已經接在 USB 上,那麼建議再重新插拔一次,讓 udev rule 生效。
D. Demo 範例實作
- Image Classification
首先試試最基本的影像分類模型,請執行下方 scripts,下載預訓練好的模型及示範圖片:
cd ~/Downloads/
wget https://dl.google.com/coral/canned_models/mobilenet_v2_1.0_224_inat_bird_quant_edgetpu.tflite \
https://dl.google.com/coral/canned_models/inat_bird_labels.txt \
https://dcoral.withgoogle.com/static/docs/images/parrot.jpg
下載完成後,進入 demo 目錄執行 classify_image.py 程式:
cd /usr/local/lib/python3.5/dist-packages/edgetpu/demo
python3 classify_image.py \
--model ~/Downloads/mobilenet_v2_1.0_224_inat_bird_quant_edgetpu.tflite \
--label ~/Downloads/inat_bird_labels.txt \
--image ~/Downloads/parrot.jpg
卻出現下方的 error:
Traceback (most recent call last):
  File "classify_image.py", line 19, in <module>
    from edgetpu.classification.engine import ClassificationEngine
ImportError: No module named 'edgetpu'
錯誤的原因是 edgetpu API 預設安裝到 /usr/local/lib/python3.5/dist-packages,但如果你的 Python 環境是 virtualenv,便需要多執行下列的安裝步驟:
cd /home/pi/envAI/lib/python3.5/site-packages/
ln -s /usr/local/lib/python3.5/dist-packages/edgetpu
ln -s /usr/local/lib/python3.5/dist-packages/edgetpu-1.9.2.dist-info
執行結果:此為待分類的示範圖片鸚鵡,範例程式預測其為 Ara macao,機率為 0.76,如下圖所示:

(圖片來源:曾成訓提供)
- Object Detection
這個範例是使用 SSD MobileNet V2 所訓練的臉孔偵測模型;一樣先下載預訓練模型及示範圖片:
cd ~/Downloads
curl -O https://dl.google.com/coral/canned_models/mobilenet_ssd_v2_face_quant_postprocess_edgetpu.tflite \
-O https://coral.withgoogle.com/static/docs/images/face.jpg
接著執行 demo 目錄中的 object_detection.py 程式:
cd /usr/local/lib/python3.5/dist-packages/edgetpu/demo
python3 object_detection.py \
--model ~/Downloads/mobilenet_ssd_v2_face_quant_postprocess_edgetpu.tflite \
--input ~/Downloads/face.jpg \
--output ~/detection_results.jpg
同樣又出現下方的 error:
Traceback (most recent call last):
  File "object_detection.py", line 110, in <module>
    main()
  File "object_detection.py", line 103, in main
    subprocess.Popen(['feh', output_name])
  File "/usr/lib/python3.5/subprocess.py", line 676, in __init__
    restore_signals, start_new_session)
  File "/usr/lib/python3.5/subprocess.py", line 1282, in _execute_child
    raise child_exception_type(errno_num, err_msg)
FileNotFoundError: [Errno 2] No such file or directory: 'feh'
原因是範例使用的是 feh 這個相片模組,因此馬上手動來安裝 feh:
sudo apt-get install feh
(ps. feh 這支 image viewer 程式還挺好用的,不但可透過 command line 執行,也支援 Python,還有各種花俏的顯示功能,如多圖顯示與桌布設定等)
執行結果:相片中的四張人臉都抓到了,而且還可以得到各個臉部的 bbox 與 score,如下圖所示:
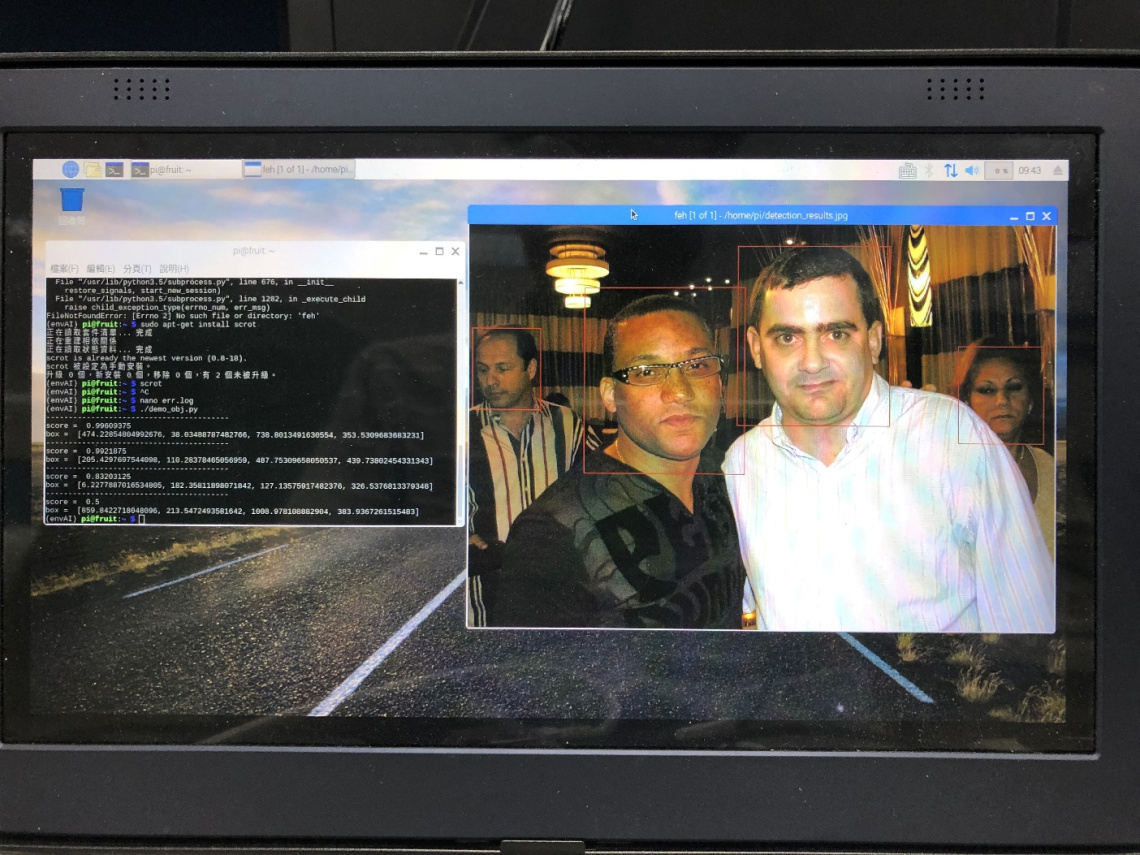
(圖片來源:曾成訓提供)
- Image Classification with PI Camera
這是影像分類結合樹莓派 PI Camera 的範例,使用 MobileNet V2 訓練,可分類超過 1000 種物品,一樣先下載模型:
cd ~/Downloads
curl -O https://dl.google.com/coral/canned_models/mobilenet_v2_1.0_224_quant_edgetpu.tflite \
-O https://dl.google.com/coral/canned_models/imagenet_labels.txt
接著執行 demo 目錄的 classify_capture.py:
cd /usr/local/lib/python3.5/dist-packages/edgetpu/demo
python3 classify_capture.py \
--model ~/Downloads/mobilenet_v2_1.0_224_quant_edgetpu.tflite \
--label ~/Downloads/imagenet_labels.txt
- Face Detection with Webcam
接下來,我們修改前面的臉孔偵測範例,改使用 webcam 來輸入影像,進行即時的偵測,並觀察其 FPS 數值;先下載預訓練模型(與前面的臉孔偵測模型相同):
cd ~/Downloads
curl -O https://dl.google.com/coral/canned_models/mobilenet_ssd_v2_face_quant_postprocess_edgetpu.tflite \
-O https://coral.withgoogle.com/static/docs/images/face.jpg
即時的臉孔偵測程式(修改自範本 object_detection.py):
import argparse
from edgetpu.detection.engine import DetectionEngine
from PIL import Image
import cv2
import time, sys

def fps_count(total_frames):
  global last_time, last_frames, fps
  timenow = time.time()

  if(timenow - last_time)>10:
    fps  = (total_frames - last_frames) / (timenow - last_time)
    last_time  = timenow
    last_frames = total_frames

  return fps


def main():

  parser = argparse.ArgumentParser()
  parser.add_argument(
      '--model', help='Path of the detection model.', required=True)
  args = parser.parse_args()

  engine = DetectionEngine(args.model)
  frameid = 0
  fps_rate = 0

  while(camera.isOpened()):
    (grabbed, frame) = camera.read()
    frame = cv2.flip(frame, 1)
    frame= cv2.resize(frame,(800,480))
    img = Image.fromarray(cv2.cvtColor(frame, cv2.COLOR_BGR2RGB))

    # Run inference.
    ans = engine.DetectWithImage(img, threshold=0.4, keep_aspect_ratio=True,

                                 relative_coord=False, top_k=10)

    # Display result.
    if ans:
      for obj in ans:
        box = obj.bounding_box.flatten().tolist()
        x1,y1,x2,y2 = int(box[0]), int(box[1]), int(box[2]), int(box[3])
        lblTXT = "face({}%)".format(int(float(obj.score)*100))
        cv2.rectangle( frame,(x1,y1),(x2,y2),(0,255,0),2)
        cv2.putText( frame, lblTXT,(x1, y1-10), cv2.FONT_HERSHEY_SIMPLEX, 0.8,(0, 0, 255), 2)
        fps_rate = fps_count(frameid)

    else:
      print ('No object detected!')

    cv2.putText( frame, "FPS:{}".format(round(fps_rate,1)),(10, 50), cv2.FONT_HERSHEY_SIMPLEX, 1.0,(255, 0, 0), 2)
    frameid += 1

    cv2.imshow("FRAME", frame)
    key = cv2.waitKey(1)

    if(key==113):
      sys.exit(0)

if __name__ == '__main__':
  fps = 0
  fps_rate = 0
  start = time.time()
  last_time = time.time()
  last_frames = 0

  camera = cv2.VideoCapture(0)
  cv2.namedWindow("FRAME", cv2.WND_PROP_FULLSCREEN)
  cv2.setWindowProperty("FRAME", cv2.WND_PROP_FULLSCREEN,cv2.WINDOW_FULLSCREEN)

  main()
執行:
python3 face_detection_webcam.py --model mobilenet_ssd_v2_face_quant_postprocess_edgetpu.tflite
- Object Detection with Webcam
一樣修改前面的物件偵測範例,改為使用 webcam 來輸入影像,進行即時的偵測,並觀察其 FPS 數值;先下載預訓練模型:
curl -O http://download.tensorflow.org/models/object_detection/ssd_mobilenet_v2_quantized_300x300_coco_2019_01_03.tar.gz
解壓:
tar –xvf object_detection/ssd_mobilenet_v2_quantized_300x300_coco_2019_01_03.tar.gz
即時的物件偵測程式(修改自範本 py):
import argparse
from edgetpu.detection.engine import DetectionEngine
from PIL import Image
import cv2
import time, sys

def ReadLabelFile(file_path):
  with open(file_path, 'r', encoding="utf-8") as f:
    lines = f.readlines()

  ret = {}
  for line in lines:
    pair = line.strip().split(maxsplit=1)
    ret[int(pair[0])] = pair[1].strip()

  return ret

def fps_count(total_frames):
  global last_time, last_frames, fps
  timenow = time.time()

  if(timenow - last_time)>10:
    fps  = (total_frames - last_frames) / (timenow - last_time)
    last_time  = timenow
    last_frames = total_frames

  return fps

def main():
  parser = argparse.ArgumentParser()
  parser.add_argument(
      '--model', help='Path of the detection model.', required=True)
  parser.add_argument(
      '--label', help='Path of the labels file.')
  args = parser.parse_args()

  engine = DetectionEngine(args.model)
  labels = ReadLabelFile(args.label) if args.label else None
  frameid = 0

  while(camera.isOpened()):
    (grabbed, frame) = camera.read()
    frame = cv2.flip(frame, 1)
    frame= cv2.resize(frame,(800,480))
    img = Image.fromarray(cv2.cvtColor(frame, cv2.COLOR_BGR2RGB))

    ans = engine.DetectWithImage(img, threshold=0.4, keep_aspect_ratio=True,
                                 relative_coord=False, top_k=10)

    if ans:
      for obj in ans:
        box = obj.bounding_box.flatten().tolist()
        x1,y1,x2,y2 = int(box[0]),int(box[1]),int(box[2]),int(box[3])
        lblTXT = "{}({}%)".format(labels[obj.label_id], int(float(obj.score)*100))
        cv2.rectangle( frame,(x1,y1),(x2,y2),(0,255,0),2)
        cv2.putText( frame, lblTXT,(x1, y1-10), cv2.FONT_HERSHEY_SIMPLEX, 0.8,(0, 0, 255), 2)
        fps_rate = fps_count(frameid)

    else:
      print ('No object detected!')

    cv2.putText( frame, "FPS:{}".format(round(fps_rate,1)),(10, 50), cv2.FONT_HERSHEY_SIMPLEX, 1.0,(255, 0, 0), 2)
    frameid += 1
    cv2.imshow("FRAME", frame)

    key = cv2.waitKey(1)
    if(key==113):
      sys.exit(0)

if __name__ == '__main__':
  fps = 0
  fps_rate = 0
  start = time.time()
  last_time = time.time()
  last_frames = 0

  camera = cv2.VideoCapture(0)
  cv2.namedWindow("FRAME", cv2.WND_PROP_FULLSCREEN)
  cv2.setWindowProperty("FRAME", cv2.WND_PROP_FULLSCREEN,cv2.WINDOW_FULLSCREEN)

  main()
執行:
python3 object_detection_webcam.py --model mobilenet_ssd_v2_coco_quant_postprocess_edgetpu.tflite --label coco_labels.txt
使用 webcam,FPS 約在 5~6 左右,如下影片所示:
使用 720 P、30 fps 的影片測試,FPS 約 3.8~4.1 左右,如下影片所示:
與 Intel Neural Computing Stick 比較
我們分別將 Google Coral USB Accelerator 與 Intel Neural Computing Stick 2 接在樹莓派上,播放 800×400 的影片並同樣使用 COCO dataset(可分辨 80 種物件)訓練的模型進行辨識,在不考慮其速度的情況下,by frame 比較其辨識的差異。
事實上,在此範例中,「Coral USB Accelerator+樹莓派」的速度,與「NCS2+樹莓派」(透過 OpenCV DNN)相當接近,都在 2.5 左右(*註);兩者最大的差異在於兩者模型的精度不同,分別為 INT8 與 FP16,雖然前者的模型精度較低,但透過重新訓練,也可取得與後者不分軒輊的準確度。
小結
持平來說,雖然 Google Coral USB Accelerator 在外形體積與耗電量上佔盡優勢,且使用精度更低的 INT8,使得 Coral USB Accelerator 在 SSD Mobilenet V2 模型的推論速度比起其他 Edge AI chip 更快(詳細可參考 Benchmarking TensorFlow and TensorFlow Lite on the Raspberry Pi ),但這是種種不方便使用之下妥協的結果,例如 Edge TPU 目前僅支援 Tensorflow lite 一種格式,且是更為簡化的 Tensorflow lite 版本,所支援的神經網路 layer 種類更少。
因此,您在上手一支 Google Coral USB Accelerator 後,除了執行官方所提供的範例外,可能還會煩惱「如何將自己先前所訓練、FP32 精度的模型透過一道道繁瑣的程序轉換為最終 INT8 的 Tensorflow lite for Edge TPU 模型?」(此步驟稱為 post-training quantization),並且思量能否接受 INT8 模型所帶來較低準確率的表現,以及後續是否需要採取重新訓練的方式來提升 INT8 精度模型的準確率。
*註:理論上,INT8 的 MobileNet 模型在 Google Coral USB Accelerator 上執行應該非常迅速,上面的測試表現,Google Coral USB Accelerator 與 NCS2 是差不多的,原因可能在於:1. 影片的尺寸較大(720P)2. Coral Accelerator 需要 USB 3.0 才能完全發揮效力 3. NCS2 透過 OpenCV DNN 執行有加速的效果。
(本文經作者同意轉載自CH.TSENG部落格、原文連結;責任編輯:賴佩萱)
- 【模型訓練】訓練馬賽克消除器 - 2020/04/27
- 【AI模型訓練】真假分不清!訓練假臉產生器 - 2020/04/13
- 【AI防疫DIY】臉部辨識+口罩偵測+紅外線測溫 - 2020/03/23
訂閱MakerPRO知識充電報
與40000位開發者一同掌握科技創新的技術資訊!