作者/圖片來源:CAVEDU 教育團隊
本文發想來源是曾希哲老師的手機遠端控制門禁系統文章,並透過RK物聯網教學實驗箱來實現,RK物聯網教學實驗箱的特色有下列幾點:
- 符合108課綱「智慧居家實習」、「介面電路控制實習」。
- LinkIt7697開發板由聯發科技推出,搭載了WIFI及藍牙(BLE)模組,可激發使用者針對物聯網情境的應用。
- RK物聯網擴充板(RK IOT EX Shield),有Grove防呆接頭,可輕鬆接上感測器不費力,不必苦惱腳位接錯。
- 圖控介面的程式操作,圖形化程式介面取代文字介面撰寫,可以大大降低專題開發的難度,再也不用因為拼錯字所造成的編譯錯誤而傷腦筋。後續也可銜接到正式的文字程式環境。
本實驗箱是依照108課綱所配置,其主題有「工場安全衛生及介面電路控制應用」、「通用序列匯流排介面」、「數位類比轉換介面」、「環境感測介面」、「辨識介面」、「藍牙無線傳輸介面」、「綜合應用」,共七個章節。本篇門禁系統就是屬於「藍牙無線傳輸介面」的延伸,以下就針對遠端控制門禁系統的範例來做說明。
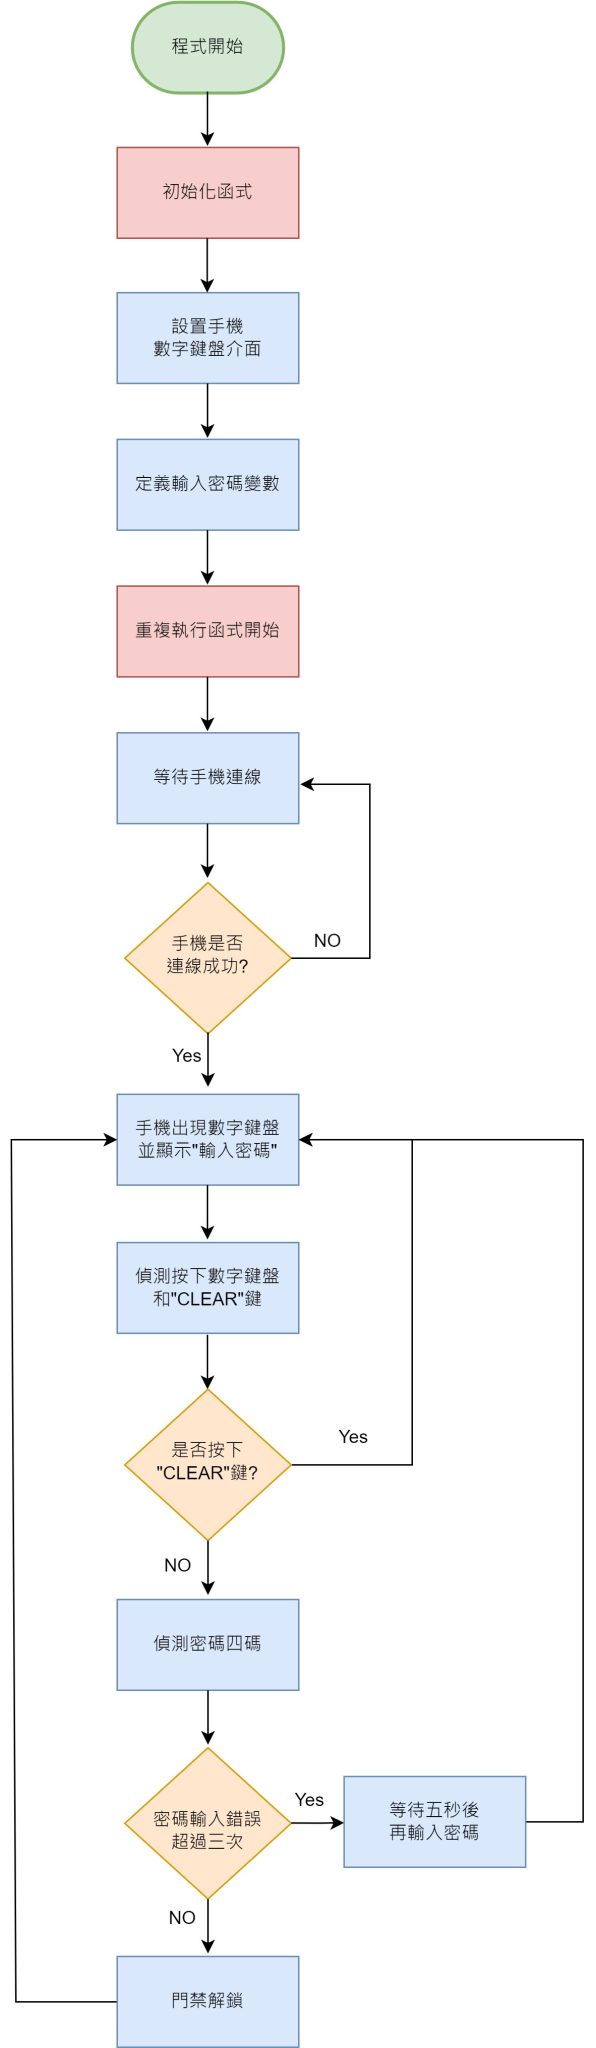
流程圖說明
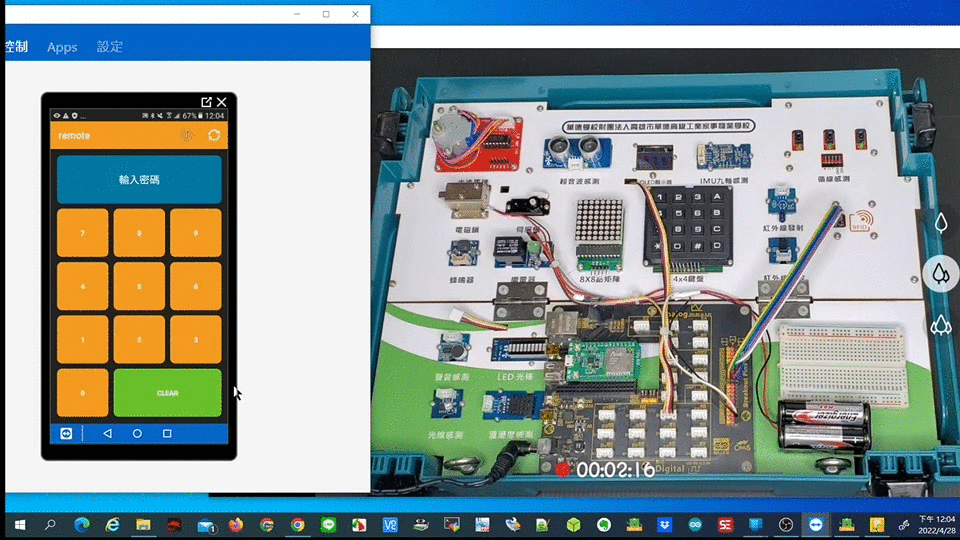
筆者是透過曾希哲老師公開的程式碼,可讓手機端藉由 BLE 藍牙來與 LinkIt 7697 開發板互動,請由此下載 iOS / Android 版本的 LinkIt Remote app,只要編寫 7697 端程式就能生成手機 app 介面,功能雖然簡單了點但已足以完成各種監控介面。請參考相關文章
輸入密碼有三次機會,三次機會全錯會有五秒鐘的等待時間,正確密碼為 9527 ,而遠端控制門禁系統操作流程,如圖所示。
硬體介紹
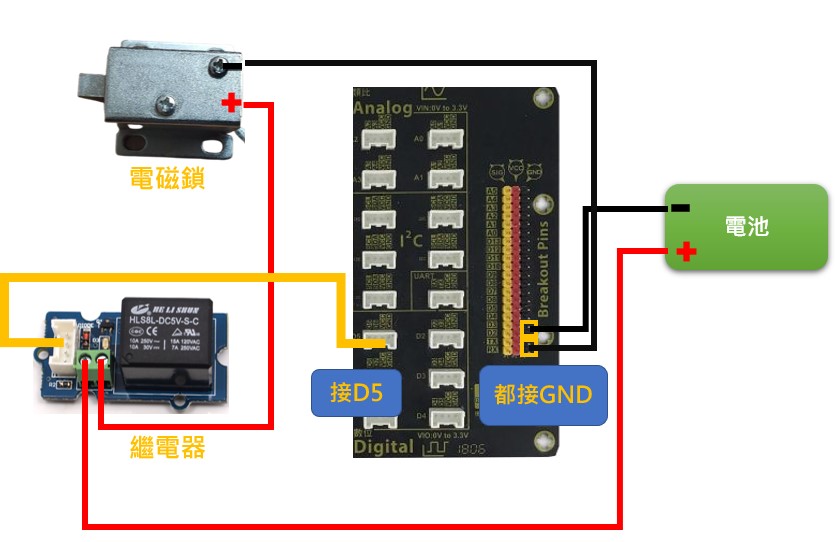
再來介紹所使用的硬體,如下圖所示。本篇是利用LinkIt7697的LinkIt Remote功能與手機連線,並在擴充板接上繼電器來控制電磁鎖,但需注意的是控制電磁鎖需要額外的外接電源,所以筆者是用四顆 1.5V 的四號電池來當外接電源。
程式撰寫
本篇程式是透過 BlocklyDuino圖形化介面來撰寫,而以下 Arduino程式碼是由 BlocklyDuino圖形化介面轉換而來,若讀者希望取得本BlocklyDuino程式碼,請由此下載。
也請參考我們所編寫的 BlocklyDuino + LinkIt 7697 相關範例,很完整喔!
RK iot box remote control
#include


int time;


int SetPasswd;


int PhonePasswd;


int c;


String S1;


String S2;


String S3;


String S4;


int count;


LRemoteButton button0;

LRemoteLabel label1;

LRemoteButton button1;

LRemoteButton button2;

LRemoteButton button3;

LRemoteButton button4;

LRemoteButton button5;

LRemoteButton button6;

LRemoteButton button7;

LRemoteButton button8;

LRemoteButton button9;

LRemoteButton button10;


void setup()

{

  LRemote.setName("remote");

  LRemote.setOrientation(RC_PORTRAIT);

  LRemote.setGrid(3, 5);

    button0.setPos(0, 4);

    button0.setText("0");

    button0.setSize(1, 1);

    button0.setColor(RC_ORANGE);

    LRemote.addControl(button0);


    label1.setPos(0, 0);

    label1.setText("輸入密碼");

    label1.setSize(3, 1);

    label1.setColor(RC_BLUE);

    LRemote.addControl(label1);


    button1.setPos(0, 3);

    button1.setText("1");

    button1.setSize(1, 1);

    button1.setColor(RC_ORANGE);

    LRemote.addControl(button1);


    button2.setPos(1, 3);

    button2.setText("2");

    button2.setSize(1, 1);

    button2.setColor(RC_ORANGE);

    LRemote.addControl(button2);


    button3.setPos(2, 3);

    button3.setText("3");

    button3.setSize(1, 1);

    button3.setColor(RC_ORANGE);

    LRemote.addControl(button3);


    button4.setPos(0, 2);

    button4.setText("4");

    button4.setSize(1, 1);

    button4.setColor(RC_ORANGE);

    LRemote.addControl(button4);


    button5.setPos(1, 2);

    button5.setText("5");

    button5.setSize(1, 1);

    button5.setColor(RC_ORANGE);

    LRemote.addControl(button5);


    button6.setPos(2, 2);

    button6.setText("6");

    button6.setSize(1, 1);

    button6.setColor(RC_ORANGE);

    LRemote.addControl(button6);


    button7.setPos(0, 1);

    button7.setText("7");

    button7.setSize(1, 1);

    button7.setColor(RC_ORANGE);

    LRemote.addControl(button7);


    button8.setPos(1, 1);

    button8.setText("8");

    button8.setSize(1, 1);

    button8.setColor(RC_ORANGE);

    LRemote.addControl(button8);


    button9.setPos(2, 1);

    button9.setText("9");

    button9.setSize(1, 1);

    button9.setColor(RC_ORANGE);

    LRemote.addControl(button9);


    button10.setPos(1, 4);

    button10.setText("Clear");

    button10.setSize(2, 1);

    button10.setColor(RC_GREEN);

    LRemote.addControl(button10);

  LRemote.begin();

  SetPasswd = 10;

  PhonePasswd = 0;

  c = 0;

  S1 = "*";

  S2 = "**";

  S3 = "***";

  S4 = "****";

  count = 3;

  pinMode(5, OUTPUT);

}


void loop()

{

  time = 5;

  LRemote.process();

  if (button9.isValueChanged()) {

    if (button9.getValue() == 1) {

      c = c + 1;

      if (c == 1) {

        PhonePasswd = PhonePasswd + 1;


      }


    }


  } else if (button5.isValueChanged()) {

    if (button5.getValue() == 1) {

      c = c + 1;

      if (c == 2) {

        PhonePasswd = PhonePasswd + 2;


      }


    }

  } else if (button2.isValueChanged()) {

    if (button2.getValue() == 1) {

      c = c + 1;

      if (c == 3) {

        PhonePasswd = PhonePasswd + 3;


      }


    }

  } else if (button7.isValueChanged()) {

    if (button7.getValue() == 1) {

      c = c + 1;

      if (c == 4) {

        PhonePasswd = PhonePasswd + 4;


      }


    }

  } else if (button4.isValueChanged()) {

    if (button4.getValue() == 1) {

      c = c + 1;


    }

  } else if (button0.isValueChanged()) {

    if (button0.getValue() == 1) {

      c = c + 1;


    }

  } else if (button6.isValueChanged()) {

    if (button6.getValue() == 1) {

      c = c + 1;


    }

  } else if (button1.isValueChanged()) {

    if (button1.getValue() == 1) {

      c = c + 1;


    }

  } else if (button8.isValueChanged()) {

    if (button8.getValue() == 1) {

      c = c + 1;


    }

  } else if (button3.isValueChanged()) {

    if (button3.getValue() == 1) {

      c = c + 1;


    }

  } else if (button10.isValueChanged()) {

    if (button10.getValue() == 1) {

      label1.updateText(String("輸入密碼"));

      c = 0;

      PhonePasswd = 0;


    }

  }

  if (c == 1) {

    label1.updateText(String(S1));


  } else if (c == 2) {

    label1.updateText(String(S2));

  } else if (c == 3) {

    label1.updateText(String(S3));

  } else if (c == 4) {

    label1.updateText(String(S4));

    delay(500);

    if (SetPasswd == PhonePasswd) {

      label1.updateText(String("開門"));

      digitalWrite(5, HIGH);

      delay(5000);

      digitalWrite(5, LOW);


    } else {

      label1.updateText(String("密碼錯誤"));

      delay(1000);

      count = count - 1;

      label1.updateText(String(String() + "還有" + count + "次"));

      if (count == 0) {

        count = 3;

        label1.updateText(String("五秒後輸入"));

        delay(1000);

        for (int count2 = 0; count2 < 5; count2++) {

          time = time - 1;

          label1.updateText(String(String() + "剩餘" + time + "秒"));

          delay(1000);

        }


      }

      delay(2000);


    }

    label1.updateText(String("輸入密碼"));

    c = 0;

    PhonePasswd = 0;

  }

  delay(100);

}
影片展示
最後,來看看RK物聯網教學實驗箱門禁系統影片的操作說明吧!
本實驗箱已備有使用手冊,及多種範例實際應用操作,進一步資訊請點選此連結。
本篇主題到此告一段落,下次再見囉!

- 【CAVEDU講堂】micro:bit V2使用TCS34725顏色感測器模組方法 - 2025/06/27
- 【CAVEDU講堂】NVIDIA Jetson AI Lab 大解密!範例與系統需求介紹 - 2024/10/08
- 【CAVEDU講堂】Google DeepMind使用大語言模型LLM提示詞來產生你的機器人操作程式碼 - 2024/07/30
訂閱MakerPRO知識充電報
與40000位開發者一同掌握科技創新的技術資訊!


