作者:Ted Lee
萬丈高樓皆由平地起。本文接續前著《Python玩AI,你也可以 — 從CVZone入門吧!》一文,將更進一步地詳細說明如何以註解掉旁枝程式碼的拆解(decompose)過程來追踨(code tracing)別人寫好的原始程式(source code)。透過這個動手術切除旁枝的技巧,我們可以很容易地從一隻程式解析出它組成的基本元素有哪些?
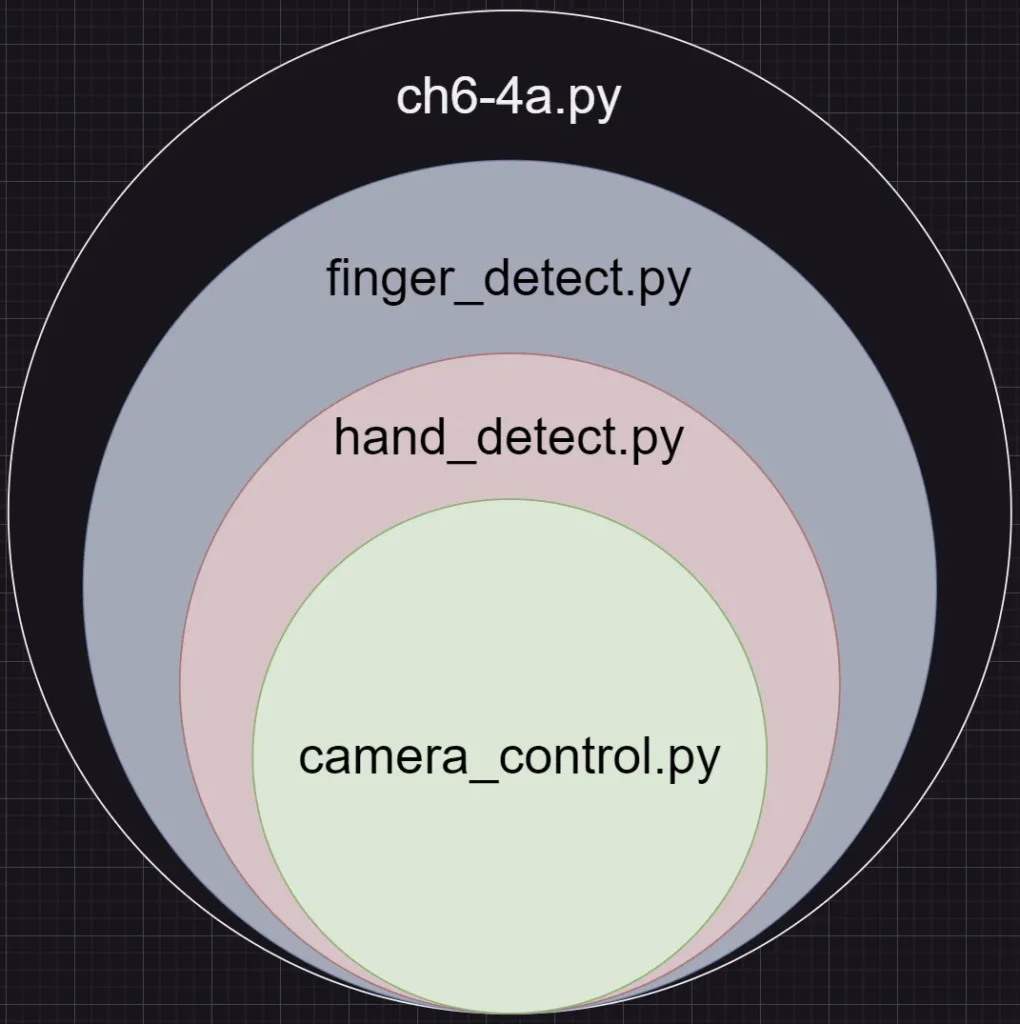
第一步,如圖 1,我們先從陳會安老師分享的 CVZone 手部辨識原始專案 ch6–4a.py 中拆解出攝影機控制,camera_control.py。第二步,再從剩餘的程式碼中找出「手部辨識」的內容,hand_detection.py。此時,程式會框出左/右手手掌的位置。第三步,手指辨識,判別五隻手指頭的出現狀況,finger_detect.py。

圖 1:專案拆解
ch6–4a.py
from cvzone.HandTrackingModule import HandDetector

import cv2


cap = cv2.VideoCapture(0)

detector = HandDetector(detectionCon=0.5, maxHands=1)


while cap.isOpened():

    success, img = cap.read()

    hands, img = detector.findHands(img)

    if hands:

        hand = hands[0]

        bbox = hand["bbox"]

        fingers = detector.fingersUp(hand)

        totalFingers = fingers.count(1)

        print(totalFingers)

        msg = "None"

        if totalFingers == 5:

            msg = "Paper"

        if totalFingers == 0:

            msg = "Rock"

        if totalFingers == 2:

            if fingers[1] == 1 and fingers[2] == 1:

                msg = "Scissors"

        cv2.putText(img, msg, (bbox[0]+200,bbox[1]-30),

                    cv2.FONT_HERSHEY_PLAIN, 2, (0, 255, 0), 2)

    cv2.imshow("Image", img)

    if cv2.waitKey(1) & 0xFF == ord("q"):

        break


cap.release()

cv2.destroyAllWindows()
註:本文所使用的 Python IDE 為陳會安老師包好 CVZone 的 fChart。
原始專案拆解 1:攝影機控制
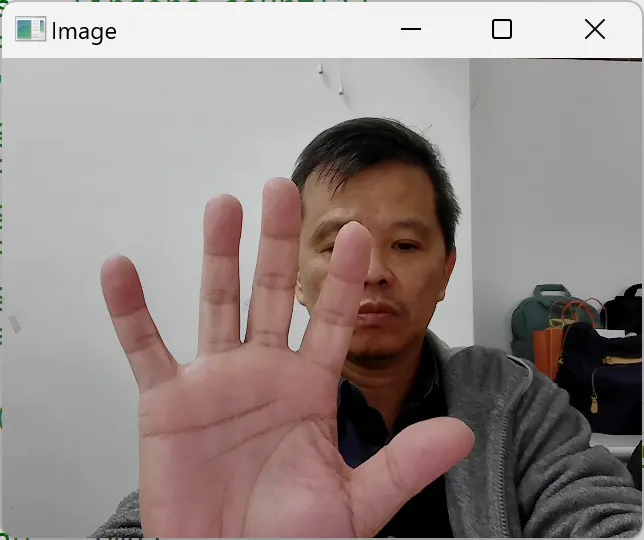
在 ch6–4a.py 中,我們使用了 Python 的單行註解 #(綠色)與多行註解 ‘’’…’’’(紅色)。註解完後如 camera_control.py 所示。執行結果的截圖如圖 2。
camera_control.py
#from cvzone.HandTrackingModule import HandDetector

import cv2


cap = cv2.VideoCapture(0)

#detector = HandDetector(detectionCon=0.5, maxHands=1)


while cap.isOpened():

    success, img = cap.read()

    '''

    hands, img = detector.findHands(img)

    if hands:

        hand = hands[0]

        bbox = hand["bbox"]

        fingers = detector.fingersUp(hand)

        totalFingers = fingers.count(1)

        print(totalFingers)

        msg = "None"

        if totalFingers == 5:

            msg = "Paper"

        if totalFingers == 0:

            msg = "Rock"

        if totalFingers == 2:

            if fingers[1] == 1 and fingers[2] == 1:

                msg = "Scissors"

        cv2.putText(img, msg, (bbox[0]+200,bbox[1]-30),

                    cv2.FONT_HERSHEY_PLAIN, 2, (0, 255, 0), 2)

    '''

    cv2.imshow("Image", img)

    if cv2.waitKey(1) & 0xFF == ord("q"):

        break


cap.release()

cv2.destroyAllWindows()

圖 2:攝影機控制,camera_control.py
其中,camera_control.py 中的以下這兩行,從指令的表面上來看,我們實測的結果為:按下鍵盤上的 q 會結束程式。所以,我們就大膽的將之註解掉。
if cv2.waitKey(1) & 0xFF == ord(“q”):

break
結果,程式仍在執行,但……視窗沒有顯示出來!此時,攝影機開啟的電源仍亮著。
會是我們將上述兩行註解掉後而導致無法開啟視窗,自然無法將攝影機取得的影像嵌入嗎?
在不急著 Google cv2.waitKey() 這個函式的功用之前,我們甞試援用 ChatGPT 來解析這個問題。
在 ChatGPT 中,我們使用三段式咒語(prompt):人(物)設(定)、任務、輸出來尋求這個問題的解答。
你是 Python CVZone 專家,以下這段程式中,
import cv2


cap = cv2.VideoCapture(0)


while cap.isOpened():

    success, img = cap.read()


    cv2.imshow("Image", img)


    if cv2.waitKey(1) & 0xFF == ord("q"):

       break


cap.release()

cv2.destroyAllWindows()
為什麼以下這兩行程式不能註解掉?(視窗沒有影像顯示)
if cv2.waitKey(1) & 0xFF == ord("q"):

       break
ChatGPT 的回答是:
這兩行程式碼不能註解掉的原因是 `cv2.waitKey(1)` 在 OpenCV 中不僅僅是用來檢查鍵盤輸入,它還有一個非常重要的功能:刷新顯示的影像視窗。
具體來說,`cv2.imshow` 函數會將影像顯示在視窗中,但這個顯示過程需要 `cv2.waitKey` 函數來配合。`cv2.waitKey` 函數會等待一段指定的時間(以毫秒為單位),在這段時間內,OpenCV 會處理任何掛起的 GUI 事件,包括刷新視窗。如果沒有這個函數,視窗將無法更新,顯示的影像也不會改變。
以下是這兩行程式碼的詳細解釋:
if cv2.waitKey(1) & 0xFF == ord("q"): # 每一毫秒檢查一次鍵盤輸入,如果按下 'q' 鍵則退出迴圈

   break
– `cv2.waitKey(1)`:這行程式碼會等待 1 毫秒,並在這段時間內處理任何掛起的 GUI 事件,包括刷新顯示的影像視窗。
– `& 0xFF`:這是為了確保只取 `cv2.waitKey` 返回值的低 8 位,這樣可以避免一些系統特定的問題。
– `ord(“q”)`:這會返回字符 ‘q’ 的 ASCII 值。
– `if cv2.waitKey(1) & 0xFF == ord(“q”)`:這行程式碼會檢查是否有按下 ‘q’ 鍵,如果有,則退出迴圈。
如果你註解掉這兩行程式碼,`cv2.waitKey` 就不會被調用(編著:呼叫),這樣 OpenCV 就無法處理掛起的 GUI 事件,導致影像視窗無法刷新,最終顯示的影像會停留在第一幀(編著:影格)。
總結來說,`cv2.waitKey` 函數在 OpenCV 中是必不可少的,它不僅用於檢查鍵盤輸入,還用於刷新顯示的影像視窗。
另一方面,陳會安老師類似的回覆如下:
cv2.waitKey() 除了延遲特定的時間外,還有以下幾個重要作用:
刷新視窗:cv2.waitKey() 允許 OpenCV 更新顯示窗口。這意味著每次調用該函數時,OpenCV 都能刷新窗口(編著:視窗)內容,使圖像能夠正確顯示。
原始專案拆解 2:手部辨識
延續前一節的拆解,我們將 camera_control.py 中的以下這三行的註解去除後產生了 hand_detection.py:
from cvzone.HandTrackingModule import HandDetector
detector = HandDetector(detectionCon=0.5, maxHands=1)
hands, img = detector.findHands(img)
hand_detection.py
from cvzone.HandTrackingModule import HandDetector

import cv2


cap = cv2.VideoCapture(0)

detector = HandDetector(detectionCon=0.5, maxHands=1)


while cap.isOpened():

    success, img = cap.read()

    hands, img = detector.findHands(img)

    '''

    if hands:

        hand = hands[0]

        bbox = hand["bbox"]

        fingers = detector.fingersUp(hand)

        totalFingers = fingers.count(1)

        print(totalFingers)

        msg = "None"

        if totalFingers == 5:

            msg = "Paper"

        if totalFingers == 0:

            msg = "Rock"

        if totalFingers == 2:

            if fingers[1] == 1 and fingers[2] == 1:

                msg = "Scissors"

        cv2.putText(img, msg, (bbox[0]+200,bbox[1]-30),

                    cv2.FONT_HERSHEY_PLAIN, 2, (0, 255, 0), 2)

    '''

    cv2.imshow("Image", img)

    if cv2.waitKey(1) & 0xFF == ord("q"):

        break


cap.release()

cv2.destroyAllWindows()
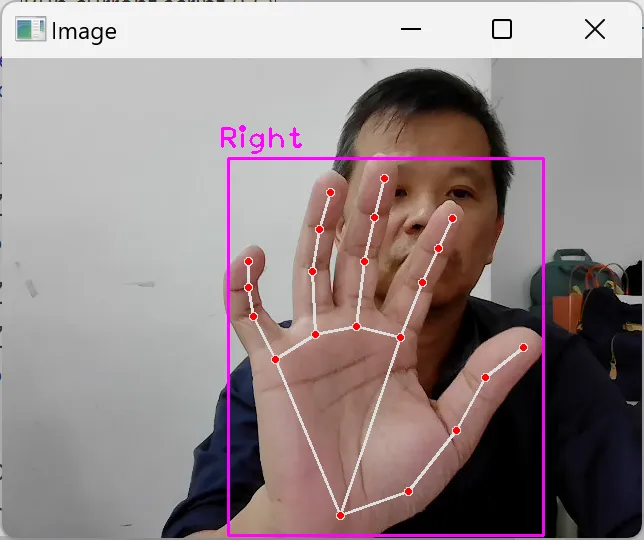
在 fChart 中的執行結果如圖 3,CVZone 會框出畫面中手掌的區域,並在紫色外框的左上方標示出左手(Left)/右手(Right)。

圖 3:手部辨識,hand_detection.py
原始專案拆解 3:手指辨識
在上小節的 hand_detection.py 中,將判別畫面中手勢是哪幾隻手指(布、石頭、剪刀)的程式碼註解掉,我們就能得到以下的 finger_detection.py。
finger_detection.py
from cvzone.HandTrackingModule import HandDetector

import cv2


cap = cv2.VideoCapture(0)

detector = HandDetector(detectionCon=0.5, maxHands=1)


while cap.isOpened():

    success, img = cap.read()

    hands, img = detector.findHands(img)

    if hands:

        hand = hands[0]

        bbox = hand["bbox"]

        fingers = detector.fingersUp(hand)

        totalFingers = fingers.count(1)

        print(totalFingers)

        msg = "None"

        '''

        if totalFingers == 5:

            msg = "Paper"

        if totalFingers == 0:

            msg = "Rock"

        if totalFingers == 2:

            if fingers[1] == 1 and fingers[2] == 1:

                msg = "Scissors"

        cv2.putText(img, msg, (bbox[0]+200,bbox[1]-30),

                    cv2.FONT_HERSHEY_PLAIN, 2, (0, 255, 0), 2)

        '''

    cv2.imshow("Image", img)

    if cv2.waitKey(1) & 0xFF == ord("q"):

        break


cap.release()

cv2.destroyAllWindows()
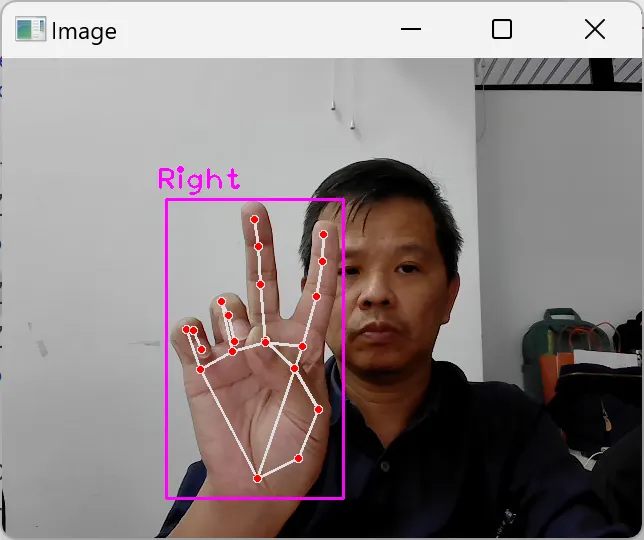
finger_detection.py 的執行結果如圖 4,手掌的關節點以紅點標示,而且各點間以白線相連接而建構出整個手掌的骨架。

圖 4:手指辨識,finger_detection.py
改參數
從原始專案 ch6–4a.py,我們一步步拆解出 camera_control.py、hand_detection.py 和 finger_detection.py。另一方面,讀者們可以更改以下各個參數來更進一步了解這隻程式的寫作邏輯。
- L5:maxHands,1:單手;2:雙手。
- L24:bbox[0]+200,bbox[1]-30,紫色框框的左上及右下的對角線位置。
- L25:2, (0, 255, 0), 2:字體大小、顏色、粗細。
- L27:q,按 ‘q’ 結束程式。
更有甚者,當手指豎立時,第 13 行的 fingersUp()會傳回陣列 fingers[],而此陣列存儲手指的順序為 [大姆指, 食指, 中指, 無名指, 小指]。因此,我們可以用它來進行以下各種的手勢辨識(gesture recognization):
- 6/rock&roll:大姆指和小指。
- 讚:大姆指。
- V:食指和中指。
- OK:大姆指和食指。
- 停止:五指。
- 數字 1~10。
使用 ChatGPT 來玩幾個有趣的專案
既然我們已經可以輕鬆地利用 AI 來辨識手指變化出的各種手勢了。
在虛擬飛行模擬(Virtual Flight Simulator)這個專案中,在不解析原始碼並以直接執行程式來建立程式直覺(intuition)之前,我們更可以透過 ChatGPT 來「幫讀」。咒語(表 1):
(人設)你是 Python 專家,
(任務)以下程式如何指定控制的手勢?
…(程式略)
(輸出)以表格列出所有控制手勢的中文、英文及方式

表 1:飛行手勢
另外,「擬虛縮放手勢(Virtual Zoom Gesture)」專案是依據雙手食指和中指中心點的距離來縮放要顯示的圖像。
最後,「Mediapipe-Hands 實現手勢算術加法」專案以手指比出加數和被加數後程式會自動計算出兩數之和。咒語:
(人設)你是 Python 專家,
(任務)說明以下程式如何操作
…(程式略)
[1]六種授權條款。
(作者為本刊專欄作家,本文同步表於作者部落格,原文連結;責任編輯:謝涵如)
- 用GenAI自動拆解程式碼學習:GenAI時代的新程式學習法 - 2025/12/29
- 「動手」之前 你需要了解電腦系統的基礎知識點! - 2025/11/28
- GenAI拆解學習:以「健康手環監測系統」示例 - 2025/10/23
訂閱MakerPRO知識充電報
與40000位開發者一同掌握科技創新的技術資訊!


