作者/圖片來源:CIRCUS Pi
Aruino UNO R4 WiFi(以下簡稱為 UNO R4 WiFi)在此次更新了 WiFi 功能, 透過 ESP32-S3 這個 WiFi 模組來做功能升級,那是由 Espressif Systems 推出的一款WiFi和藍牙模組,使得此次 UNO R4 WiFi 的更新可以遠程控制和監控設備,並與其他設備進行數據交換。
先前筆者也為大家整理了 UNO R4 WiFi 的特點以及基礎介紹了!有興趣瞭解的話可以點擊連結延伸閱讀。關於更新另一要點的 LED 矩陣,這邊也有一篇文章介紹如何使用 UNO R4 WiFi 來製作矩陣動畫,其內容也有提到如何安裝所需的程式以及套件,若是沒有使用過 Arduino 的夥伴們不妨先到上一篇文章看看喔!
接下來就來實作看看此次更新的 WiFi 功能吧!
透過建立 AP 遠端控制 UNO R4 WiFi LED 開關
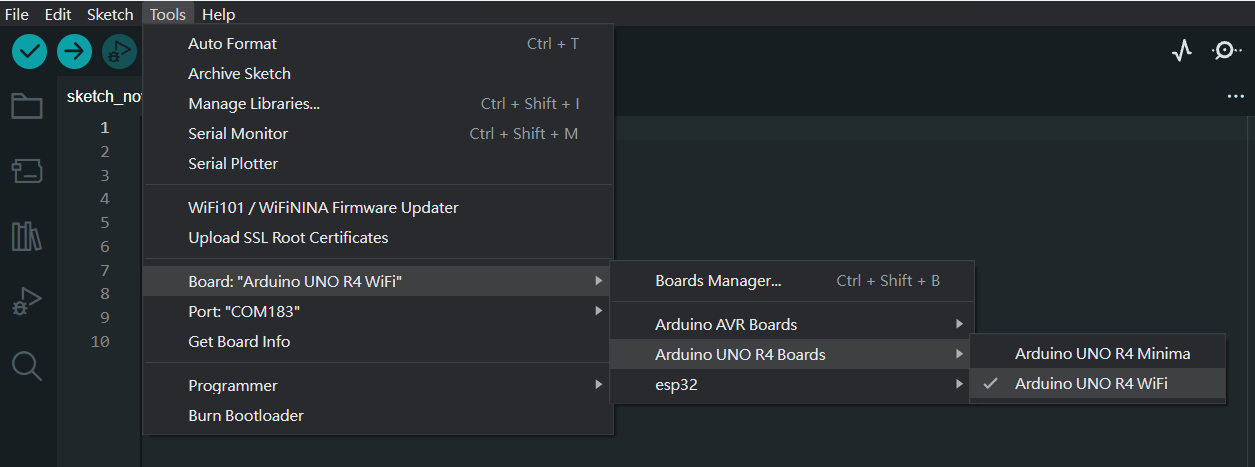
選擇開發板
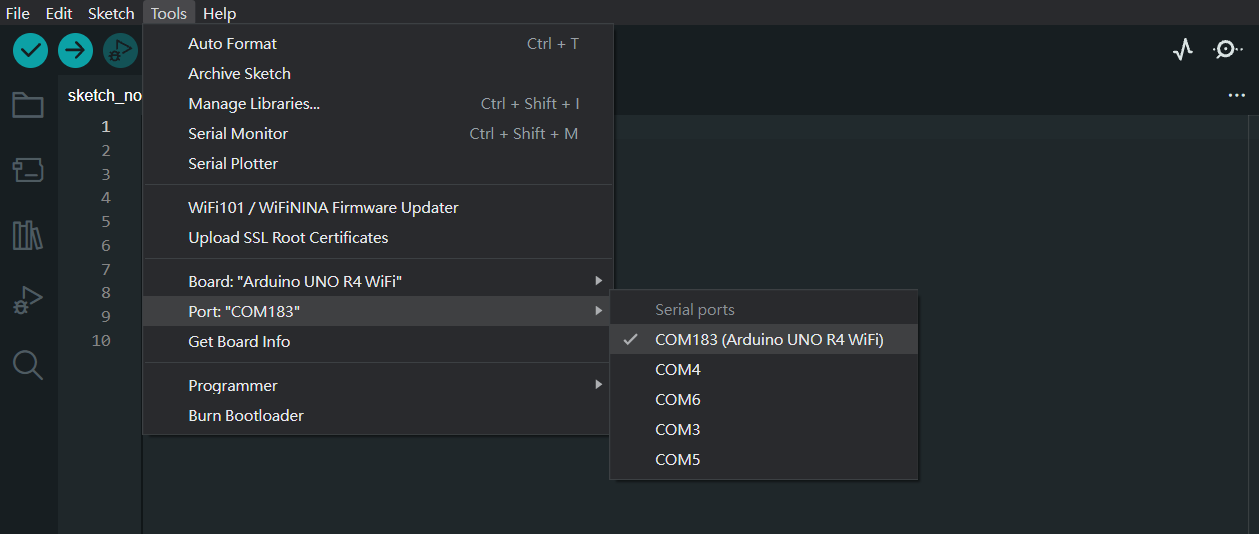
選擇對應之COM接口
點選範例程式
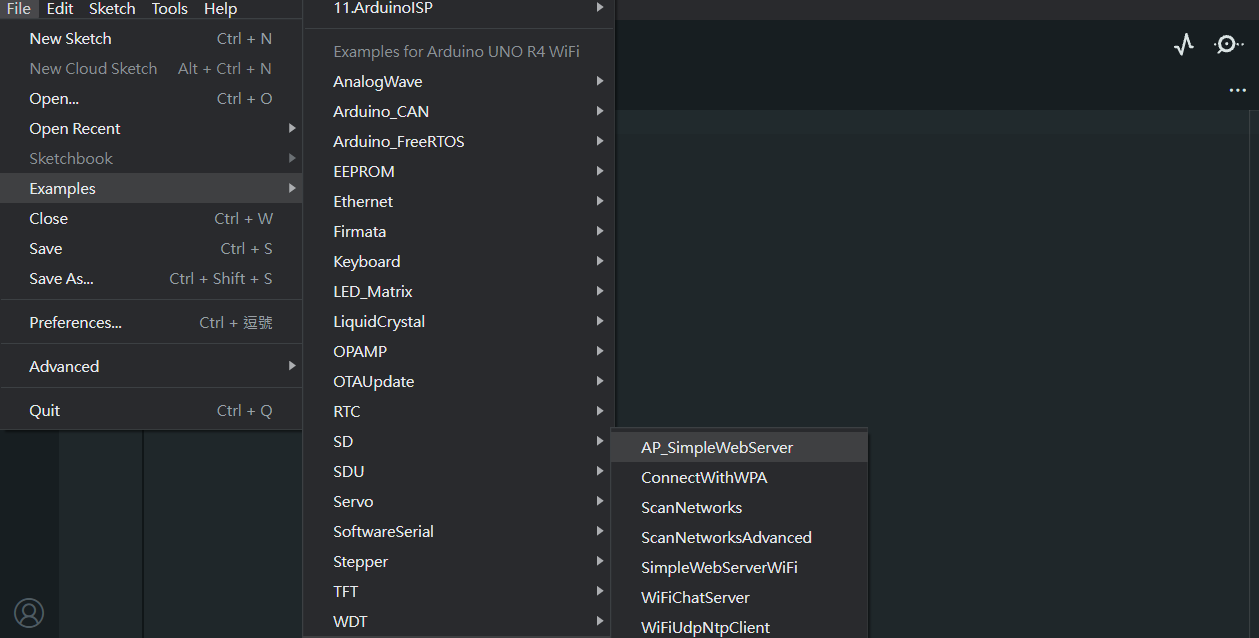
透過檔案選取範例,再從 WiFiS3 分類中點選 AP_SimpleWebSever。 隨後會跳出另外一個視窗顯示這個範例程式檔案, 會看到程式如下:
WiFi Web Server LED Blink
A simple web server that lets you blink an LED via the web.
This sketch will create a new access point (with no password).
It will then launch a new server and print out the IP address
to the Serial Monitor. From there, you can open that address in a web browser
to turn on and off the LED on pin 13.
If the IP address of your board is yourAddress:
http://yourAddress/H turns the LED on
http://yourAddress/L turns it off
created 25 Nov 2012
by Tom Igoe
adapted to WiFi AP by Adafruit
Find the full UNO R4 WiFi Network documentation here:
https://docs.arduino.cc/tutorials/uno-r4-wifi/wifi-examples#access-point
*/
#include "WiFiS3.h"
#include "arduino_secrets.h"
///////please enter your sensitive data in the Secret tab/arduino_secrets.h
char ssid[] = SECRET_SSID; // your network SSID (name)
char pass[] = SECRET_PASS; // your network password (use for WPA, or use as key for WEP)
int keyIndex = 0; // your network key index number (needed only for WEP)
int led = LED_BUILTIN;
int status = WL_IDLE_STATUS;
WiFiServer server(80);
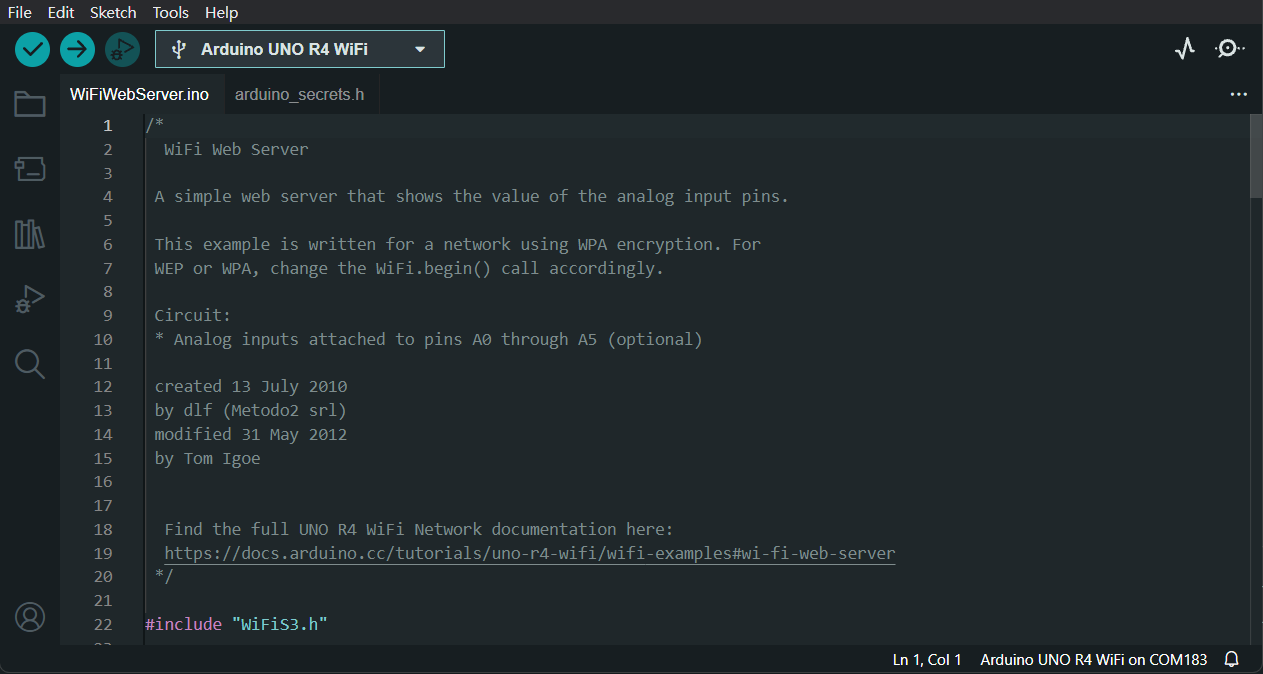
void setup() {
//Initialize serial and wait for port to open:
Serial.begin(9600);
while (!Serial) {
; // wait for serial port to connect. Needed for native USB port only
}
Serial.println("Access Point Web Server");
pinMode(led, OUTPUT); // set the LED pin mode
// check for the WiFi module:
if (WiFi.status() == WL_NO_MODULE) {
Serial.println("Communication with WiFi module failed!");
// don't continue
while (true);
}
String fv = WiFi.firmwareVersion();
if (fv < WIFI_FIRMWARE_LATEST_VERSION) {
Serial.println("Please upgrade the firmware");
}
// by default the local IP address will be 192.168.4.1
// you can override it with the following:
WiFi.config(IPAddress(192,48,56,2));
// print the network name (SSID);
Serial.print("Creating access point named: ");
Serial.println(ssid);
// Create open network. Change this line if you want to create an WEP network:
status = WiFi.beginAP(ssid, pass);
if (status != WL_AP_LISTENING) {
Serial.println("Creating access point failed");
// don't continue
while (true);
}
// wait 10 seconds for connection:
delay(10000);
// start the web server on port 80
server.begin();
// you're connected now, so print out the status
printWiFiStatus();
}
void loop() {
// compare the previous status to the current status
if (status != WiFi.status()) {
// it has changed update the variable
status = WiFi.status();
if (status == WL_AP_CONNECTED) {
// a device has connected to the AP
Serial.println("Device connected to AP");
} else {
// a device has disconnected from the AP, and we are back in listening mode
Serial.println("Device disconnected from AP");
}
}
WiFiClient client = server.available(); // listen for incoming clients
if (client) { // if you get a client,
Serial.println("new client"); // print a message out the serial port
String currentLine = ""; // make a String to hold incoming data from the client
while (client.connected()) { // loop while the client's connected
delayMicroseconds(10); // This is required for the Arduino Nano RP2040 Connect - otherwise it will loop so fast that SPI will never be served.
if (client.available()) { // if there's bytes to read from the client,
char c = client.read(); // read a byte, then
Serial.write(c); // print it out to the serial monitor
if (c == '\n') { // if the byte is a newline character
// if the current line is blank, you got two newline characters in a row.
// that's the end of the client HTTP request, so send a response:
if (currentLine.length() == 0) {
// HTTP headers always start with a response code (e.g. HTTP/1.1 200 OK)
// and a content-type so the client knows what's coming, then a blank line:
client.println("HTTP/1.1 200 OK");
client.println("Content-type:text/html");
client.println();
// the content of the HTTP response follows the header:
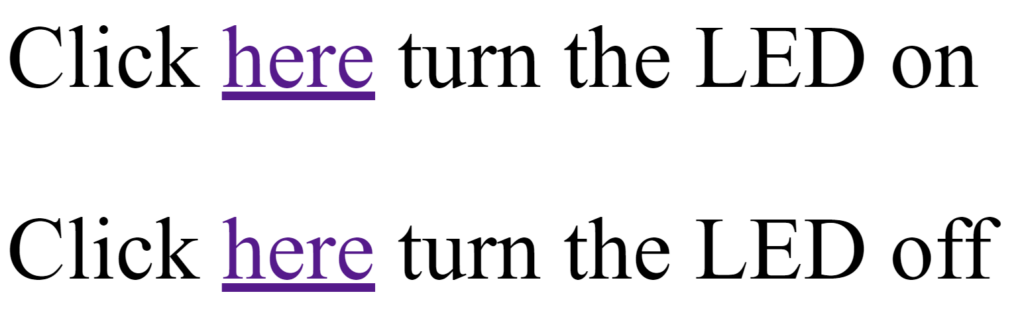
client.print("
<p style="0font-size: 7vw;">Click <a href="\"/H\"">here</a> turn the LED on</p>
");
client.print("
<p style="0font-size: 7vw;">Click <a href="\"/L\"">here</a> turn the LED off</p>
");
// The HTTP response ends with another blank line:
client.println();
// break out of the while loop:
break;
}
else { // if you got a newline, then clear currentLine:
currentLine = "";
}
}
else if (c != '\r') { // if you got anything else but a carriage return character,
currentLine += c; // add it to the end of the currentLine
}
// Check to see if the client request was "GET /H" or "GET /L":
if (currentLine.endsWith("GET /H")) {

  digitalWrite(led, HIGH);  // GET /H turns the LED on

}

if (currentLine.endsWith("GET /L")) {

  digitalWrite(led, LOW);  // GET /L turns the LED off

}
}
}
// close the connection:
client.stop();
Serial.println("client disconnected");
}
}
void printWiFiStatus() {
// print the SSID of the network you're attached to:
Serial.print("SSID: ");
Serial.println(WiFi.SSID());
// print your WiFi shield's IP address:
IPAddress ip = WiFi.localIP();
Serial.print("IP Address: ");
Serial.println(ip);
// print where to go in a browser:
Serial.print("To see this page in action, open a browser to http://");
Serial.println(ip);
}
注意這邊需要將此段程式碼「等號」後面的文字改成您要建立的網路名稱以及密碼,若是含有特殊字元如:!、@、#、$、%、^、&、*、……等,加上”雙引號”或是’單引號’就可以正常運行了!
char pass[] = SECRET_PASS; // your network password (use for WPA, or use as key for WEP)
點選箭頭燒入 upload

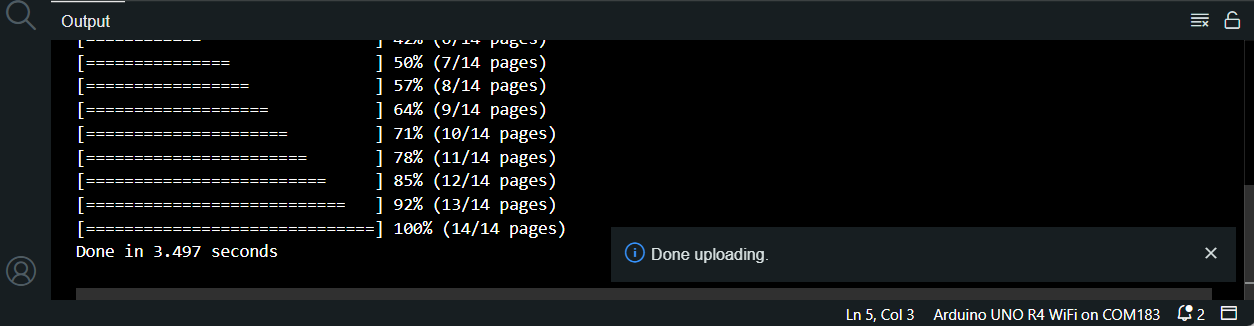
成果驗收!
燒錄完成時會出現像這樣子的提示訊息:
接著點擊 Serial Monitor 會看見輸出的訊息:
Device disconnected from AP
- 這表示你的裝置(Arduino Uno R4 WiFi)已經從接入點(Access Point, AP)斷開連接。這可能是由於連接中斷、連接品質差、或者裝置自行斷開,可以按下arduino上的reset按鈕嘗試重連。
Access Point Web Server
- 表示 Arduino Uno R4 WiFi 正在以 Access Point(AP)的模式運行,並且它是一個 Web 伺服器,可以通過網頁進行互動。
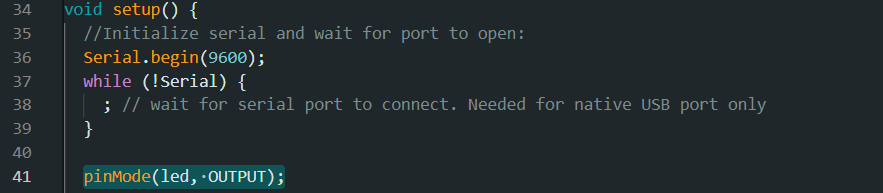
Please upgrade the firmware
- 用來檢查 WiFi 模組的韌體版本。如果韌體版本較舊,就會提示你升級韌體。但是對於 Arduino Uno R4 WiFi,通常不需要手動升級韌體,因為出廠時已經預先燒錄了正確且可運行的版本了。
Creating access point named: ” “
- 表示 Arduino Uno R4 WiFi 創建了一個名為 ” ” 的 Access Point。
SSID: #####
- 顯示了你的 WiFi 網路的 SSID(Service Set Identifier,WiFi 名稱)。
IP Address: 192.48.56.2
- 這是 Access Point 的 IP 地址。在程式中設定,Access Point 的 IP 地址是 192.48.56.2。
To see this page in action, open a browser to <http://192.48.56.2>
- 這是一個提示,告訴你可以打開網頁瀏覽器,輸入 http://192.48.56.2 來使用 Arduino Uno R4 WiFi 提供的網頁頁面。
💡 注意 UNO R4 WiFi 是以 Access Point(AP)模式運行。 在這種模式下,UNO R4 WiFi 會建立一個自己的 WiFi 網路, 需進行通信的裝置需要連接到同一個 WiFi 才能與 Arduino 進行通信。
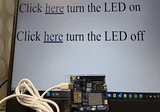
所以接下來就將電腦連接上剛才 UNO R4 WiFi 所建立的網路吧!若是成功連接上網頁,會出現這樣的頁面
接下來就可以動手透過遠端通信的電腦操作Arduino的內建LED燈了!
透過建立 WebServer 遠端控制 UNO R4 WiFi LED 開關
在實際操作之前要先帶讀者們瞭解 Access Point 和 Web Server ,在上一個範例中我們可以得知 Access Point 可以建立一個存取點供使用者連線讀取,而 Web Server 則是一種提供網頁內容的軟體或硬體裝置。
💡 Access Point 和 Web Server
在某些情況下,這兩者可能會結合在一起,例如當使用者透過 Wi-Fi 連接到一個無線路由器(同時具有AP功能)時,該路由器的內部可能運行一個 Web Server,使用戶能夠通過網頁設置路由器的配置。
所以兩者在 Wi-Fi 技術下是不一樣的概念,它們在無線網絡中扮演不同的角色。
在接下來的實作中就是要藉由外部的 Wi-Fi 網路分享器做為 Web Server,將 UNO R4 WiFi 和電腦都連到該網路進行溝通,同樣的去控制 LED 的開關。
- 打開範例程式
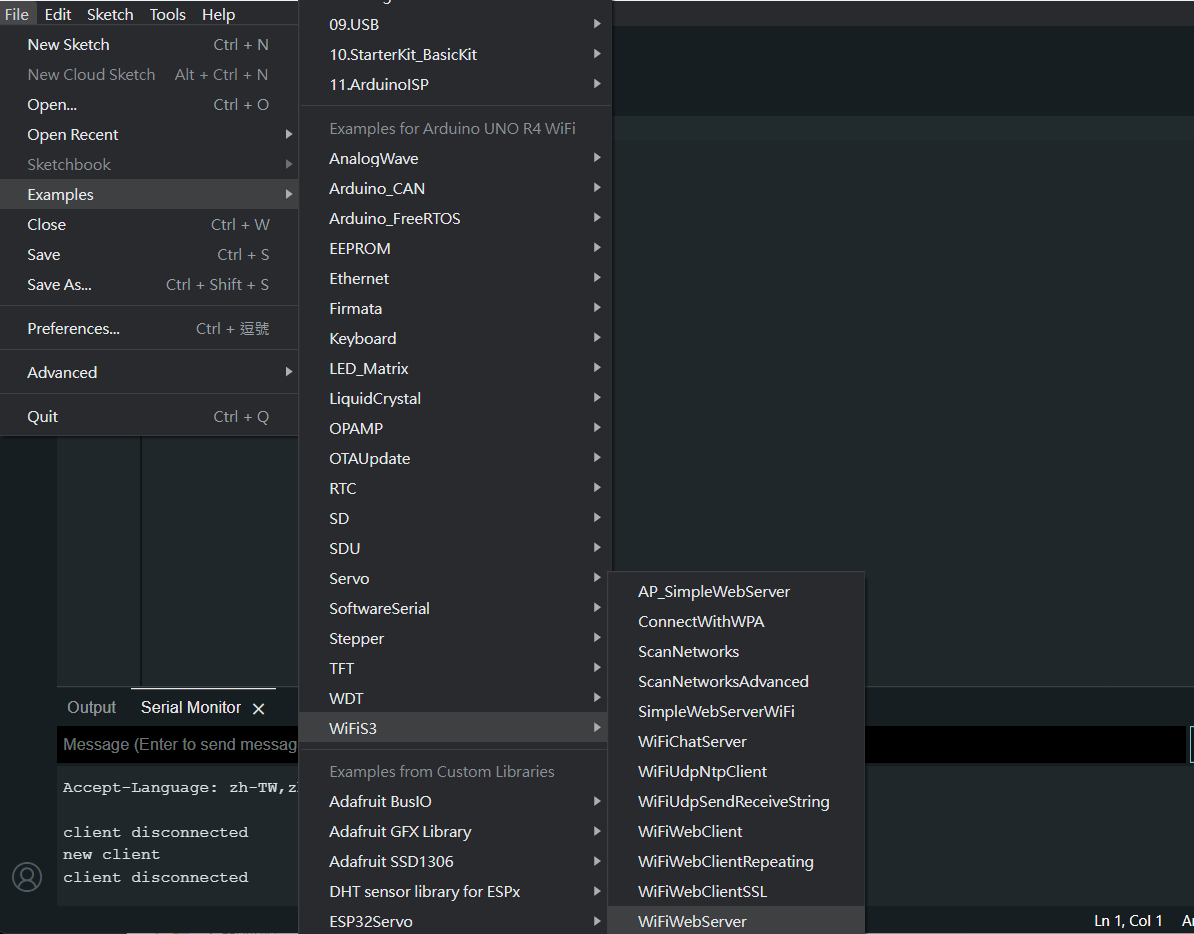 一樣透過檔案範例,找到WiFiS3分類中的 WiFiWebServer。
 - 打開後會顯示一個新的範例程式檔案
- 改寫程式碼
可以對照上面透過 AP 方式控制 LED 開關的程式內容,我們需要增加以下內容:
LED變數宣告
int led = LED_BUILTIN;

setup()函式中的 LED 初始化:
pinMode(led, OUTPUT); // set the LED pin mode
設定變數 currentLine
String currentLine = "";
HTML按鈕的生成:
loop() 函式中的 LED 控制:
if (currentLine.endsWith("GET /H")) {
digitalWrite(led, HIGH); // GET /H turns the LED on
}
if (currentLine.endsWith("GET /L")) {
digitalWrite(led, LOW); // GET /L turns the LED off
}

修改完成後點擊上傳按鈕將程式碼燒錄到 Arduino UNO R4 WiFi 中,完成後可以點擊 SerialPort 查看輸出訊息:
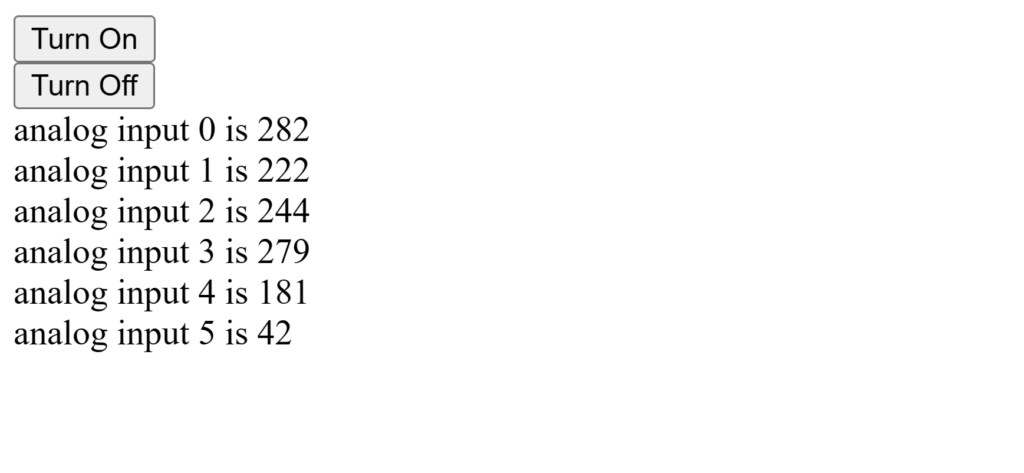
複製該 IP 之後啟動瀏覽器,複製貼上該 IP 於網頁搜尋欄,進入該網頁。可以看見網站會輸出一些接角的類比訊號,也有兩個按鈕能夠點擊控制LED的開關。讀者可以嘗試看看是否能夠控制 UNO R4 WiFi 上面的 LED 燈囉!
結論
在這篇文章中我們使用了兩種 Wi-Fi 常見的技術,Access Point 以及 Web Server 來實際體驗 UNO R4 WiFi 所帶來的全新體驗,筆者在測試時發現雖然連接網路很迅速,但似乎沒有像使用 ESP32 開發板的 Wi-Fi 功能來的穩定,需要隨時去檢測是否有斷開連結的發生,但除此之外此次 UNO R4 WiFi 做的大更新 WiFiS3 套件真的為許多 Arduino 開發愛用者開啟了更多創意的新大門!
這一次也簡單的介紹了 Access Point 以及 Web Server 兩個之間的不同供讀者知悉,綜合上述的實作,搭配不同的感測器也可以為您的創意增添新樂趣!像是以物聯網概念做資訊管理統整,亦或是遠端操控設備、監控攝影機也都是很此次 UNO R4 WiFi 更新的創作發想方向,趕緊動手試試看吧!
(本文經同意轉載自CIRCUS Pi、原文連結;責任編輯:謝涵如)

- 【CIRCUS Pi】ESP32教學系列:用ESP32玩91段電子紙 - 2025/03/24
- 【CIRCUS Pi】ESP32教學系列:硬體中斷 - 2024/12/25
- 【CIRCUS Pi】使用 Arduino UNO R4 WiFi 輕鬆製作 LED Matrix 動畫 - 2024/10/14
訂閱MakerPRO知識充電報
與40000位開發者一同掌握科技創新的技術資訊!


