作者/圖片:Ted Lee
本文將透過8787內建的AI影像處理(image processing)功能來進行實作,設計一款能顯示今日心情指數(blue Monday、生人勿近…)的小燈飾來點亮你我心中那盞光明燈!(小提示:利用8787的形狀偵測功能來觸發燈條以閃爍不同顏色。)
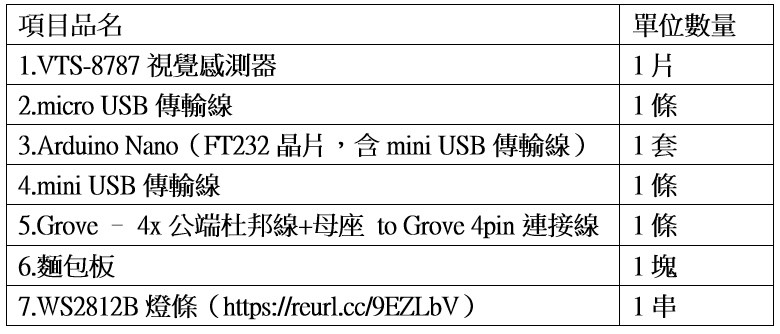
材料清單
註:如果讀者要將項目3的開發板換成Uno或其他Arduino版本,請自行將項目4的傳輸線做調當的調整。
造形設計(機構)
為自己的創作小物(https://reurl.cc/AqgWG3)加上心情顏色(https://reurl.cc/AqgWQK),例如萌萌橘、鎮定藍…。
功能設計(電路、程式)
先依照下表及接線圖接妥8787、Nano、燈條與電池盒雙電源共地的連接線路。若僅作功能測試,可以將燈條直接使用Nano上的5V電源,以省去準備外接電源的功夫。
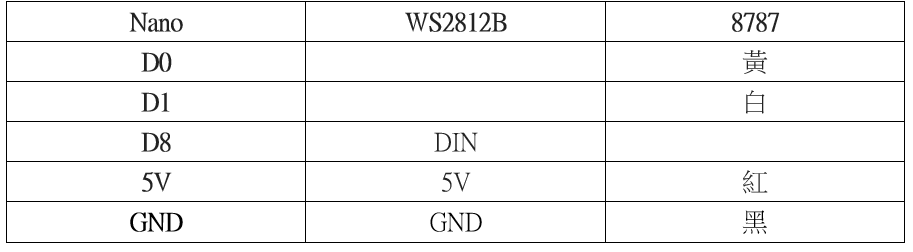

本次設計的接線圖
在Pixetto Utility 上選用形狀偵測(Shape Detection)功能後,將之套用至8787。

在Pixetto Utility上選用形狀偵測功能。
接著,在Pixetto Junior 上拉出圖3的積木程式。這個程式的邏輯是當8787識別出圓形時就讓Nano板載D13腳位的SMD LED點亮;若為矩形就關閉。其中,點亮LED將於最後的Arduino程式中改為燈條的顏色顯示。
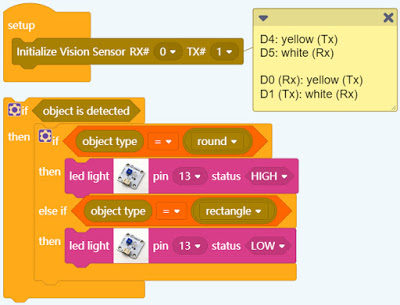
Pixetto Junior的Blockly程式碼。
在進行最後一個步驟前,先將燈條的Arduino函數庫(https://reurl.cc/j7qZ8n)加到Pixetto Junior中(預設路經為C:\Pixetto\PixettoJunior\arduino\libraries)。然後再將以下標示底線用來控制燈條的指令(初始化綠光、圓形:紅光、矩形:藍光)加到自動產生的Arduino程式碼中。
#include<Adafruit_NeoPixel.h>

#include<Arduino.h>
#include<SmartSensor.h>

SmartSensor ss(0,1);

#define PIN 8 //Which pin on the Arduino is connected to the NeoPixels?
#define NUMPIXELS 6 // How many NeoPixels are attached to the Arduino?

// When setting up the NeoPixel library, we tell it how many pixels,
// and which pin to use to send signals. Note that for older NeoPixel
// strips you might need to change the third parameter -- see the
// strandtest example for more information on possible values.
Adafruit_NeoPixel pixels(NUMPIXELS, PIN, NEO_GRB + NEO_KHZ800);

void setup() {
ss.begin();

pixels.begin(); // INITIALIZE NeoPixel strip object (REQUIRED)
pixels.fill(0x00FF00, 0, 6);
pixels.show();
delay(500);

pixels.clear(); // Set all pixel colors to 'off'
pixels.show();
} //end of setup()

void loop() {
if (ss.isDetected()) {
if (ss.getTypeID() == ss.SHAPE_ROUND) {
pixels.fill(0xFF0000, 0, 6);
pixels.show();
} else if (ss.getTypeID() == ss.SHAPE_RECTANGLE) {
pixels.fill(0x0000FF, 0, 6);
pixels.show();
} //end of if
} //end of if
} //end of loop()
本單元的操作影片:
教學活動設計
讓8787看到圓形時閃流水燈(https://reurl.cc/NjXdMx)樣式,看到矩形時閃霹靂燈(https://reurl.cc/g78y54)樣式。
(本文經作者同意轉載自泰布布部落格、原文連結;責任編輯:王姵文)

- 用GenAI自動拆解程式碼學習:GenAI時代的新程式學習法 - 2025/12/29
- 「動手」之前 你需要了解電腦系統的基礎知識點! - 2025/11/28
- GenAI拆解學習:以「健康手環監測系統」示例 - 2025/10/23
訂閱MakerPRO知識充電報
與40000位開發者一同掌握科技創新的技術資訊!


