作者:賴桑
接續前一篇《用Ameba打造智慧盆栽監控器》的需求,現在越多人對於Internet of Thing(IOT)有興趣,希望能夠隨時隨地透過無線通訊知道監測的狀況,於是乎許多廠商推出了各式各樣的IoT資料平台,包括本文的ThingSpeak、聯發科MediaTek的Cloud Service…等,每個都有其強調的特色。
本文挑選ThingSpeak介紹的原因是:這個ThingSpeak已經在國際間行之有年,除開放原始程式碼檔案供使用者下載外,也能讓每位使用者免費使用,所以用戶眾多,因此也被列為本文的實驗標的。
Ameba與Arduino不同之處在於已經內建了WiFi,所以通訊機能的利用更簡單!目前我只用了1.6.1的Arduino IDE就可以達到目的,想必之後的各項功能將陸續加入使得接受度更高、應用範圍更廣。
實作步驟:
1. 請先到ThingSpeak的入口 https://thingspeak.com/ 進行註冊,程序相當容易,將基本資料填寫即可。

進入ThingSpeak進行註冊
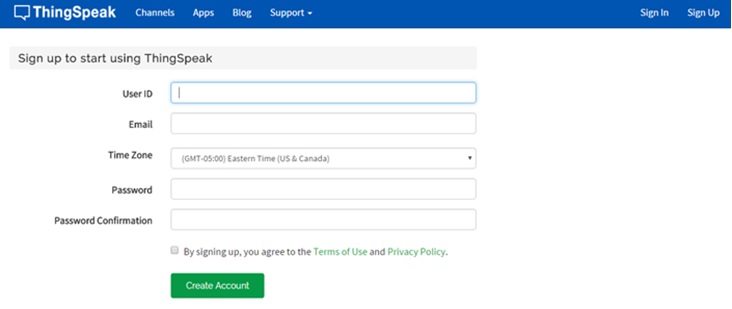
填寫基本資料,建立帳號
2. 當帳號成功建立後,按下 Sign In 就能登入,然後到 Channel 下建立 Channel ,其中,一個Channel目前固定最多從field1到field8有八個欄位,每個欄位可以設定顯示的字樣;在這個範例中,我們設定field1為temperature,field2為humidity,做為之後上傳感測器量測值,氣溫與濕度數據的儲存欄位。
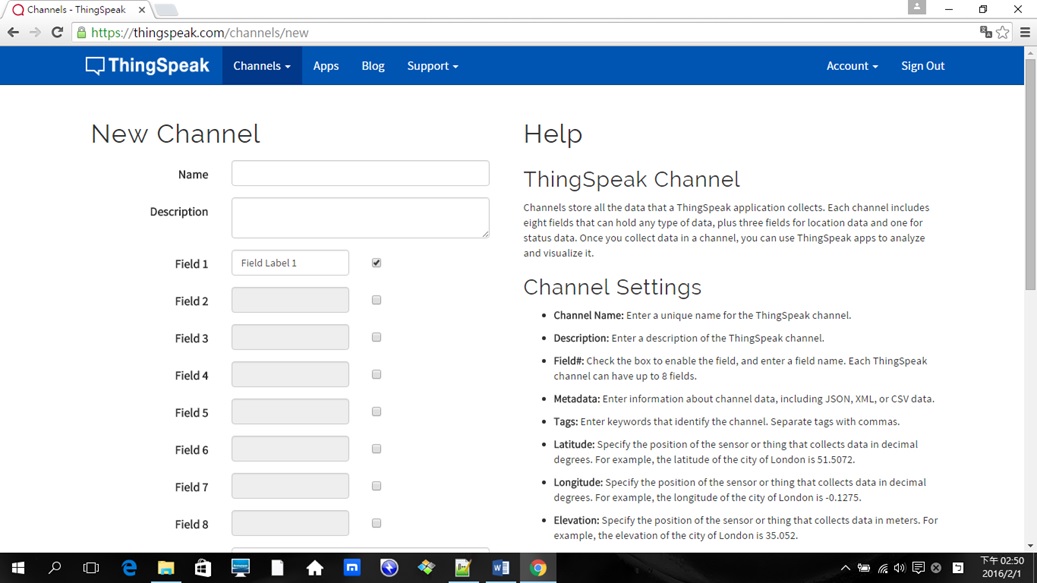
到 Channel 下建立欄位
3. 在 Save Channel 後就可以取得這個 Channel 的Key,所謂的Key就是指定將來要存取這個 Channel 的時候的通行碼,請記住,認Key不認名稱!
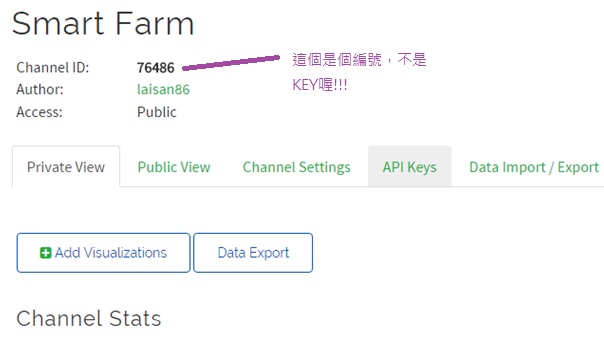
在 Save Channel 後,以取得這個 Channel 的Key

Key ( Channel 的通行碼 )
原始程式碼
#include

#include "WifiClient1.h"


char ssid[] = "AndroidAP1B3F";      //  your network SSID (name)

char pass[] = "t101419008";   // your network password

int keyIndex = 0;            // your network key Index number (needed only for WEP)


int status = WL_IDLE_STATUS;


// Initialize the Wifi client library

WiFiClient1 client;


// server address:

char server[] = "api.thingspeak.com";


void printWifiStatus() {

  // print the SSID of the network you're attached to:

  Serial.print("SSID: ");

  Serial.println(WiFi1.SSID());


  // print your WiFi shield's IP address:

  IPAddress ip = WiFi1.localIP();

  Serial.print("IP Address: ");

  Serial.println(ip);


  // print the received signal strength:

  long rssi = WiFi1.RSSI();

  Serial.print("signal strength (RSSI):");

  Serial.print(rssi);

  Serial.println(" dBm");

}


void setup() {

  // put your setup code here, to run once:


  // start serial port:

  Serial.begin(9600);


// attempt to connect to Wifi network:

  while ( status != WL_CONNECTED) {

    Serial.print("Attempting to connect to SSID: ");

    Serial.println(ssid);

    // Connect to WPA/WPA2 network. Change this line if using open or WEP network:

    status = WiFi1.begin(ssid, pass);


    // wait 10 seconds for connection:

    delay(10000);

  }

  // you're connected now, so print out the status:

  printWifiStatus();

}


void loop() {

  // put your main code here, to run repeatedly:


  // if there's a successful connection:

  if (client.connect(server, 80)) {

    Serial.println("Updateing...");


    client.print("GET /update");

    client.print("?key=DXIDOVC1CHXCCH5Q&field1=23&field2=50");

    client.println(" HTTP/1.1");


    client.println("Host: api.thingspeak.com");

    client.println("User-Agent: arduino-ethernet");

    client.println("Connection: close");

    client.println();


    Serial.println("Updated!");


    client.stop();

  }


  delay(10000);

}
基本說明
每隔10秒,程式產生一個字串,把兩個值23、50寫入 Write Key 為 DXIDOVC1CHXCCH5Q 對應的 Channel 中,每次寫入都能產生統計圖的變化,只不過不是立即的。值以及欄位可以改用 Arduino 的 library,例如: sprintf()等,形成字串後上傳。
用Ameba存入ThingSpeak
評比
有內建的WiFi對於實際使用來說相對簡單很多,如果用Arduino Uno,或其他系列的產品,雖然一樣可以做出相似,甚至相同的效果,可是必須外掛像是ESP8266等模組。

- 【開箱評測】用Mbed上手開發DSI 2599開發板 - 2020/08/03
- 【OpenVINO™教學】自製麵包影像辨識POS機的應用 - 2019/12/24
- 【邊緣運算】OpenVINO好夥伴 — athena A1 Kit x86單板 - 2019/11/18
訂閱MakerPRO知識充電報
與40000位開發者一同掌握科技創新的技術資訊!