作者:Perry Wu/編輯:賴芳如
 之前派樂雲的控制中心主要運行在樹莓派上,雖然樹莓派價格便宜,但是考量到一般使用情況下,大眾對樹莓派的接受度還不是很高,所以試著將控制中心在QNAP上運行看看。
一拿到QNAP TS-251A,研究一下系統後,我認為有三個可能Porting的方向:
- 在Docker中運行
- 在Virtual PC中運行
- APP Center安裝運行
首先拿Docker來Porting,不過設置環境後,發現了一些預期之外的問題,於是就先將Docker擱置。而Virtual PC因為會瓜分掉原本NAS的CPU/記憶體空間,則是完全不列入考慮。
再來,考量到一般人最容易上手的應該是由APP Center安裝程式直接使用,所以,就先朝向App Center的開發進行。(雖然我個人傾向在Docker上運作,但需要再花些時間研究可行性……)
所以,這篇主要在講如何Porting一個node.js的應用到QNAP上。
首先來分析一下控制中心,它主要是由以下套件所組成:
- node.js 控制中心
- mysql 資料庫
- motion 進行動作偵測以及縮時攝影的程式
- ffmpge 縮時攝影需要用到的程式
- jhead 圖像編輯用
- nmap 掃描區網需要用的工具
查了一下,QNAP內建的有node.js、MariaDB (mysql compatible)以及jhead 這三個安裝,所以若要移植控制中心,仍需先把motion、ffmpge和nmap先Porting到系統中。
底下是我用到的步驟:
1. 安裝QPKG
要啟用開發模式,第一步當然是按照官網的文件指示,安裝QPKG。
官網說明連結:
https://wiki.qnap.com/wiki/QPKG_Development_Guidelines
下載QPKG連結:
http://download.qnap.com/QPKG/QDK/QDK_2.2.14.zip
解壓縮後,會得到一個QDK_2.2.14.qpkg檔案。
開啟QNAP NAS中的APP Center,選擇手動安裝套件,將這個套件帶入手動安裝的套件中。
完成安裝後,NAS中的QPKG的環境就設定完成。
2. 在X86上準備QNAP的Cross Compiler
先由以下連結下載x86的Cross compiler:
https://sourceforge.net/projects/qosgpl/files/QNAP%20NAS%20Tool%20Chains/cross-project-x86.u7-20111011.tar.gz/download
下載完成後,在linux主機上安裝這個cross compiler的環境。
以下指令會將cross compiler安裝到/opt/cross-project/x86下:
tar zxvf cross-project-x86.u7-20111011.tar.gz -C /
安裝好cross compiler後,每次登入系統要使用環境時,需要先執行以下指令:
sudo chroot /opt/cross-project/x86/sys-root
這樣能夠改變root path到cross compiler的環境,就可以使用QNAP打包好的開發環境了。
3. Porting motion、ffmpge、nmap
以下步驟都是在QNAP Cross Compiler的環境進行。
(sudo chroot /opt/cross-project/x86/sys-root)
a. 建立開發資料夾,所有需要編譯的程式都下載到這裡:
mkdir build
b. 安裝x264
下載以下程式碼:
git clone git://git.videolan.org/x264
解壓縮後,把程式碼放到build/x264之下:
./configure –disable-asm –enable-shared –prefix=/build/pk-ha-center
make; make install;
c. 安裝ffmpge
wget http://ffmpeg.org/releases/ffmpeg-3.0.tar.bz2
tar xvfj ffmpeg-3.0.tar.bz2
cd ffmpeg-3.0
mkdir tmpCFLAGS=’-I /build/pk-ha-center/include/’ CPPFLAGS=’-I /build/pk-ha-center/include/’ LDFLAGS=’-L /build/pk-ha-center/lib/’ TMPDIR=/build/ffmpeg-3.0/tmp ./configure –disable-yasm –enable-shared –prefix=/build/pk-ha-center –enable-gpl –disable-libmp3lame –disable-librtmp –enable-shared –disable-libfaac –enable-libx264
d. 安裝motion
./configure –with-ffmpeg=/build/pk-ha-center/ –without-optimizecpu –prefix=/build/pk-ha-center –without-sqlite3
修改Makefile 中的CFLAGS,以及在LIBS 加入-I/include 和-lswresample -lm -lz, 如下所示:
CFLAGS       =  -g -O2 -D_REENTRANT -DMOTION_V4L2 -DTYPE_32BIT="int" -DHAVE_BSWAP    -Wall -DVERSION="Unofficial-Git-UNKNOWN" -Dsysconfdir="$(sysconfdir)" -I/build/pk-ha-center/include -I/include

LIBS         = -lm  -lpthread -ljpeg  -L/build/pk-ha-center/lib -lavutil -lavformat -lavcodec -lswscale -lswresample -lm -lz
e. 安裝nmap
wget https://nmap.org/dist/nmap-7.30.tar.bz2
./configure –prefix=/build/pk-ha-center –without-openssl –without-liblua
make; make install
經由以上步驟,在/build/pk-ha-center下面應該就會出現以下程式:
(在此我先省略內容檔,只顯示第一層的資訊,不然檔案會過多)
/build/pk-ha-center$ tree -L 1

.

├── bin

├── etc

├── include

├── lib

└── share


5 directories, 0 files
f. 安裝中控中心node.js 的modules
由於node.js的安裝是由npm下載相依套件完成的,過程中還可能會調用node-gyp來編譯程式,所以一定要事先下載能在Target System中運行的node_modules。
先將中控中心的整個node.js的程式碼,搬到/build/pk-ha-center/lib/node_modules/pk-ha_center下。
由於依然是在QNAP cross compiler環境下,所以執行npm安裝,若有需要編譯的部分,也會使用cross compiler編譯。
整個npm 安裝完成後,這個node.js程式就可以在QNAP NAS中執行了。
g. 打包QPKG
打包QPKG要在 QNAP NAS環境中執行,所以先以ssh登入QNAP環境,登入後
在/share/CACHEDEV1_DATA/Public 下開一個資料夾build,然後使用qbuild建立一個新專案:
cd /share/CACHEDEV1_DATA/Public
mkdir build; cd build;
qbuild –create-env ha-center
準備qpkg.cfg,底下是部分的ha-center/qpkg.cfg檔案:
# Name of the packaged application.

QPKG_NAME="ha-center"

# Version of the packaged application.

QPKG_VER="2.0.1"

# Author or maintainer of the package

QPKG_AUTHOR="Perry Wu"

# License for the packaged application

QPKG_LICENSE="Commercial"

# One-line description of the packaged application

QPKG_SUMMARY="Enjoy your home life with smart internet of things."


# Preferred number in start/stop sequence.

QPKG_RC_NUM="101"

# Init-script used to control the start and stop of the installed application.

QPKG_SERVICE_PROGRAM="ha-center.sh"


# Specifies any packages required for the current package to operate.

#QPKG_REQUIRE="Python >= 2.7, Optware | opkg, OPT/openssh"

# Specifies what packages cannot be installed if the current package

# is to operate properly.

#QPKG_CONFLICT="Python, OPT/sed"

# Name of configuration file (multiple definitions are allowed).

#QPKG_CONFIG="myApp.conf"

#QPKG_CONFIG="/etc/config/myApp.conf"

# Port number used by service program.

#QPKG_SERVICE_PORT=""

# Location of file with running service's PID

#QPKG_SERVICE_PIDFILE=""

# Relative path to web interface

QPKG_WEBUI="/pillakloud"

# Port number for the web interface.

QPKG_WEB_PORT="5000"

# Port number for the SSL web interface.

#QPKG_WEB_SSL_PORT=""


# Use QTS HTTP Proxy and set Proxy_Path in the qpkg.conf.

# When the QPKG has its own HTTP service port, and want clients to connect via QTS HTTP port (default 8080).

# Usually use this option when the QPKG need to connect via myQNAPcloud service.

QPKG_USE_PROXY="1"

#QPKG_PROXY_PATH="/qpkg_name"
接著準備package_routines,底下是部分的ha-center/package_routines檔案:
CENTER_CONF="/etc/config/ha-center.conf"

PK_ROOT="/etc/config/pillakloud"


PKG_MAIN_REMOVE="{

    $CMD_RM -f $CENTER_CONF

    $CMD_RM -f $PK_ROOT

}"

pkg_init(){

    add_qpkg_config $CENTER_CONF 0

}

pkg_install(){

    if [ -f "$CENTER_CONF" ]; then

        $CMD_SED -i "s!\(CENTER_VERSION=\).*!\1$CENTER_VER!" $CENTER_CONF

        $CMD_SED -i "s!\(CENTER_PATH=\).*!\1$SYS_QPKG_DIR!" $CENTER_CONF

    else

        $CMD_ECHO "CENTER_VERSION=$QPKG_VER" > $CENTER_CONF

        $CMD_ECHO "CENTER_PATH=$SYS_QPKG_DIR" >> $CENTER_CONF

    fi

    $CMD_CHMOD 644 $CENTER_CONF


    if [ ! -d "$PK_ROOT" ]; then

        $CMD_MKDIR $PK_ROOT

    fi

}
然後準備ha-center/share/ha-center.sh,QNAP之後會使用這個shell來呼叫我們的start/stop函式:
#!/bin/sh

CONF=/etc/config/qpkg.conf

QPKG_NAME="ha-center"

QPKG_ROOT=`/sbin/getcfg $QPKG_NAME Install_Path -f ${CONF}`

APACHE_ROOT=/share/`/sbin/getcfg SHARE_DEF defWeb -d Qweb -f /etc/config/def_share.info`


PK_BIN_DIR=${QPKG_ROOT}/bin

PK_LIB_DIR=${QPKG_ROOT}/lib


export PATH=${PK_BIN_DIR}:${PATH}

export LD_LIBRARY_PATH=${PK_LIB_DIR}:${LD_LIBRARY_PATH}

export NODE_PATH=${PK_LIB_DIR}/node_modules


case "$1" in

  start)

    ENABLED=$(/sbin/getcfg $QPKG_NAME Enable -u -d FALSE -f $CONF)

    if [ "$ENABLED" != "TRUE" ]; then

        echo "$QPKG_NAME is disabled."

        exit 1

    fi

    : ADD START ACTIONS HERE

    DEBUG=app,cfg PKROOT=/etc/config/pillakloud PORT=5000 node ${QPKG_ROOT}/lib/node_modules/pk-ha-center/app.js >> /var/log/pk-ha-center.log 2>&1 &

    ;;


  stop)

    : ADD STOP ACTIONS HERE

    killall node

    ;;


  restart)

    $0 stop

    $0 start

    ;;


  *)

    echo "Usage: $0 {start|stop|restart}"

    exit 1

esac

exit 0
然後再把剛剛在cross compiler環境中打包的pk-ha-center.tar.gz ,下載到ha-center/share之下。
放在share下的東西,之後會完整安裝指定路徑(/share/CACHEDEV1_DATA/.qpkg/ha-center/)
最後再把ha-center/icons裡的圖示稍作修改,圖示的規則如下:
[QPKG_Name].gif       一般畫面看到的icon,可以略大於 80 x 80

[QPKG_Name]_80.gif    App Center上看到的icon,大小是 80 x 80

[QPKG_Name]_grey.gif  在app停用時用來顯示的灰色圖案,內容基本同 _80.gif
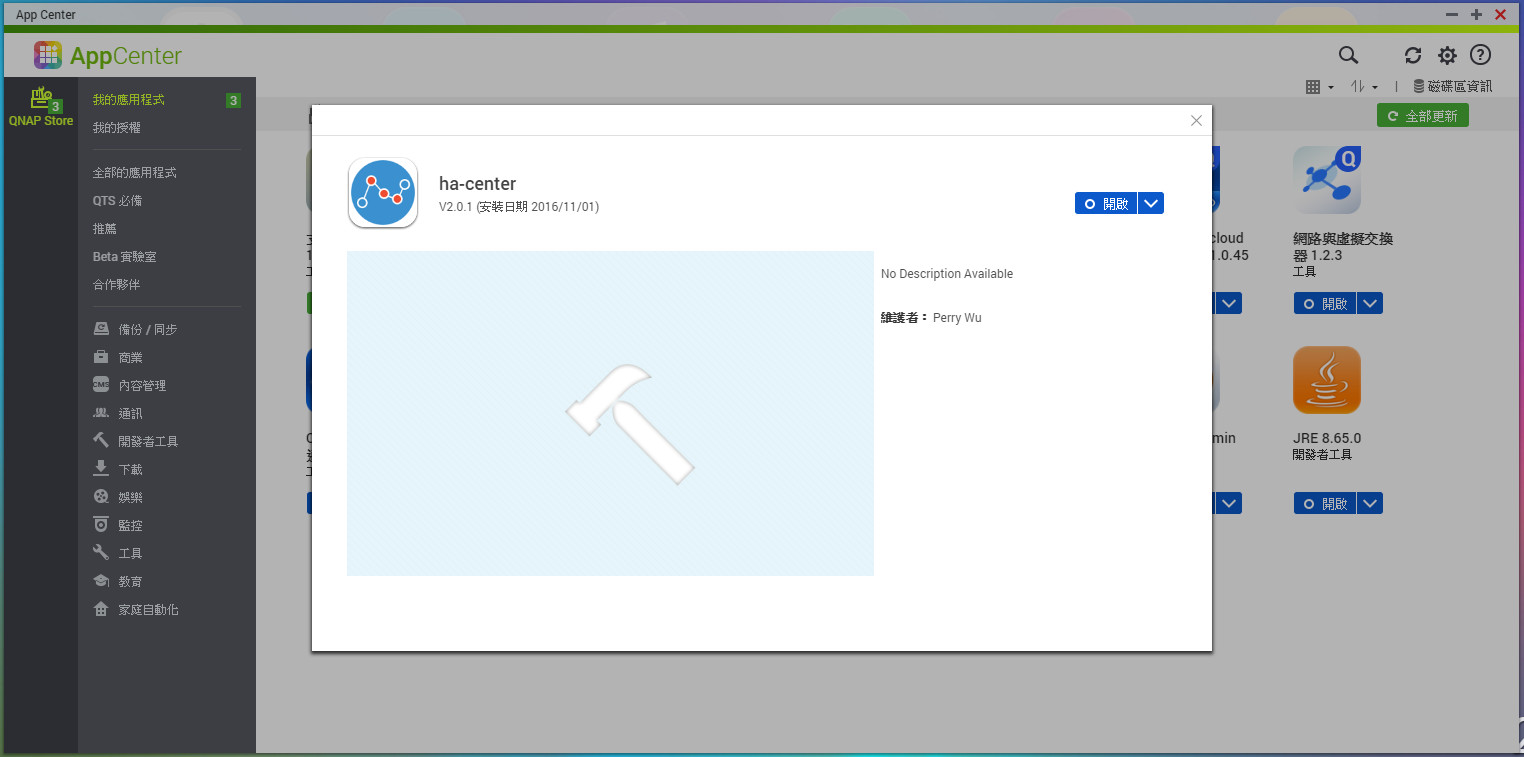
在ha-center這目錄,執行 qbuild,進行打包QPKG的動作。打包好的檔案,會放在ha-center/build中。我們可以拿這個檔案,直接使用手動的方式在APP Center中進行安裝:
[/share/CACHEDEV1_DATA/Public/build/ha-center/build] # ls -l

-rw-r--r--    1 admin    administ  85664583 Oct 26 15:52 ha-center_0.1.qpkg

-rw-r--r--    1 admin    administ  75182467 Nov  1 20:52 ha-center_2.0.1.qpkg
裝起來就會看到這個畫面:
4. 運作
運行後,控制中心就可以在QNAP NAS上運行,接下來就能用簡單的方式控制家中的連網裝置,如下圖所示:
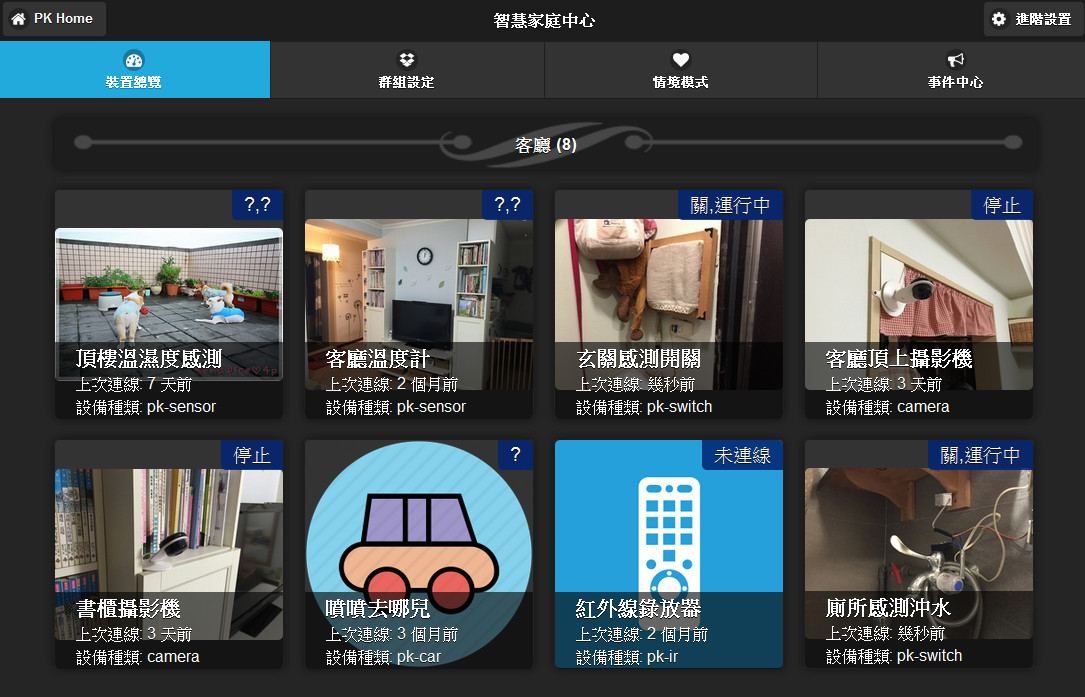
還可以達成裝置之間的連動控制,下面影片是在Maker Faire時展出的Demo:
5. 其他
但是,目前使用APP Center的方式還有一個滿大的問題,那就是:沒辦法簡易的讓使用者從外地直接存取家中設備。我向QNAP的技術支援詢問,他們提供一個Proxy的處理方式。
若使用這個方式存取http://192.168.100.124:8080/pillakloud (NAS存取為192.168.100.124:8000),則這樣的存取會被proxy到控制中心來,但這麼一來,URL PATH都會多一個path:
# Relative path to web interface

QPKG_WEBUI="/pillakloud"

# Port number for the web interface.

QPKG_WEB_PORT="5000"


# Usually use this option when the QPKG need to connect via myQNAPcloud service.

QPKG_USE_PROXY="1"
比如在html中,想要存取js的路徑是js/pk.js (相對路徑),然後,瀏覽器會開啟的路徑是192.168.100.124:8080/pillakloud/js/pk,所以控制中心收到這個要求時,要把中間的pillakloud拿掉,這樣就能夠正常處理。
最後,我認為在QNAP環境中Porting node.js的應用,應該都可以使用類似方法來達成。
(本文同步發表於作者部落格“Pillakloud技術宅”,原文連結)

熱愛自己動手做出生活周邊會使用的應用。目前為派樂雲(Pillakloud)創辦人,致力於提供豐富好用的智慧家庭雲服務。
- 將node.js的控制中心移植到QNAP上運行 - 2016/11/15
訂閱MakerPRO知識充電報
與40000位開發者一同掌握科技創新的技術資訊!


